Tạm thời disable dịch vụ Windows Update hết các Windows server nhé. Microsoft không ngừng ra các bản phá nhằm bản vá Lỗi liên tục có thể mô tả bên dưới: Windows 10 KB5009543: Lỗi VPN L2TP Windows 10 KB5008212: Lỗi liên quan Outlook Windows Server 2012 R2 KB5009624: +Lỗi liên quan Domain Controller do lsass.exe, wininit.exe, Lỗi này tránh rollback liên quan USN AD
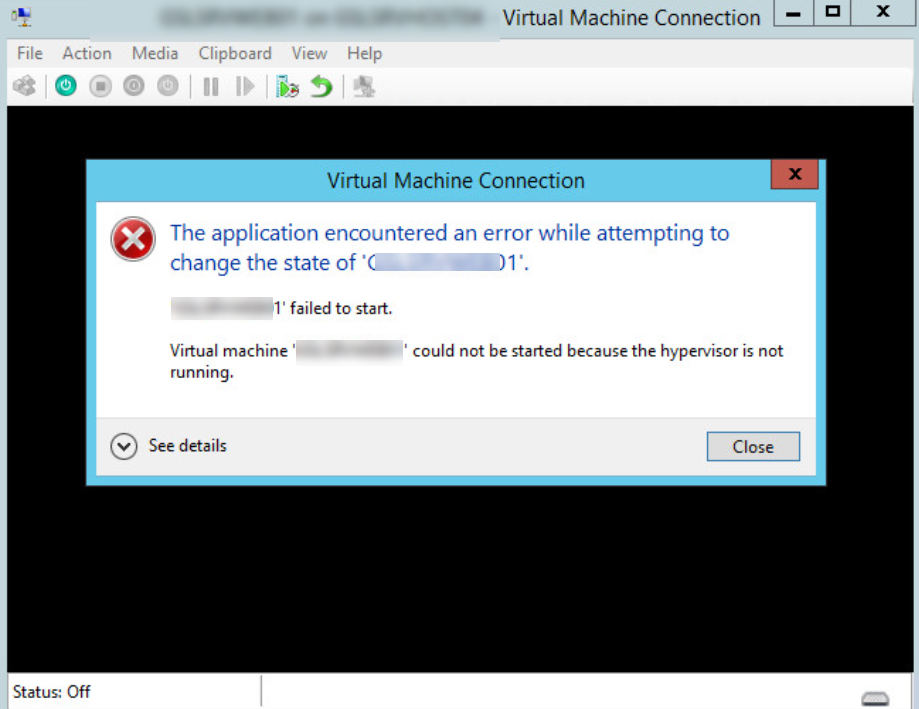
Lỗi liên quan đến dịch vụ Hyper-V không start được VM, Lỗi VM Gen 2 (UEFI) tronge Hyper-V không start,
Lỗi liên quan Clustering CSV. KB5009586 Windows Server 2012 R2 KB5009595, Windows Server 2019 KB5009557 Windows Server 2022 KB5009555 : Lỗi liên quan đến dịch vụ DNS không start được. Windows Server 2012 R2 KB5009595, Windows Server 2019 KB5009557 Windows Server 2022 KB5009555: Lỗi liên quan đến định dạng disk ReFS trạng thái RAW.
Mới đây sau khi report 02/01/2022 các anh em kêu gào trên thế giới vì lỗi liên quan sản phẩm Exchange 2016, Exchange 2019. Microsoft đã xác nhận đây là lỗi Y2K22.
Microsoft đã tạo một giải pháp để giải quyết vấn đề thư bị kẹt trong hàng đợi truyền tải trên Exchange Server 2016 và Exchange Server 2019 do sự cố ngày tiềm ẩn trong tệp chữ ký được công cụ quét phần mềm độc hại trong Exchange Server sử dụng.
Log Name: Application
Source: FIPFS
Logged: 1/1/2022 1:03:42 AM
Event ID: 5300
Level: Error
Computer: NVPSRVEX01.viettechgroup.lab
Description: The FIP-FS "Microsoft" Scan Engine failed to load. PID: 23092, Error Code: 0x80004005. Error Description: Can't convert "2201010001" to long.
Log Name: Application
Source: FIPFS
Logged: 1/1/2022 11:47:16 AM
Event ID: 1106
Level: Error
Computer: NVPSRVEX01.viettechgroup.lab
Description: The FIP-FS Scan Process failed initialization. Error: 0x80004005. Error Details: Unspecified error.
Nguyên Nhân
FIP-FS sử dụng kiểu “Int32” để lưu giá trị của các biến số thời gian. Giá trị tối đa mà kiểu này có thể lưu là “2.147.483.647”.
Tuy nhiên, các ngày trong năm 2022 có giá trị tối thiểu là 2.201.010.001 hoặc lớn hơn giá trị tối đa có thể được lưu trữ trong biến int32 đã ký, khiến FIP-FS “Microsoft” Scan Engine thất bại và không phát hành thư để gửi nên bị giữ.
Xử lý Cập nhật
Cách 1 cập nhật tự động
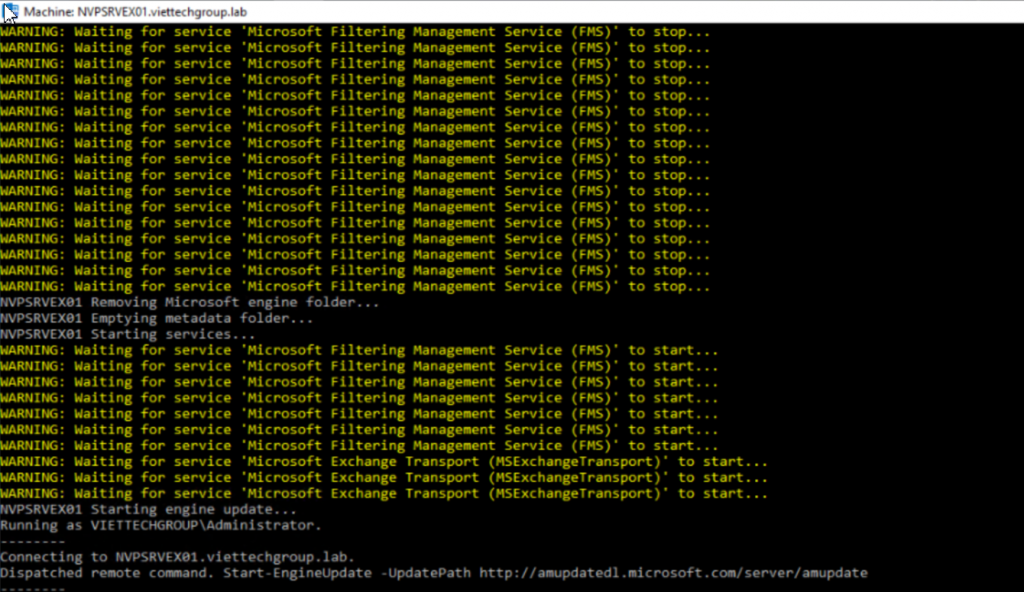
Microsoft đã cập nhật 1 script tự động ResetscanengineVersion. Lưu ý trong hệ thống có bao nhiêu máy chủ Exchange thì chạy hết tất cả để cập nhật nhé.
Run EMS Administrators trên tất cả Exchange Server chúng ta đang có nhé.
.\Reset-ScanEngineVersion.ps1
[PS] D:\Y2K22>.\Reset-ScanEngineVersion.ps1
NVPSRVEX01 Stopping services...
WARNING: Waiting for service 'Microsoft Filtering Management Service (FMS)' to stop...
WARNING: Waiting for service 'Microsoft Filtering Management Service (FMS)' to stop...
WARNING: Waiting for service 'Microsoft Filtering Management Service (FMS)' to stop...
WARNING: Waiting for service 'Microsoft Filtering Management Service (FMS)' to stop...
WARNING: Waiting for service 'Microsoft Filtering Management Service (FMS)' to stop...
WARNING: Waiting for service 'Microsoft Filtering Management Service (FMS)' to stop...
WARNING: Waiting for service 'Microsoft Filtering Management Service (FMS)' to stop...
WARNING: Waiting for service 'Microsoft Filtering Management Service (FMS)' to stop...
WARNING: Waiting for service 'Microsoft Filtering Management Service (FMS)' to stop...
WARNING: Waiting for service 'Microsoft Filtering Management Service (FMS)' to stop...
WARNING: Waiting for service 'Microsoft Filtering Management Service (FMS)' to stop...
WARNING: Waiting for service 'Microsoft Filtering Management Service (FMS)' to stop...
WARNING: Waiting for service 'Microsoft Filtering Management Service (FMS)' to stop...
WARNING: Waiting for service 'Microsoft Filtering Management Service (FMS)' to stop...
WARNING: Waiting for service 'Microsoft Filtering Management Service (FMS)' to stop...
WARNING: Waiting for service 'Microsoft Filtering Management Service (FMS)' to stop...
WARNING: Waiting for service 'Microsoft Filtering Management Service (FMS)' to stop...
WARNING: Waiting for service 'Microsoft Filtering Management Service (FMS)' to stop...
WARNING: Waiting for service 'Microsoft Filtering Management Service (FMS)' to stop...
WARNING: Waiting for service 'Microsoft Filtering Management Service (FMS)' to stop...
WARNING: Waiting for service 'Microsoft Filtering Management Service (FMS)' to stop...
WARNING: Waiting for service 'Microsoft Filtering Management Service (FMS)' to stop...
WARNING: Waiting for service 'Microsoft Filtering Management Service (FMS)' to stop...
WARNING: Waiting for service 'Microsoft Filtering Management Service (FMS)' to stop...
WARNING: Waiting for service 'Microsoft Filtering Management Service (FMS)' to stop...
WARNING: Waiting for service 'Microsoft Filtering Management Service (FMS)' to stop...
WARNING: Waiting for service 'Microsoft Filtering Management Service (FMS)' to stop...
WARNING: Waiting for service 'Microsoft Filtering Management Service (FMS)' to stop...
WARNING: Waiting for service 'Microsoft Filtering Management Service (FMS)' to stop...
WARNING: Waiting for service 'Microsoft Filtering Management Service (FMS)' to stop...
WARNING: Waiting for service 'Microsoft Filtering Management Service (FMS)' to stop...
WARNING: Waiting for service 'Microsoft Filtering Management Service (FMS)' to stop...
WARNING: Waiting for service 'Microsoft Filtering Management Service (FMS)' to stop...
WARNING: Waiting for service 'Microsoft Filtering Management Service (FMS)' to stop...
WARNING: Waiting for service 'Microsoft Filtering Management Service (FMS)' to stop...
WARNING: Waiting for service 'Microsoft Filtering Management Service (FMS)' to stop...
WARNING: Waiting for service 'Microsoft Filtering Management Service (FMS)' to stop...
WARNING: Waiting for service 'Microsoft Filtering Management Service (FMS)' to stop...
WARNING: Waiting for service 'Microsoft Filtering Management Service (FMS)' to stop...
WARNING: Waiting for service 'Microsoft Filtering Management Service (FMS)' to stop...
WARNING: Waiting for service 'Microsoft Filtering Management Service (FMS)' to stop...
WARNING: Waiting for service 'Microsoft Filtering Management Service (FMS)' to stop...
WARNING: Waiting for service 'Microsoft Filtering Management Service (FMS)' to stop...
WARNING: Waiting for service 'Microsoft Filtering Management Service (FMS)' to stop...
WARNING: Waiting for service 'Microsoft Filtering Management Service (FMS)' to stop...
WARNING: Waiting for service 'Microsoft Filtering Management Service (FMS)' to stop...
WARNING: Waiting for service 'Microsoft Filtering Management Service (FMS)' to stop...
WARNING: Waiting for service 'Microsoft Filtering Management Service (FMS)' to stop...
WARNING: Waiting for service 'Microsoft Filtering Management Service (FMS)' to stop...
NVPSRVEX01 Removing Microsoft engine folder...
NVPSRVEX01 Emptying metadata folder...
NVPSRVEX01 Starting services...
WARNING: Waiting for service 'Microsoft Filtering Management Service (FMS)' to start...
WARNING: Waiting for service 'Microsoft Filtering Management Service (FMS)' to start...
WARNING: Waiting for service 'Microsoft Filtering Management Service (FMS)' to start...
WARNING: Waiting for service 'Microsoft Filtering Management Service (FMS)' to start...
WARNING: Waiting for service 'Microsoft Filtering Management Service (FMS)' to start...
WARNING: Waiting for service 'Microsoft Filtering Management Service (FMS)' to start...
WARNING: Waiting for service 'Microsoft Filtering Management Service (FMS)' to start...
WARNING: Waiting for service 'Microsoft Exchange Transport (MSExchangeTransport)' to start...
WARNING: Waiting for service 'Microsoft Exchange Transport (MSExchangeTransport)' to start...
WARNING: Waiting for service 'Microsoft Exchange Transport (MSExchangeTransport)' to start...
NVPSRVEX01 Starting engine update...
Running as VIETTECHGROUP\Administrator.
--------
Connecting to NVPSRVEX01.viettechgroup.lab.
Dispatched remote command. Start-EngineUpdate -UpdatePath http://amupdatedl.microsoft.com/server/amupdate
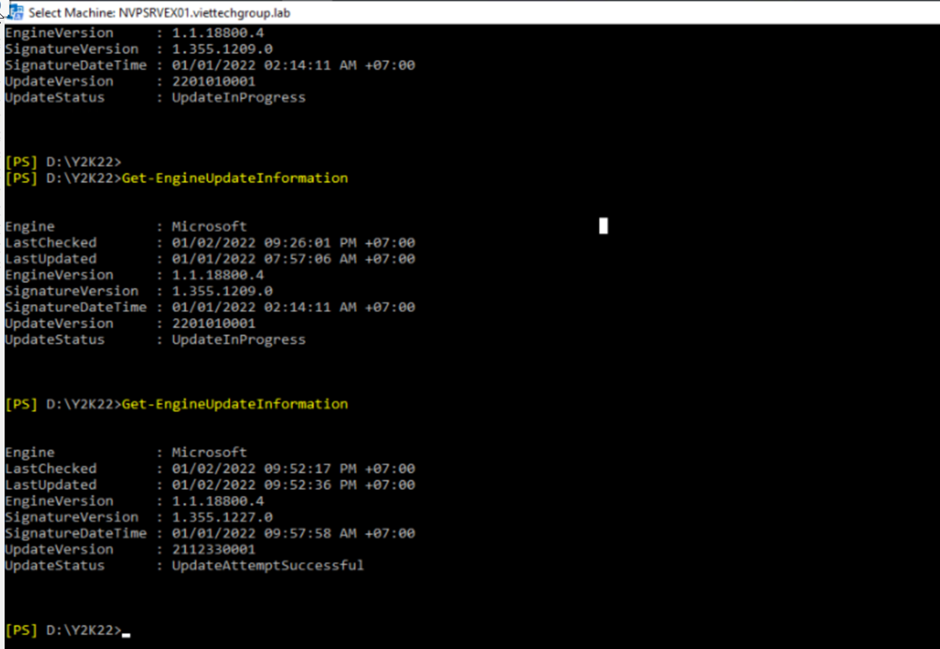
Quá trình update diễn ra trong thời gian 15-30 phút tùy hệ thống mạng. Bằng cách kiểm tra bằng lệnh này:
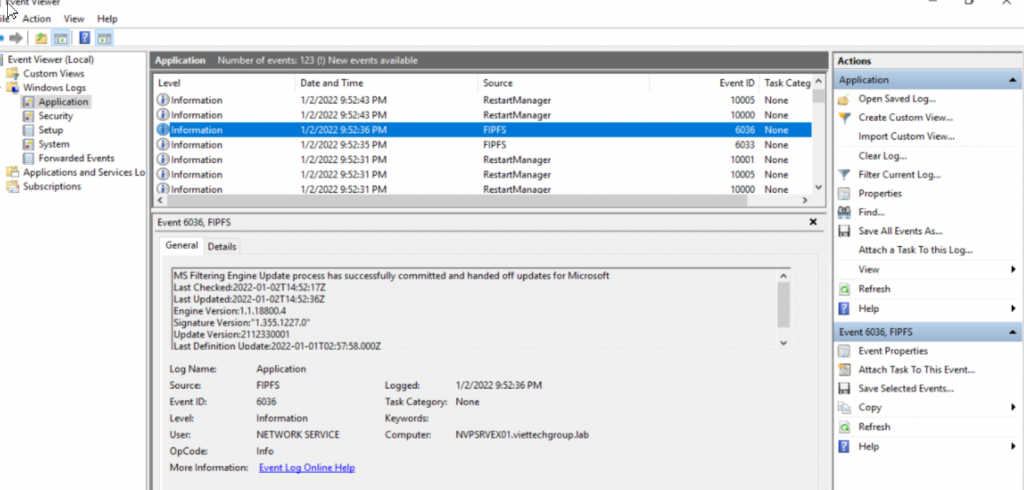
Đảm bảo rằng phiên bản là 2112330001 và kiểm tra trong event viewer không có lỗi nhé
Cách 2: Cập nhật manual
Xóa thư mục tồn tại engine và metadata
1. Stop the Microsoft Filtering Management service. 2. Dùng task Manager đảm bảo updateservice.exe đã stop 3. Xóa thư mục Microsoft theo đường dẫn: %ProgramFiles%\Microsoft\Exchange Server\V15\FIP-FS\Data\Engines\amd64\Microsoft. 4. Xóa file trong thư mục metadata theo đường dẫn : %ProgramFiles%\Microsoft\Exchange Server\V15\FIP-FS\Data\Engines\metadata.
Cập nhật engine mới nhất
1. Start dịch vụ Microsoft Filtering Management service và the Microsoft Exchange Transport service. 2. Mở EMS, navigate to the Scripts folder (%ProgramFiles%\Microsoft\Exchange Server\V15\Scripts), and run Update-MalwareFilteringServer.ps1 <server FQDN>
Kiểm tra phiên bản
1. EMS chạy Add-PSSnapin Microsoft.Forefront.Filtering.Management.Powershell. 2. Run Get-EngineUpdateInformation và xác nhận UpdateVersion information is 2112330001.
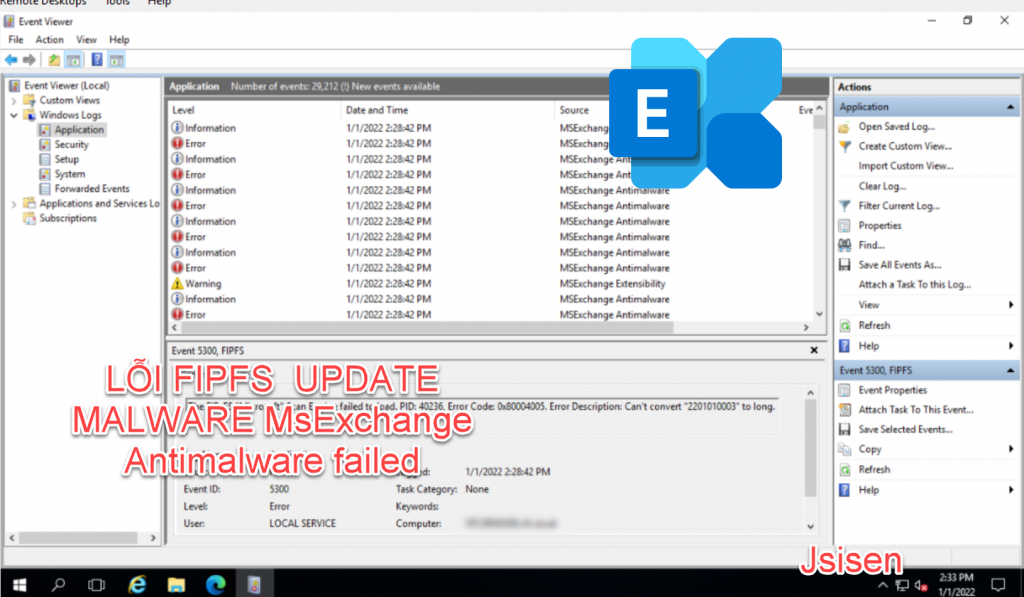
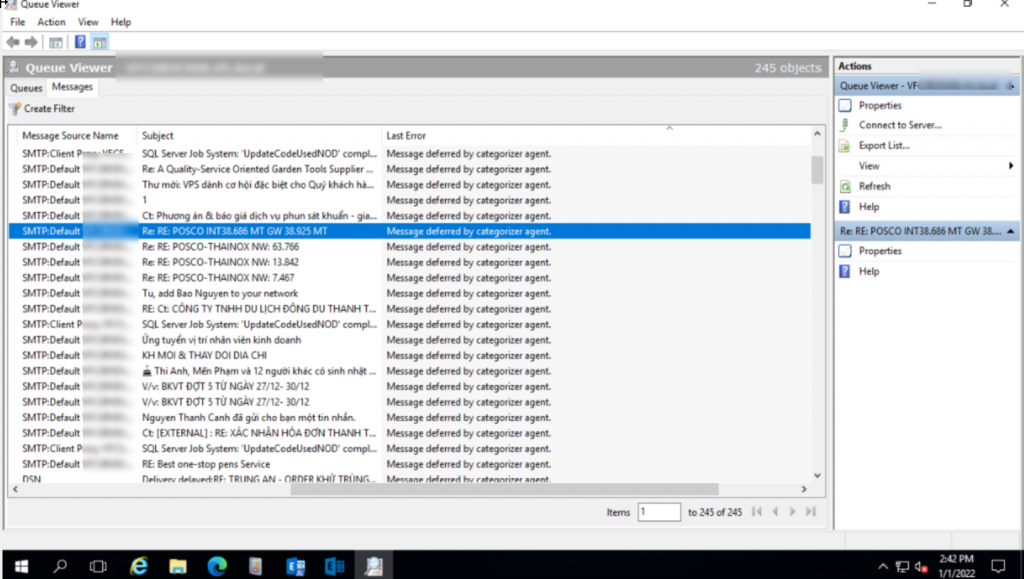
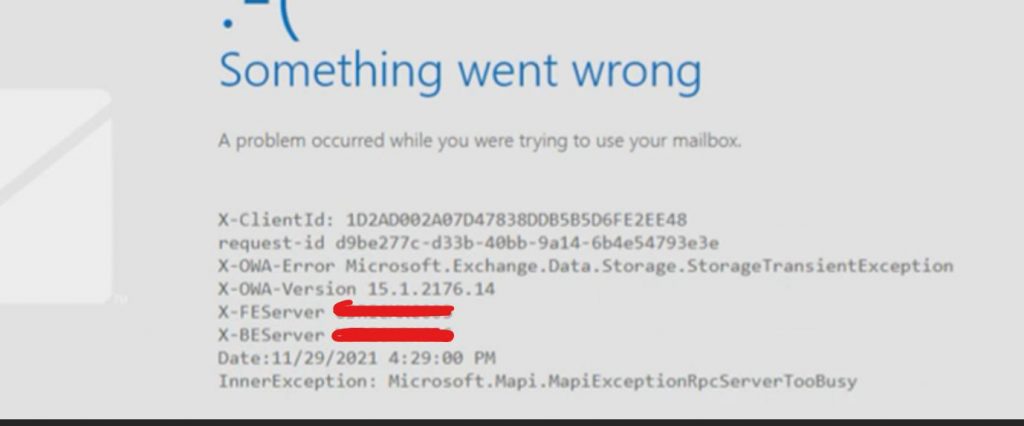
Anh em nào đang sử dụng lưu ý nhé. Đầu năm 2022 đúng ngày năm mới. Microsoft Exchange Vừa ra MSFTExchange đã ra bản cập nhật #msantimalware dành cho Exchange Anti-malware. Bản cập nhật này sẽ gây lỗi không gửi/nhận email. Nguyên nhân liên quan đến Y2K2 không convert chuổi số. Tất cả emails sẽ bị treo ở hàng đợi (submission queue) với mã lỗi “Message deferred by categorizer agent” hoặc mã lỗi event id: 5300 The FIP-FS “Microsoft” Scan Engine failed to load. PID: 14908, Error Code: 0x80004005. Error Description: Can’t convert “2201010003” to long. with #Exchange2016 & #Exchange2019.
Nguyên Nhân
FIP-FS sử dụng kiểu “Int32” để lưu giá trị của các biến số thời gian. Giá trị tối đa mà kiểu này có thể lưu là “2.147.483.647”.
Tuy nhiên, các ngày trong năm 2022 có giá trị tối thiểu là 2.201.010.001 hoặc lớn hơn giá trị tối đa có thể được lưu trữ trong biến int32 đã ký, khiến FIP-FS “Microsoft” Scan Engine thất bại và không phát hành thư để gửi nên bị giữ.
Kiểm tra mail queue bằng lệnh
Get-Queue -Identity submission
Các xử lý
Cách xử lý: tạm thời disable hoặc bypass Antimalware của Exchange. Mở Powershell chạy các lệnh bên dưới:
cd $ExScripts
.\Disable-AntiMalwareScanning.ps1
Set-MalwareFilteringServer -BypassFiltering $True -identity <ServerMBX>
Restart-Service MSExchangeTransport
[PS] C:\Program Files\Microsoft\Exchange Server\V15\scripts>.\Disable-AntiMalwareScanning.ps1
WARNING: The following service restart is required for the change(s) to take effect : MSExchangeTransport
Anti-malware scanning is successfully disabled. Please restart MSExchangeTransport for the changes to take effect.
Chờ Microsoft cập nhật bản vá lỗi. Hôm nay đã bị và gặp anh em nào quản trị xem xét xử lý nhé. Thân chào Chúc mừng năm mới 2022
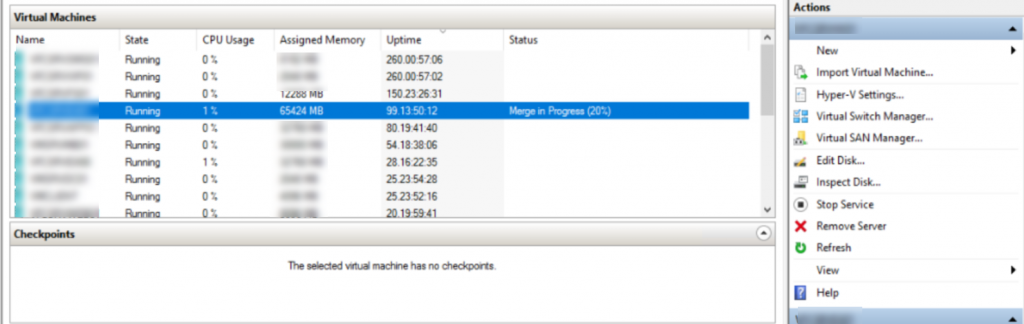
Đối với VM trong hyper-v tạo và xóa checkpoint là chuyện bình thường. Tuy nhiên vì lý do nào đó chúng ta sử dụng phần mềm Backup Veritas hoặc Veeam backup mà bị failed giữa chừng thì máy ảo trạng thái có vết checkpoint hay snapshot trong Hyper-v mà không thể xóa/merge được trên giao diện. Về bản chất xóa checkpoint gọi là merge disk vhdx.
Giải quyết
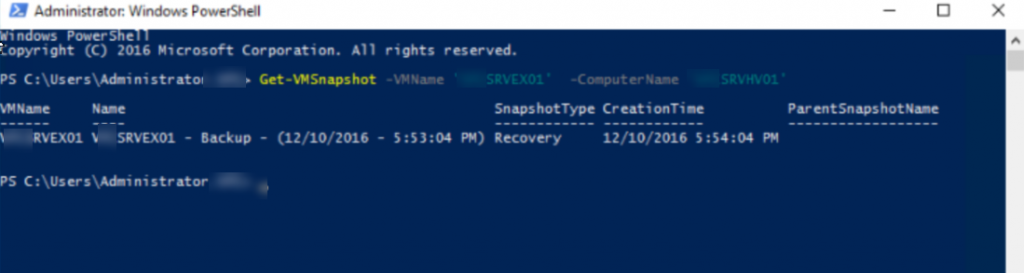
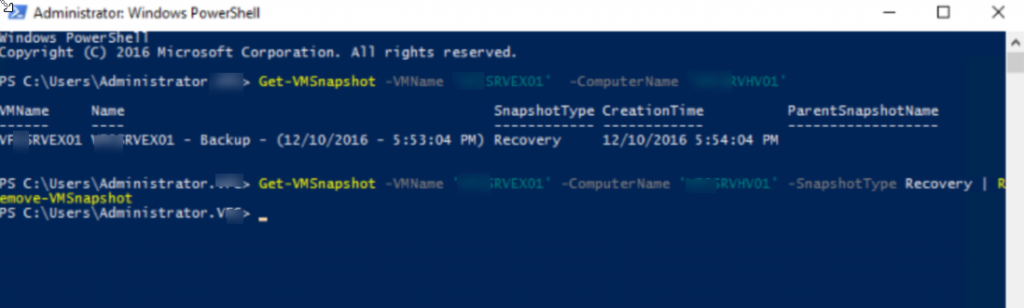
Chúng ta dùng lệnh kiểm tra máy ảo trạng thái recoverysnaphot nhé.
Lệnh kiểm tra các máy ảo trên HOST
Get-VMSnapshot -VMName 'VM' -ComputerName 'HOST'
Xóa checkpoint (Snapshot) mà không thể thực hiện trên giao diện Hyper-V manager, Bởi lý do phần mềm thứ 3 như Veeam hay vertias đã dùng cơ chế snapshot để backup sau khi backup sẽ tự động xóa checkpoint như bị cúp điện hay lỗi không thể rollback đôi khi hỏng luôn VM. Cho nên máy ảo sẽ trạng thái snapshotType là Recovery.
n a Microsoft Exchange Server 2019, 2016, 2013, or 2010 on-premises environment that’s configured to use Kerberos for authentication, the Microsoft Outlook and mobile device clients continually prompt for authentication after you install the November 2021 Windows Server update on domain controllers to fix the problem that’s described in security advisory CVE-2021-42278.
Resolution
An out-of-band Windows update is available to resolve this problem. Install the following fix on domain controllers, as appropriate for your system version.
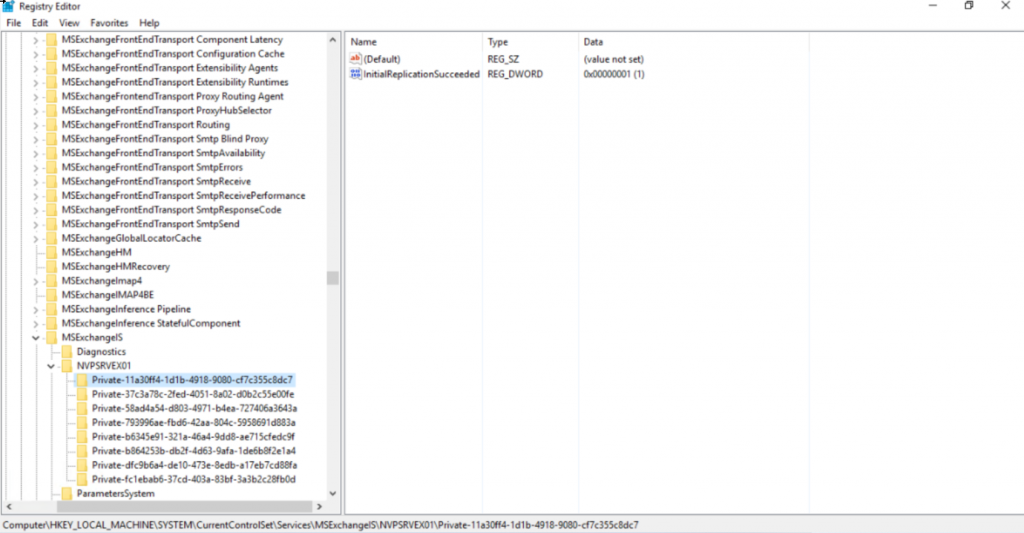
4. Dưới thanh ghi này ở bước 3 sau cái Server tìm database GUID có từ bước 2 ví dụ e.g. Private-dad6b75a-f6df-42c6-b1c4-8c63c5ef123f”, bắt đầu “Private-xxxxxxxxxxxxxxxxxxxxxxxxx“.
5. Tìm đến khóa “QuarantinedMailboxes” registry key:
6. Tìm ác mailbox bị lỗi liên quan đến MailboxGuid tìm được ở bước 1và xóa it.
7. Restart dịch vụ “Microsoft Exchange Information Store”.
Kiểm tra lại các database tình trạng
Get-MailboxDatabaseCopyStatus
Kiểm tra kết quả.
Nếu thấy bài viết này hữu ích đừng quên like và share nhé.
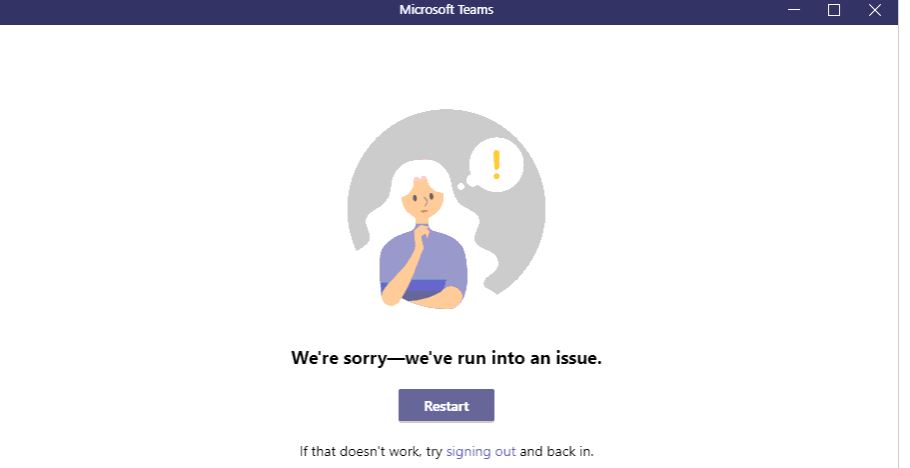
Thời covid 19 việc học tập và làm việc online đều không thể thiếu trong cuộc sống chúng ta. Tuy nhiên 1 số trường hợp chúng ta sử dụng MS Teams là 1 trong số công cụ bị lỗi như hình bên dưới:
We’re sorry — We’ve run into an issue”
Nguyên nhân
Có nhiều nguyên nhân gây ra lỗi này: lỗi về mạng, user, đường truyền, bộ nhớ cache
Xử lý
Cách 1: Chúng ta có thể remove MS teams và download cài lại từ đầu nhé.
Cách 2: chúng ta thực hiện xóa cache như sau:
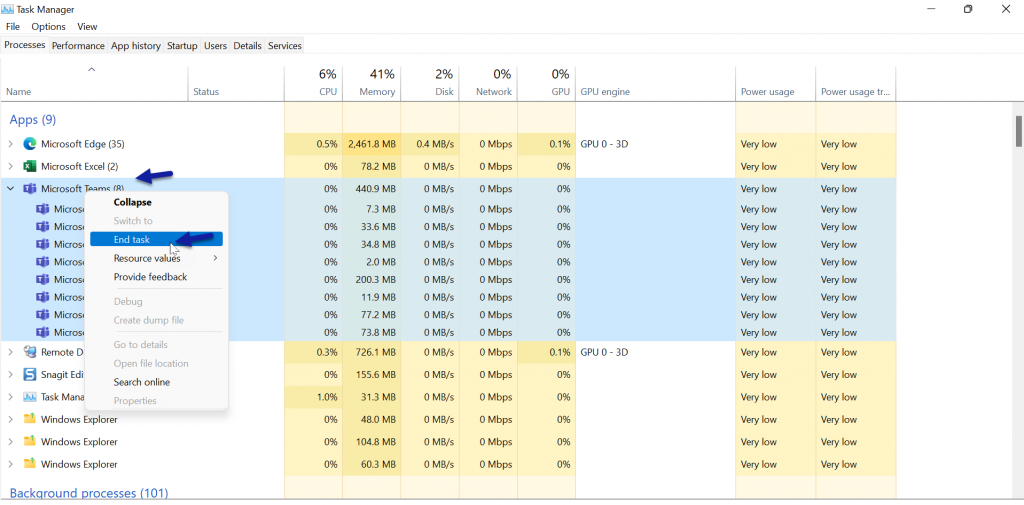
Đầu tiên chúng ta đóng hẵn chương trình Microsoft Teams và cho chắc ăn thoát ở mức Task manager (Ctrl+ Alt+Del)=> Tìm tác vụ Đóng hoàn toàn ứng dụng Microsoft Teams, bạn có thể kích biểu tượng Teams trên thanh Taskbar và chọn ‘Quit’ hoặc chạy Task Manager và kill các process liên quan đến Microsoft Teams.
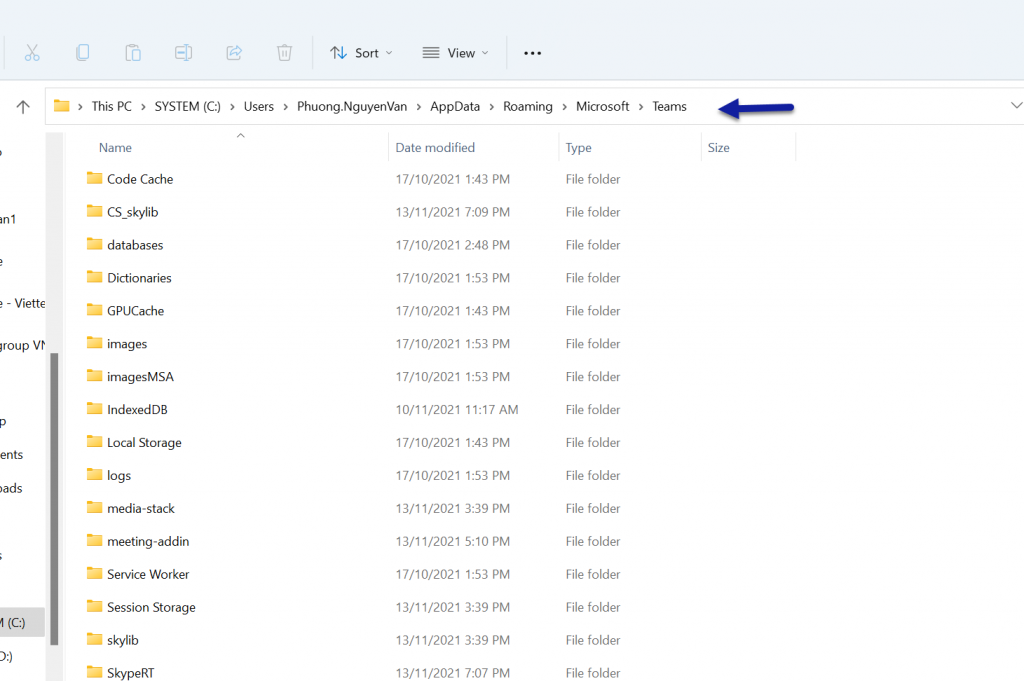
Tại đây chúng ta lần lượt xóa các file folder theo đường dẫn sau:
a. Trong thư mục ‘Application Cache’, tới thư mục Cache và xoá toàn bộ các file ở trong thư mục Cache.
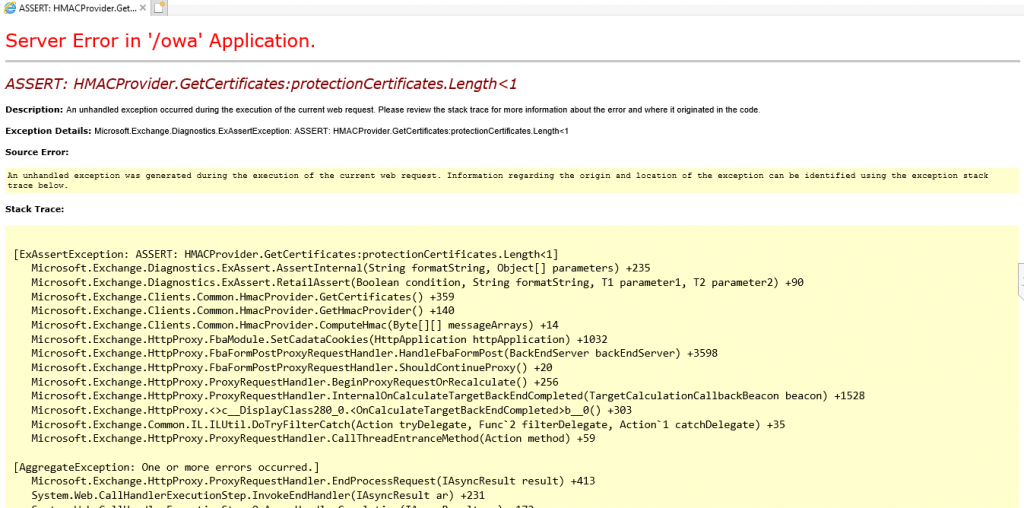
When you try to sign in to Outlook on the web or the EAC in Exchange Server, the web browser freezes or reports that the redirect limit was reached. Additionally, Event 1003 is logged in the event viewer. For example, the following entry is logged:
Event ID: 1003
Source: MSExchange Front End HTTPS Proxy
[Owa] An internal server error occurred. The unhandled exception was: System.NullReferenceException: Object reference not set to an instance of an object.
   at Microsoft.Exchange.HttpProxy.FbaModule.ParseCadataCookies(HttpApplication httpApplication)
Cause
This issue occurs if the Exchange Server Open Authentication (OAuth) certificate is expired, not present, or not configured correctly.
Resolution
To Resolve this problem carry out the following:
Open Exchange Management Shell as Administrator
Run the following command. (Replace contoso.com with your SMTP domain)
New-ExchangeCertificate -KeySize 2048 -PrivateKeyExportable $true -SubjectName "cn=Microsoft Exchange Server Auth Certificate" -FriendlyName "Microsoft Exchange Server Auth Certificate" -DomainName "contoso.com"
3. Take note of your thumbprint, you’ll need it for the next command. Now run the rest of the commands.
4. If you have multiple Exchange servers, you’ll need to run the following commands on each of them, but wait for the new Exchange Auth Certificate to be replicated to them first.
Wait, this can take a few hours-48hours to replicate across (more than the one hour Microsoft state), but then everything will start working again. If you wish to confirm each server is aware of the new Auth configuration you can run “Get-AuthConfig” and validate the Thumbprint and effective date match your new certificate and the time you executed the first “Set-AuthConfig” command respectively. If you have a Hybrid Exchange environment you need to rerun the “Hybrid Configuration Wizard” again to update these changes to Azure Active Directory.