🚀 WHITELISTED.ORG – Mua Whitelist IP cho Mail Server để tránh bị lọt danh sách spam
#phuongit #emailserver #UCEPROTECT #Whitelist
Chia sẻ chút kinh nghiệm thực tế khi vận hành hệ thống mail on-premise cho doanh nghiệp:
Nếu anh em đang chạy Mail Server riêng (Exchange, Zimbra, MDaemon, Postfix…), chắc chắn không ít lần gặp cảnh:
Gửi email cho khách/bạn hàng bị từ chối, báo “Your IP is listed in UCEPROTECT Level 2/3”.
IP sạch nhưng dính “vạ lây” vì ISP hoặc subnet có máy infected → dẫn đến tình trạng email đi bị chặn.
Support nhà cung cấp nước ngoài khó như lên trời, chờ gỡ blacklist 1–2 tuần là chuyện bình thường.
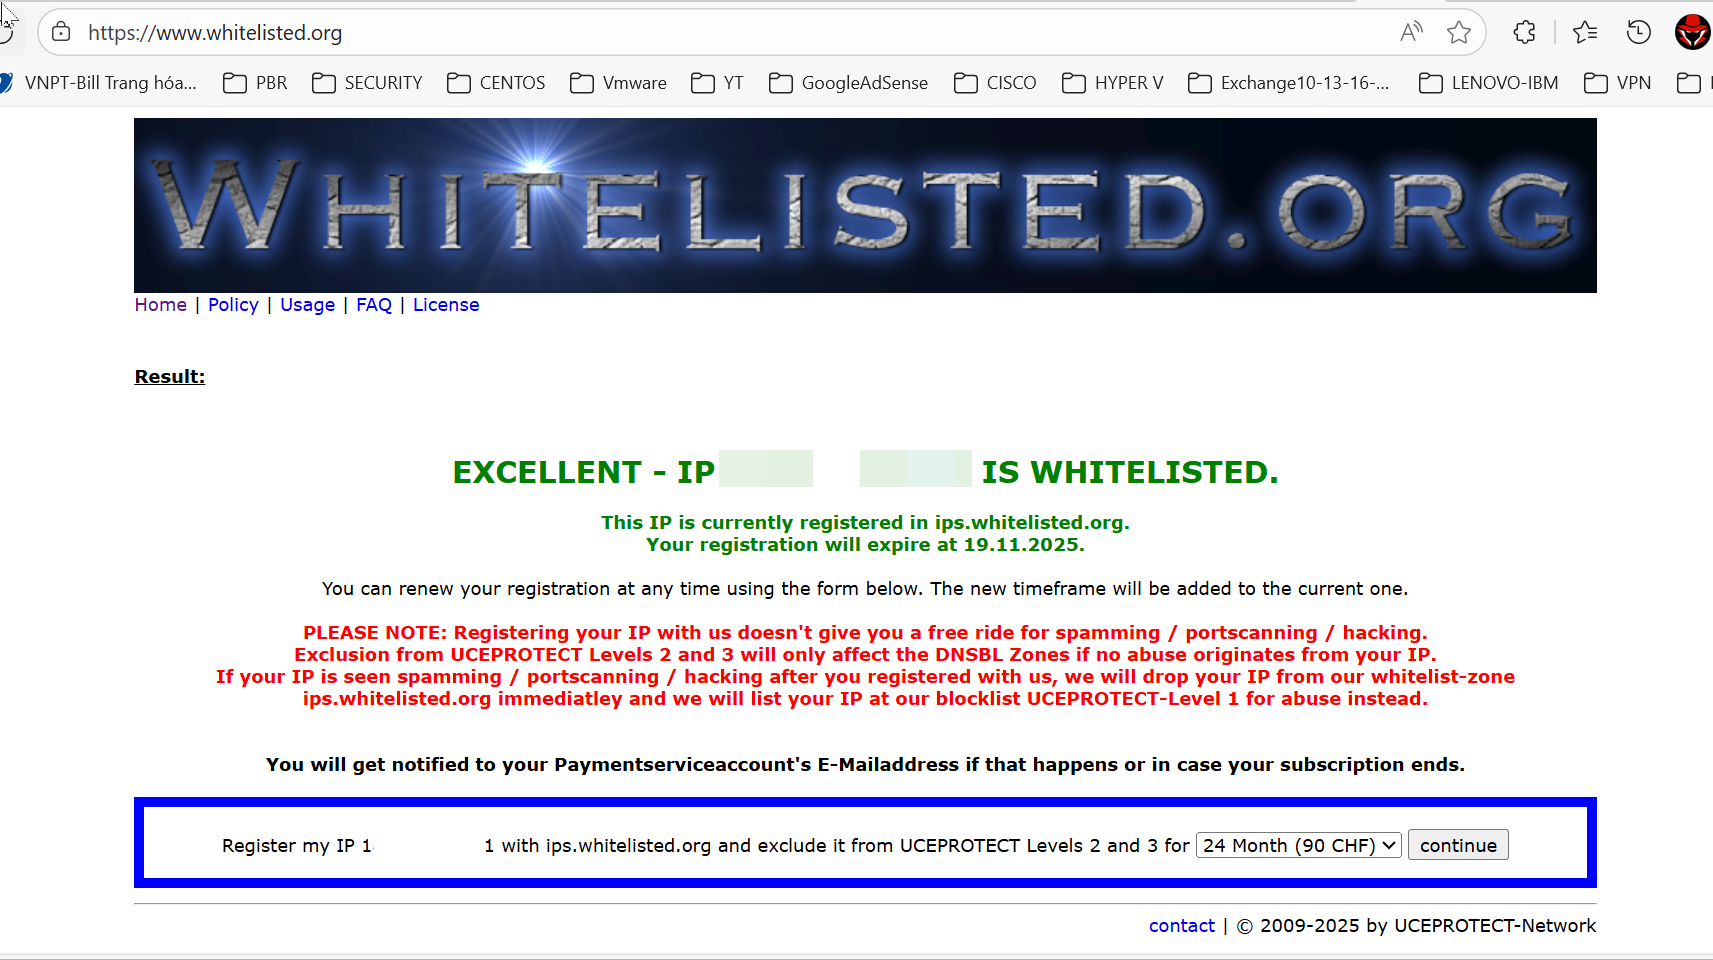
👉 Giải pháp nhanh – gọn – hiệu quả: Đăng ký IP vào Whitelist trên WHITELISTED.ORG Đây là dịch vụ whitelisting thuộc UCEPROTECT giúp loại trừ IP ra khỏi blacklist Level 2 và 3 (dạng neighborhood listing).
Lợi ích khi Whitelist IP
Email ra ngoài Deliverability cao, gần như không bị chặn.
Tách IP mail khỏi subnet bẩn → tránh bị “vạ lây”.
Quản trị viên chủ động kiểm soát, không phải chờ ISP.
Chi phí khá rẻ so với uy tín email doanh nghiệp.
Loại trừ các hệ thống có mail gateway hoặc thuê replay
💰 Chi phí tham khảo
Hôm nay mình gia hạn 1 IP mail server:
➡ Gói 24 tháng: 90 CHF (~2.3–2.5 triệu VNĐ) ➡ IP của mình– tình trạng: WHITELISTED 🎉
Đăng ký xong là active ngay, không cần chờ đợi.
⚠️ Lưu ý quan trọng
Whitelist không có nghĩa là muốn làm gì thì làm 😄
Nếu IP gửi spam / virus / port-scanning / hacking, WHITELIST sẽ drop ngay lập tức.
Phải đảm bảo: ✔ Mail server bảo mật ✔ Không open-relay ✔ Không có bot gửi email bất thường ✔ DKIM/DMARC/SPF chuẩn chỉnh
📌 Kết luận
Nếu doanh nghiệp đang dùng mail server on-prem và gặp tình trạng email bị reject do UCEPROTECT Level 2–3 → WHITELISTED.ORG là giải pháp nhanh nhất.
🔗 Giá rẻ, hiệu quả cao, giảm rủi ro gián đoạn email. Hiện mình đang dùng và hoạt động ổn định sài 2 năm 90 CHF ổn.
Anh em IT nếu cần mình hướng dẫn thêm cách kiểm tra blacklist, tối ưu deliverability, SPF/DKIM/DMARC chuẩn RFC – cứ ping nhé!
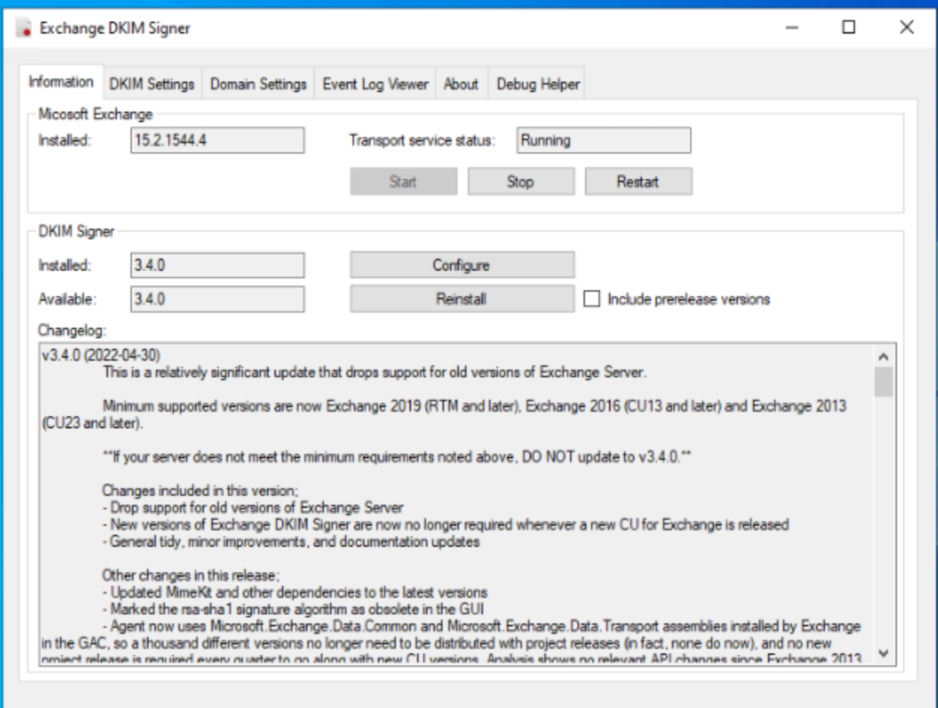
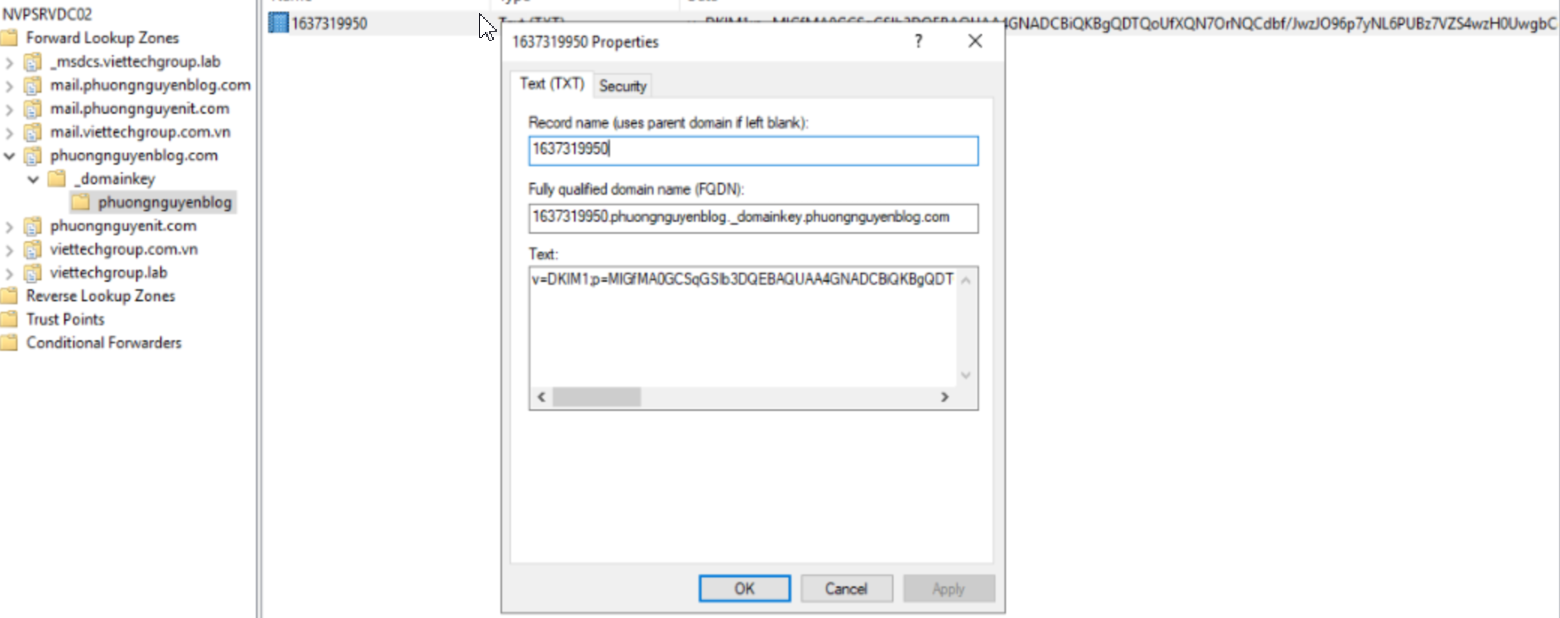
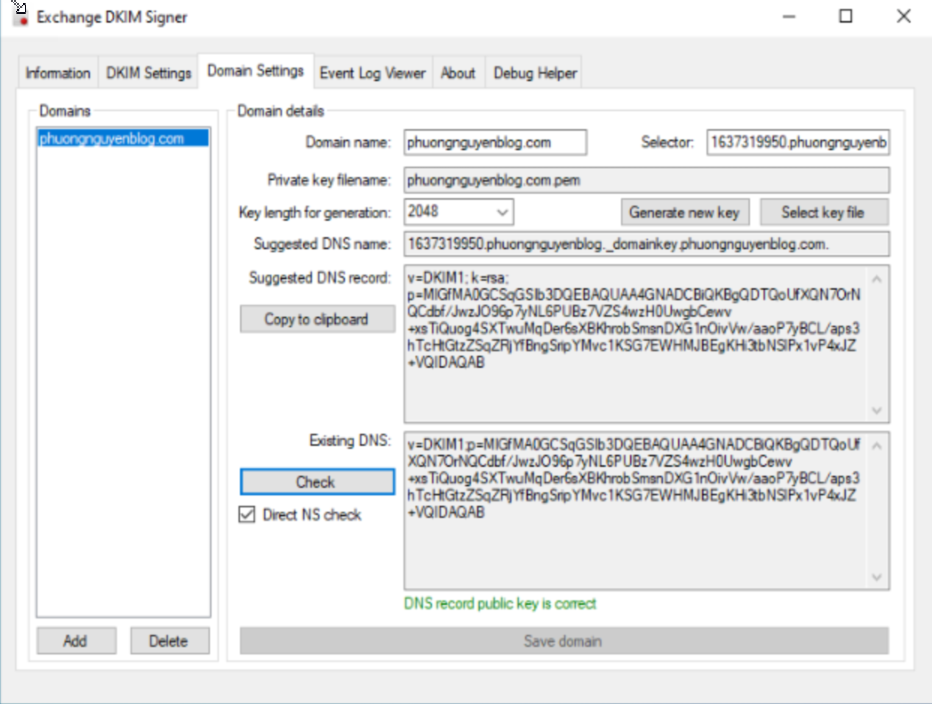
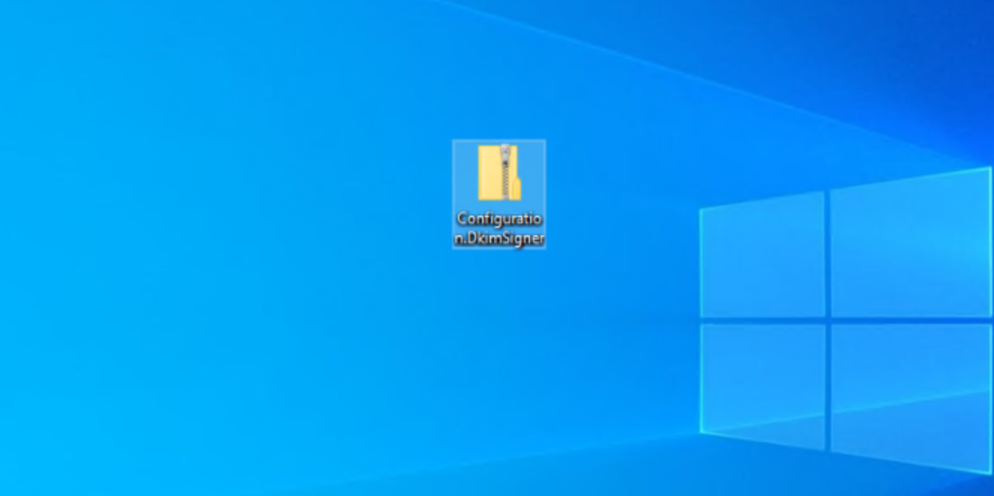
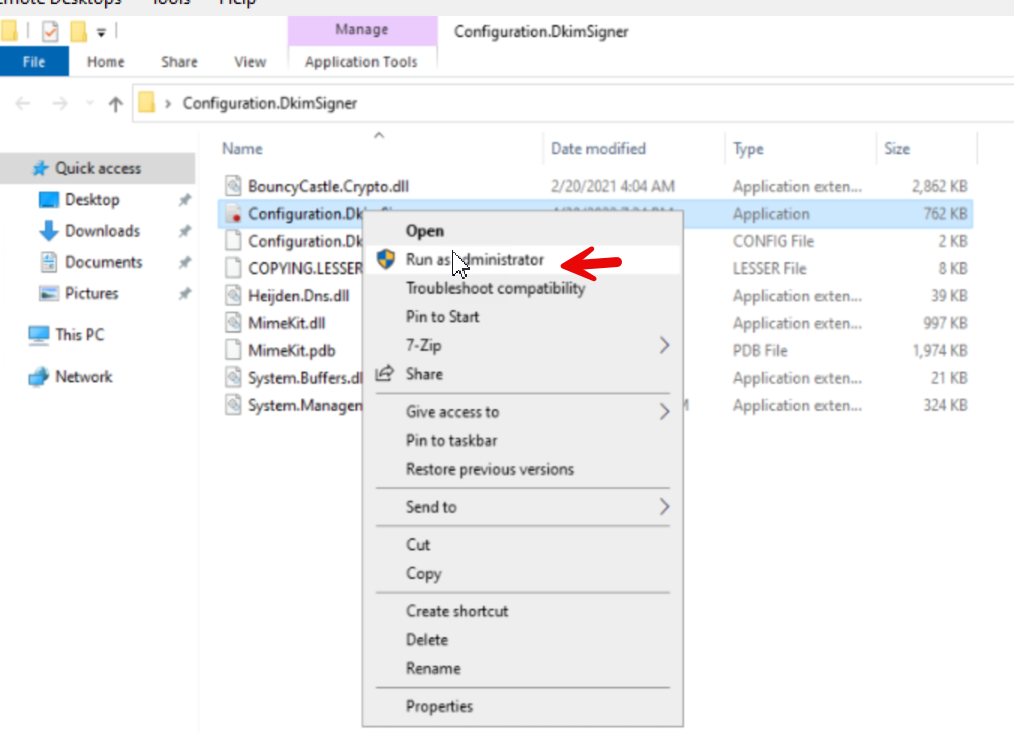
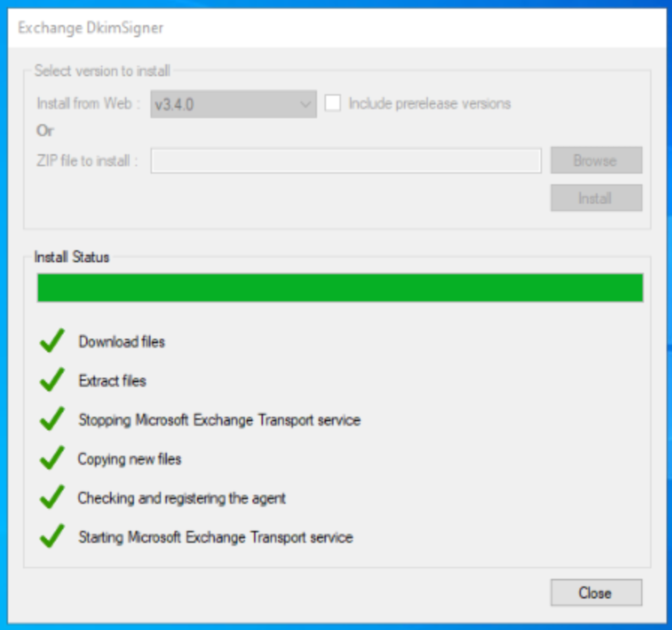
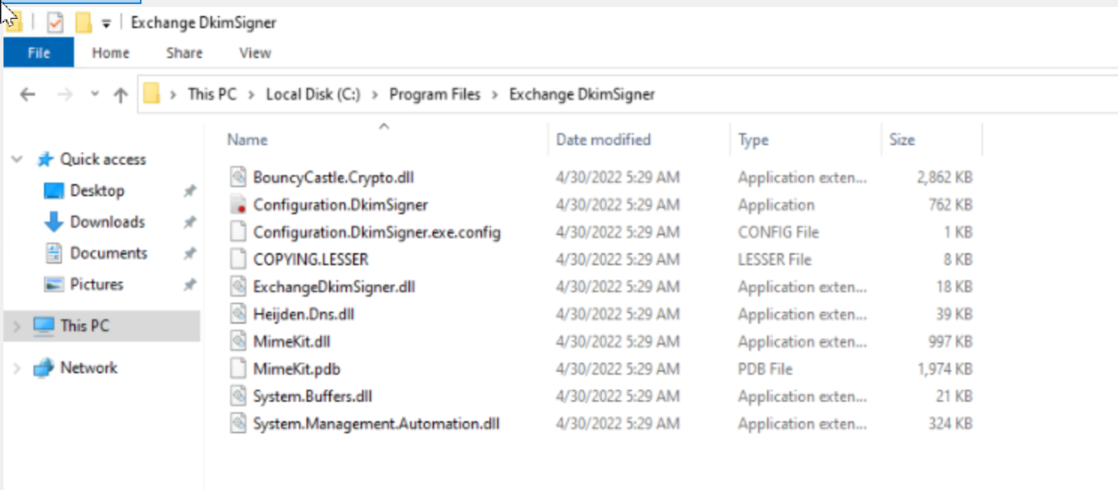
Cài xong vào đường dẫn C:\Program Files\Exchange DkimSigner
Sent to desktop cho dễ lần sau thao tác, chúng ta chạy file configuration.dkim.signer.exe
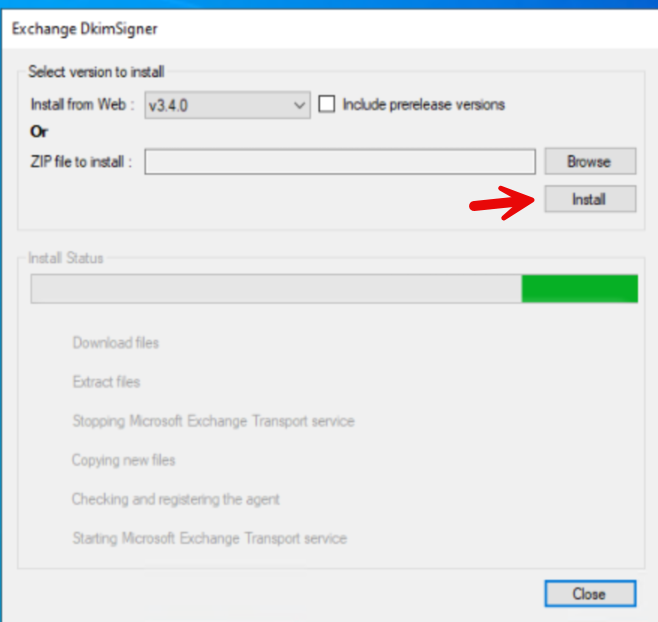
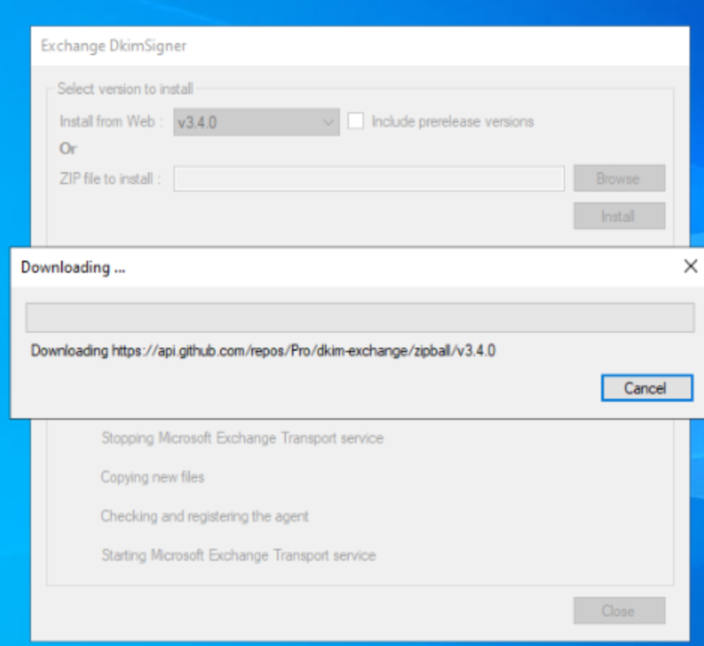
Lần đầu tiên init sẽ chọn ok load cấu hình mặc định
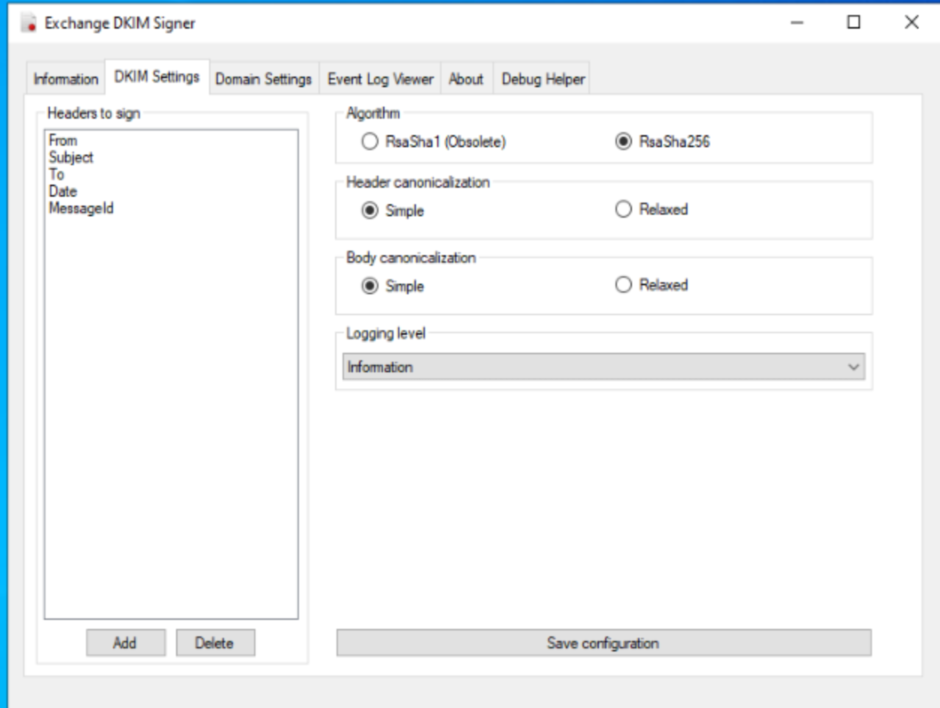
Chọn tab dkim settings
Có thể default hoặc chúng ta chọn Relaxed
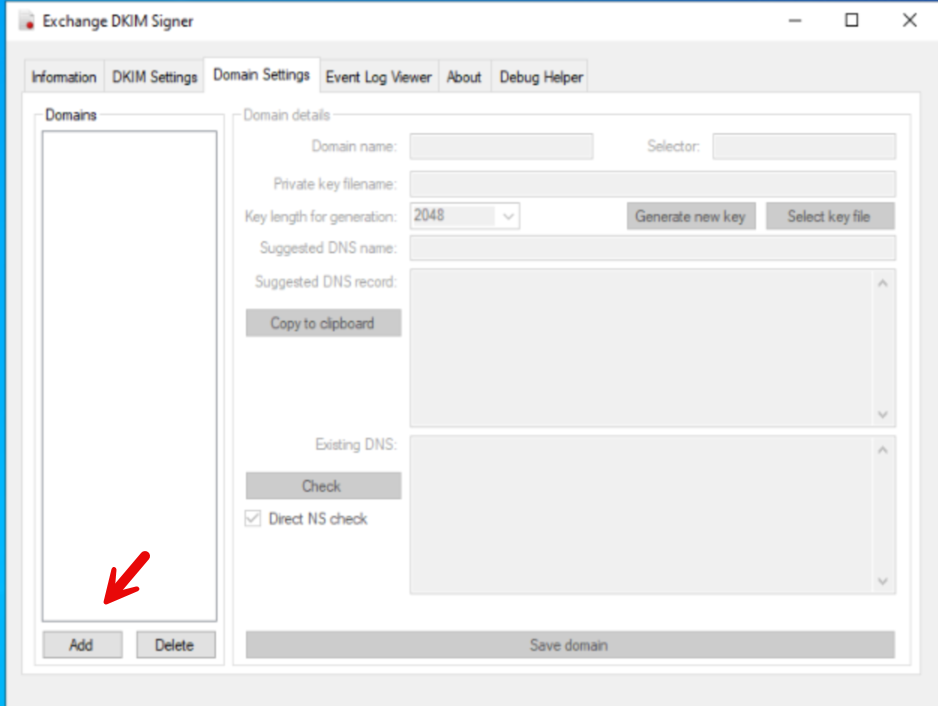
Cấu hình Domain settings phần này quan trọng
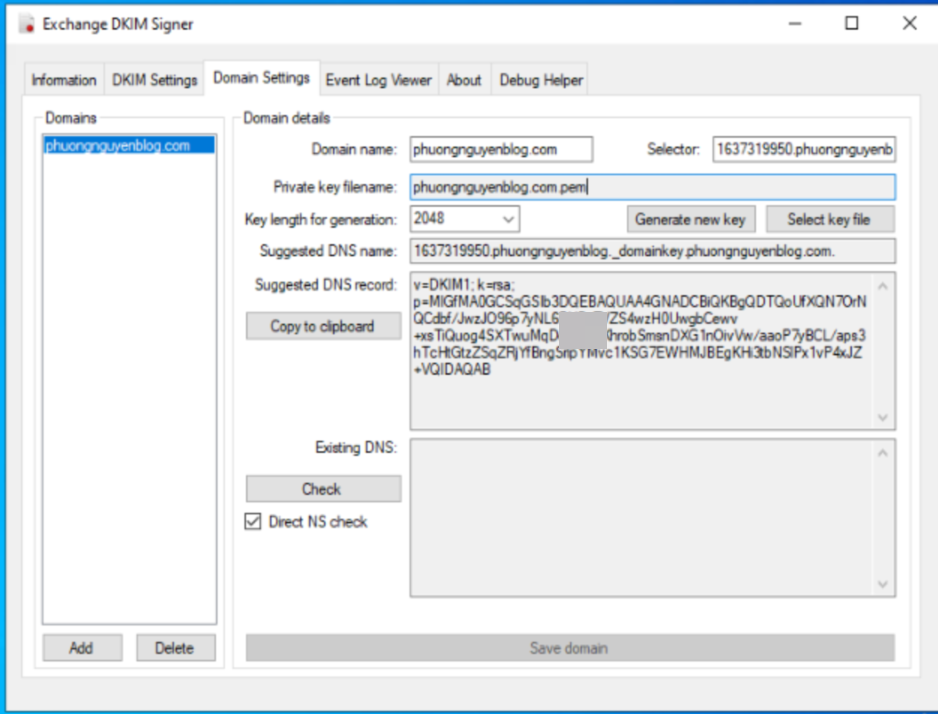
Add-> phuongnguyenblog.com cần ký cho domain mail nào add domain đó. Lưu ý đây là ngữ cảnh domain của tôi. Còn các bạn add domain của các bạn.
Lần đầu khai báo thì Generate new key-> tạo key .pem
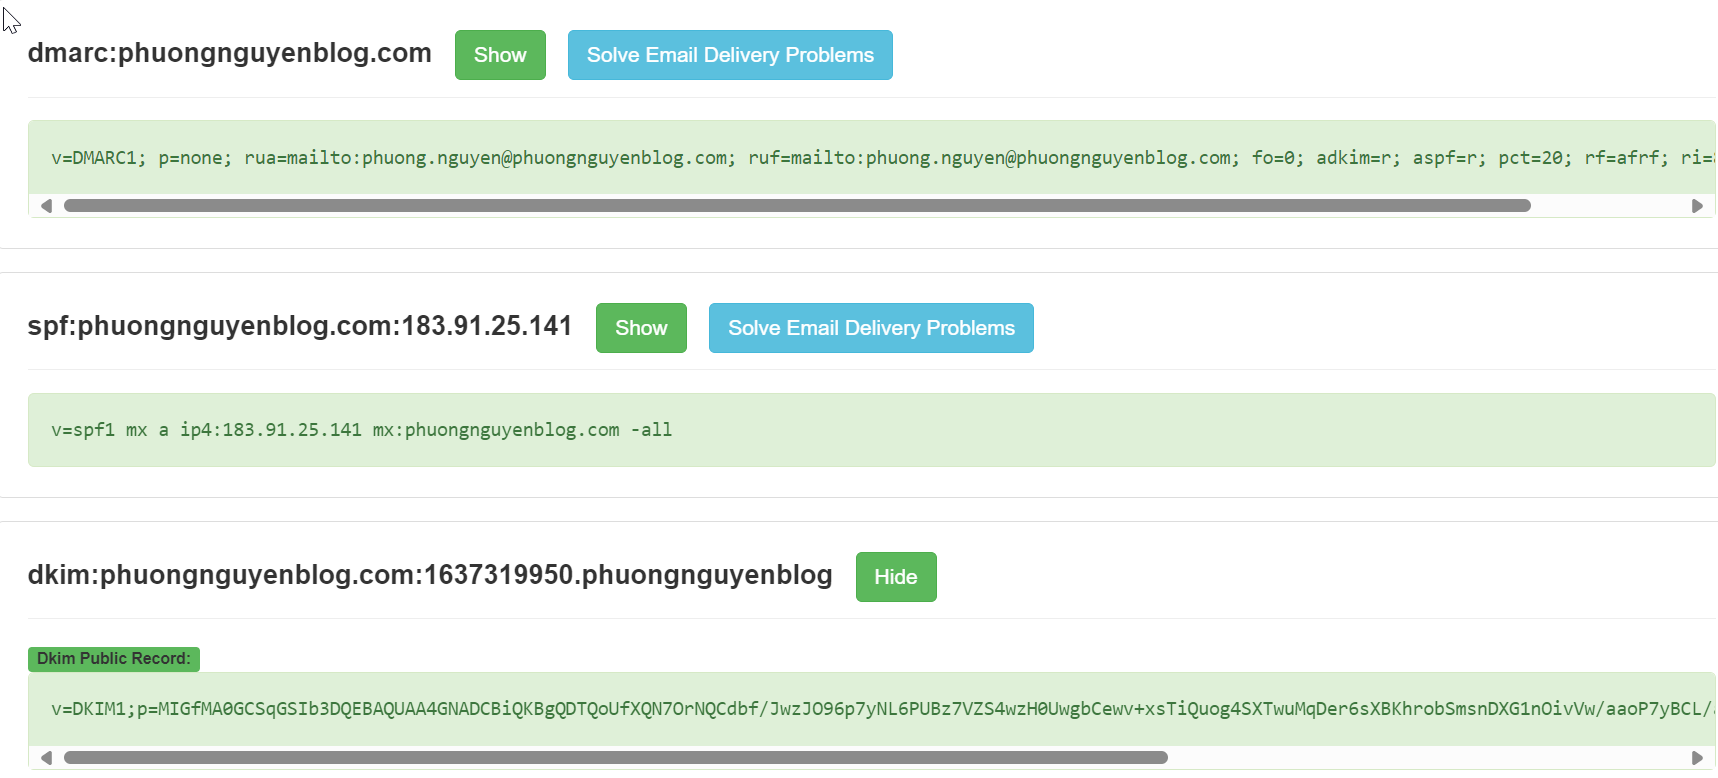
Khai báo select và khai báo DNS local để xác minh thành công nhé. Các bạn có thể khai báo select khác nhau miễn sau tạo DNS để nhận được select của DKIM là ok.
Save domain
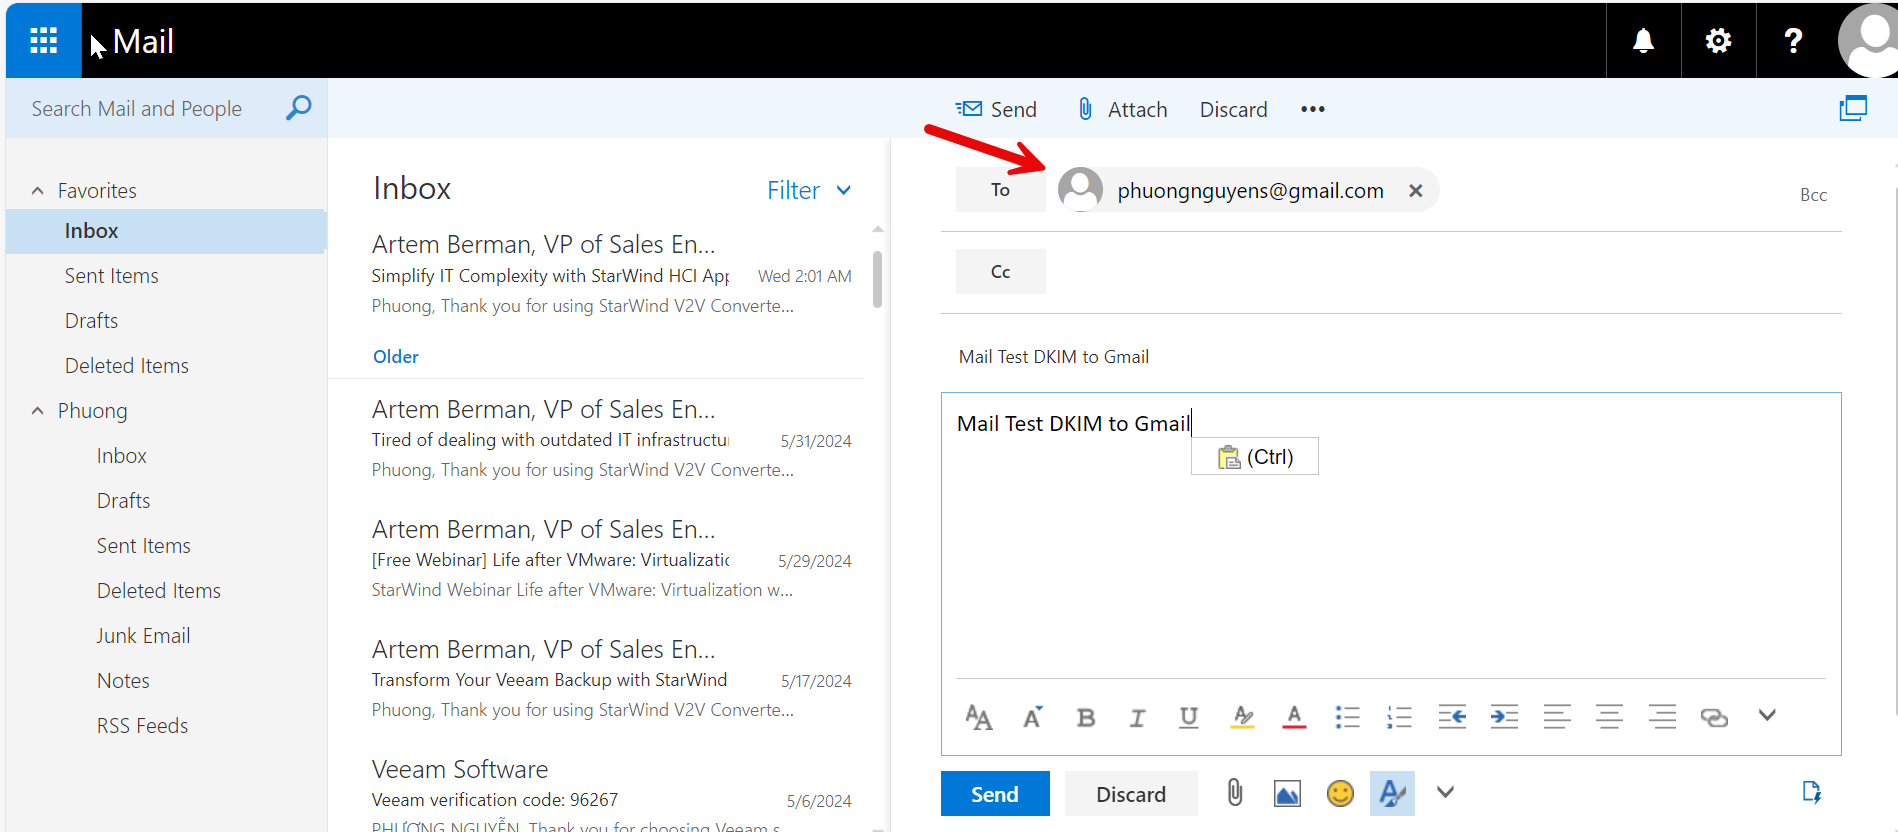
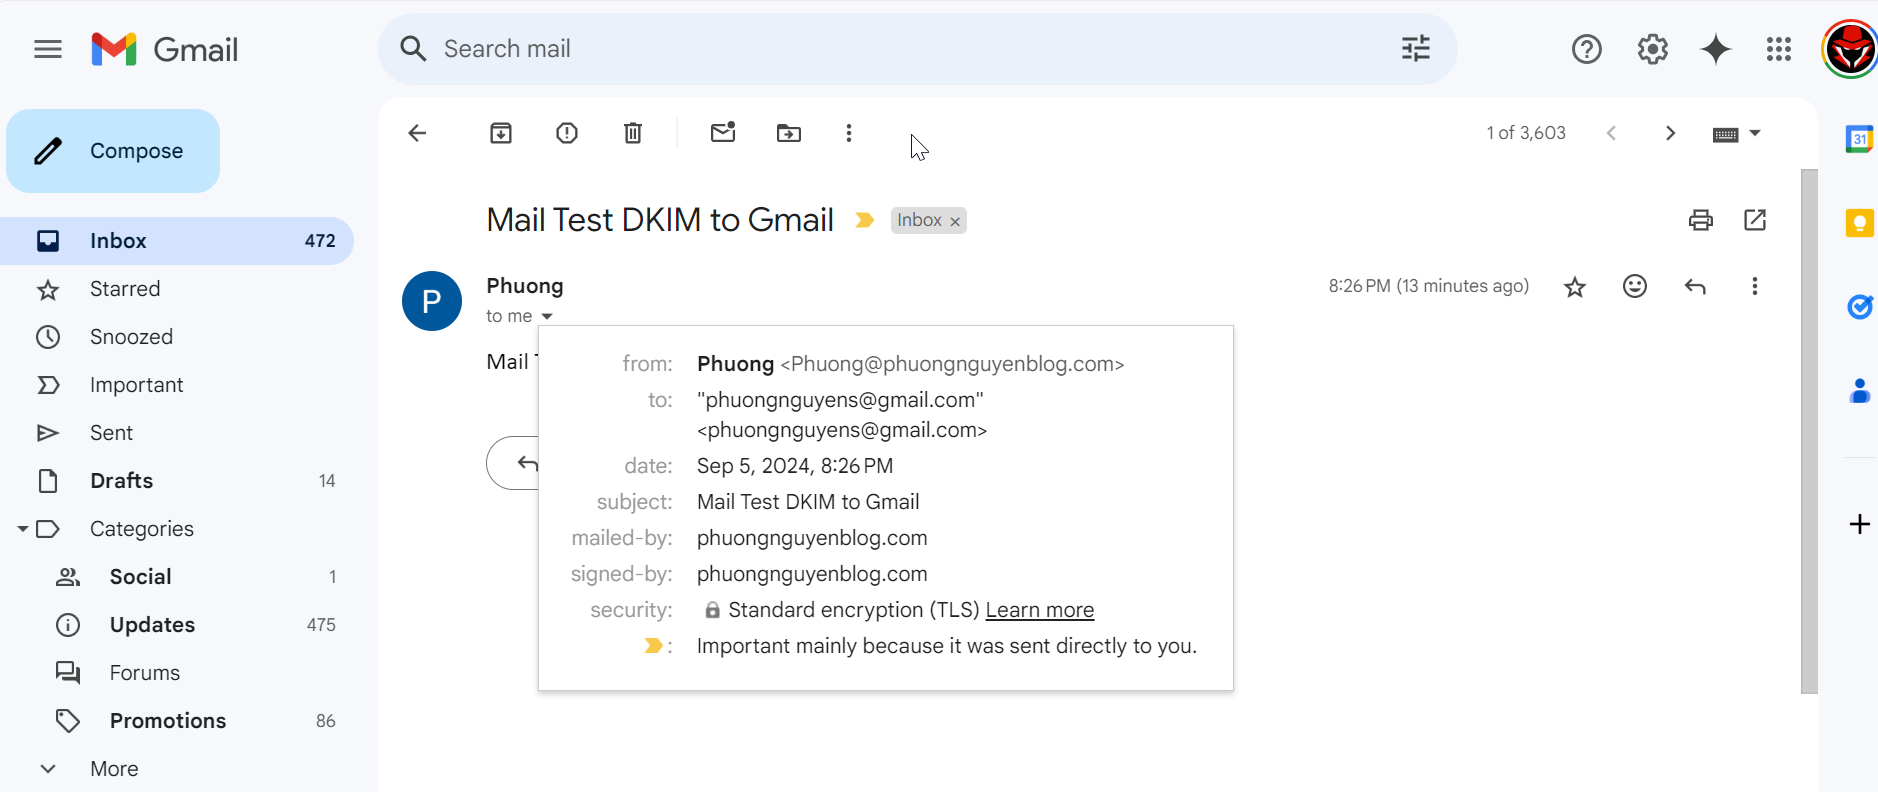
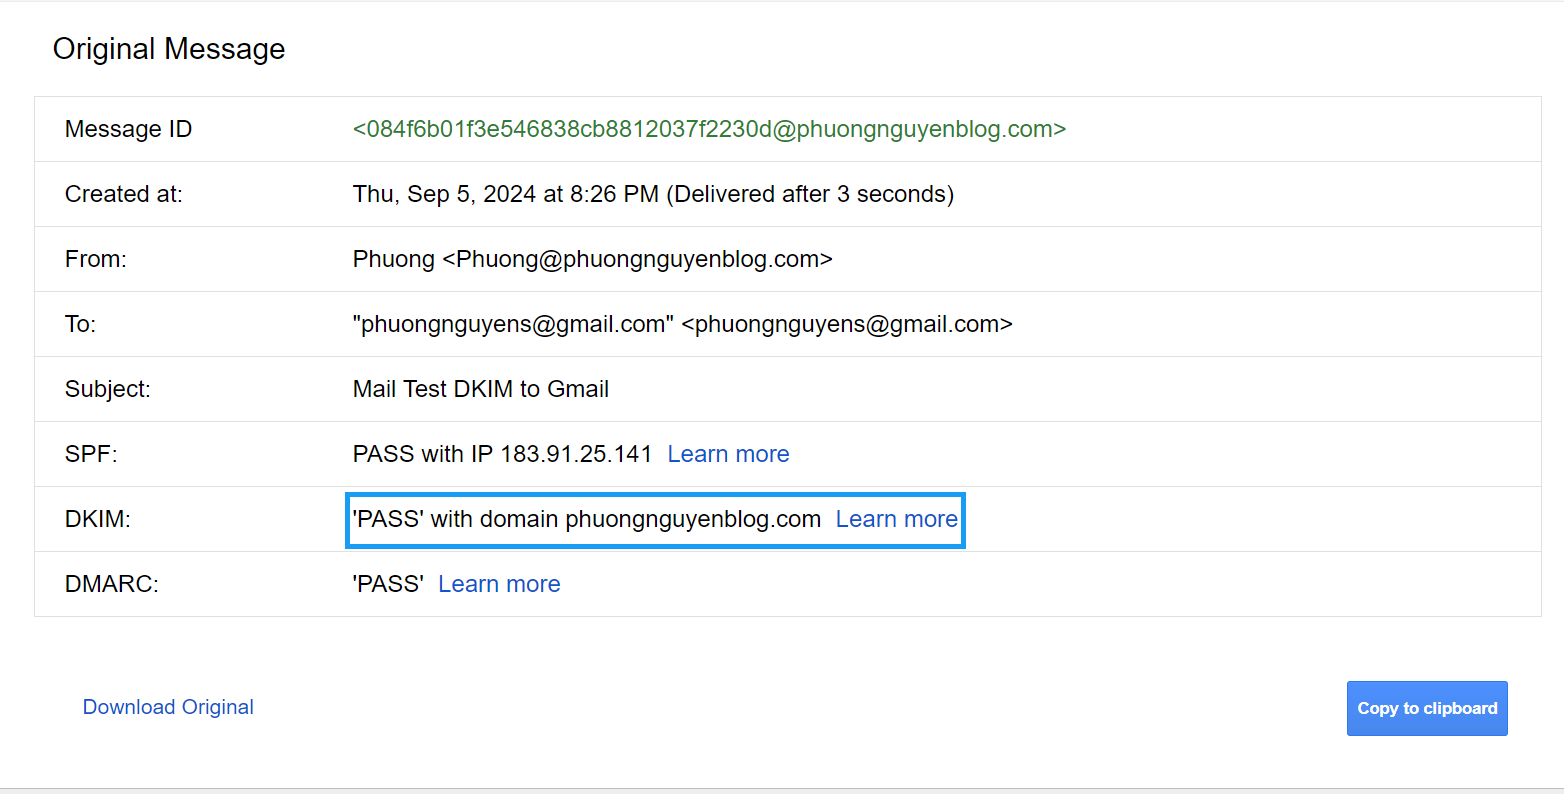
Test dkim
Kiểm tra
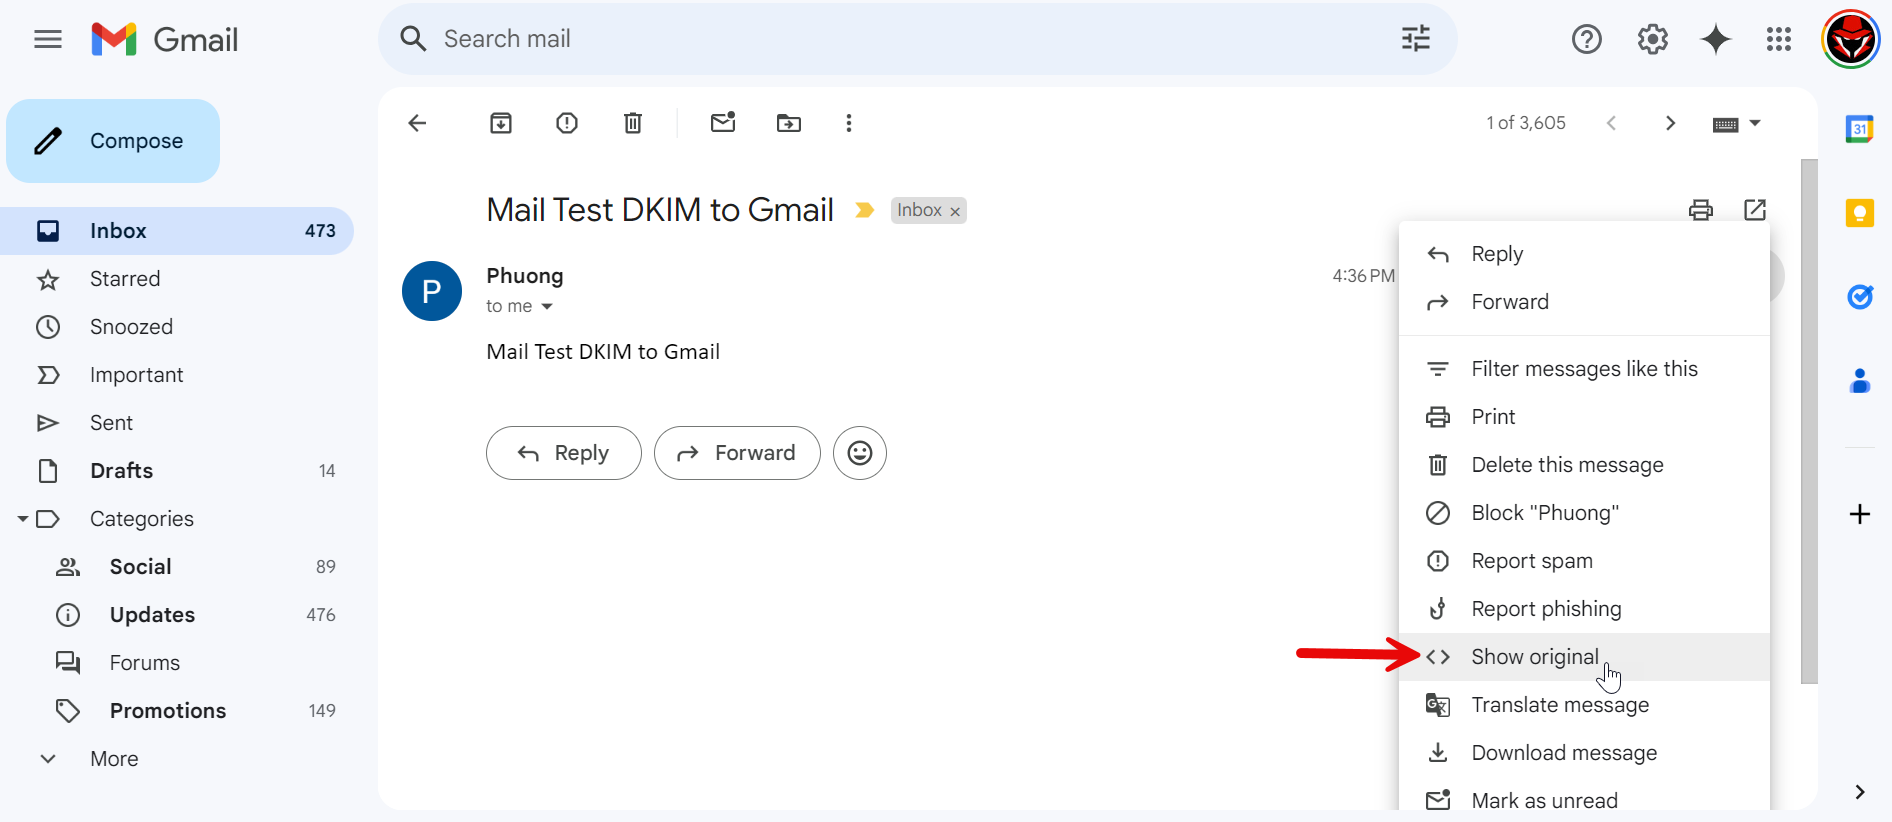
Chọn vào dấu 3 chấm-> Show original
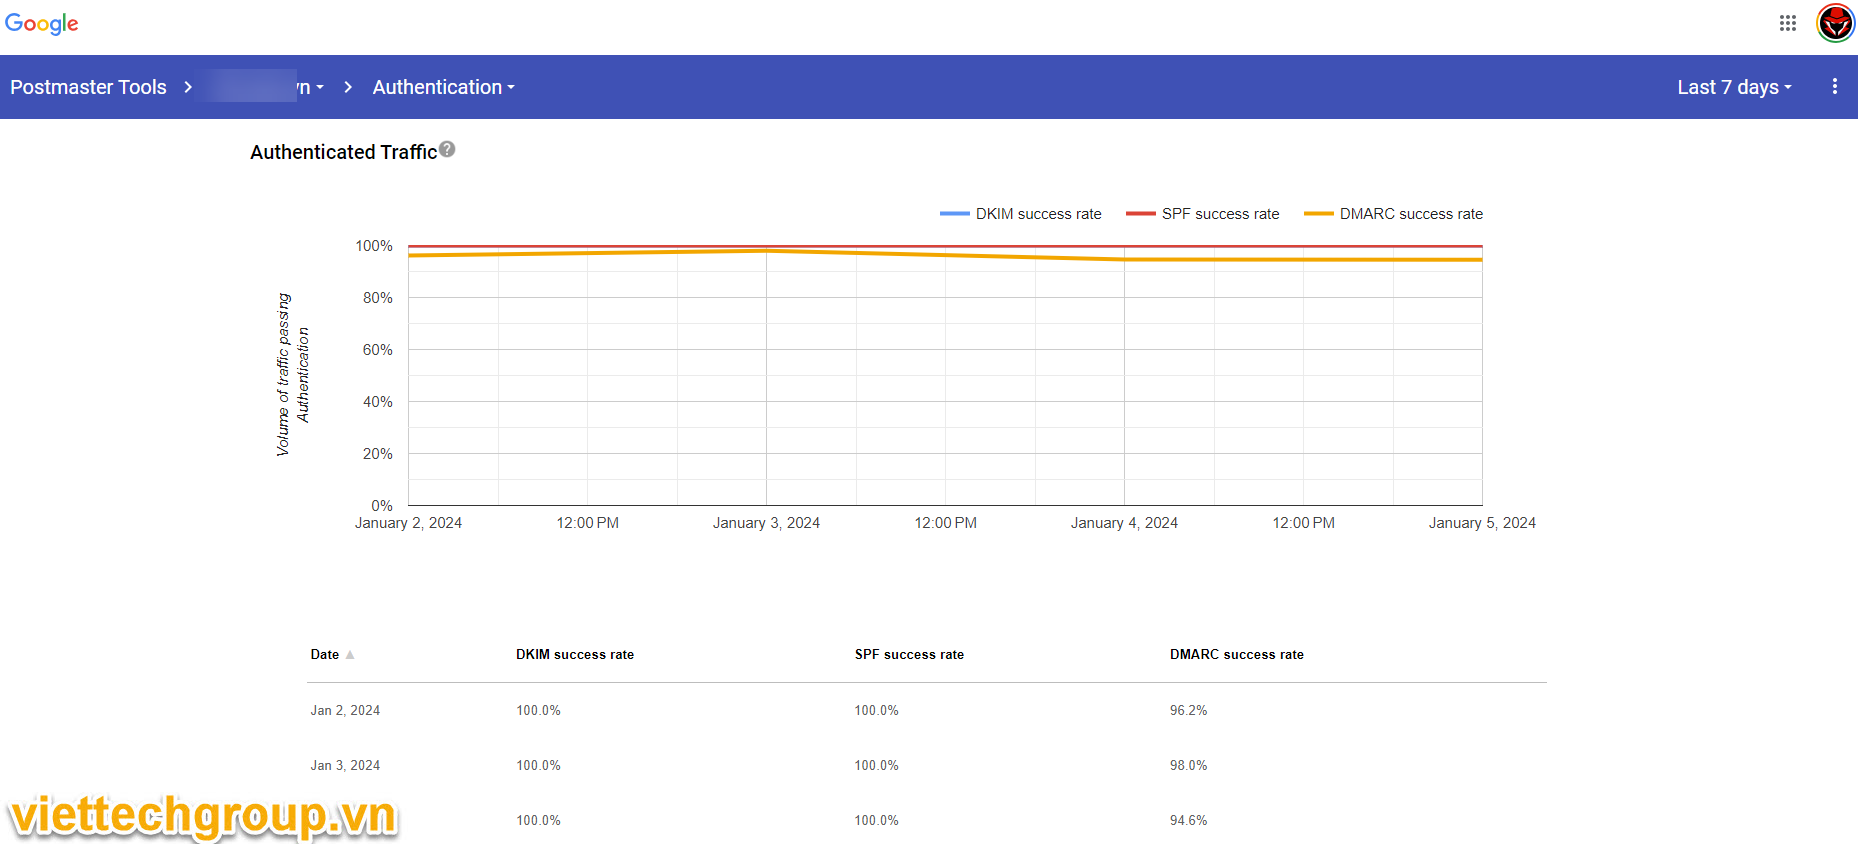
Chúng ta thấy 3 điều kiện điều pass nhé, SPF, DKIM, DMARC.
Nếu các bạn muốn báo cáo đẹp hơn thì dùng mxtools phân tích header email nhé.
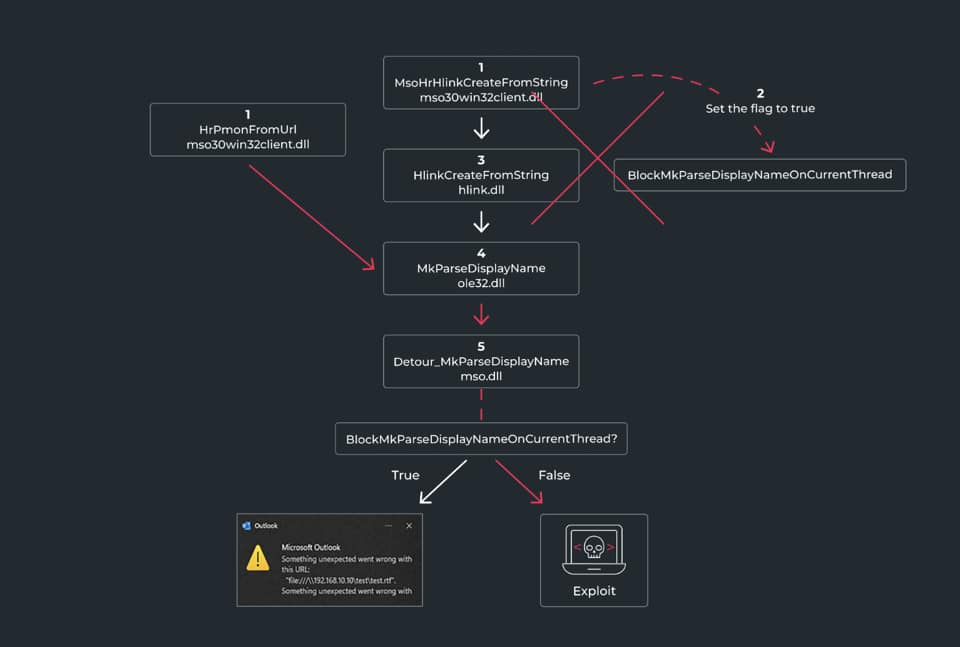
Các nhà nghiên cứu tại Morphisec đã phát hiện ra chi tiết kỹ thuật quan trọng về lỗ hổng thực thi mã từ xa (RCE) không cần tương tác người dùng trong Microsoft Outlook, được định danh là CVE-2024-38021. Lỗ hổng này cho phép kẻ tấn công thực thi mã tùy ý mà không cần xác thực người dùng. Nó khai thác lỗ hổng trong cách Outlook xử lý các liên kết hình ảnh. Khác với CVE-2024-21413, CVE-2024-38021 bỏ qua bản vá ban đầu của Microsoft bằng cách tấn công phương thức mso30win32client!HrPmonFromUrl.
Phương thức này, chịu trách nhiệm phân tích cú pháp URL trong các thẻ hình ảnh, không đặt cờ BlockMkParseDisplayNameOnCurrentThread. Do đó, nó cho phép xử lý các composite monikers, dẫn đến việc gọi hàm MkParseDisplayName không an toàn.
Điều này có thể dẫn đến việc khai thác lỗ hổng bảo mật bằng cách lợi dụng quá trình phân tích các liên kết trong Outlook, gây ra nguy cơ thực thi mã độc từ xa mà không cần sự tương tác của người dùng. Cuộc tấn công liên quan đến việc chèn một composite moniker vào URL trong thẻ hình ảnh. Điều này giúp vượt qua các biện pháp bảo mật được áp dụng trong chức năng tạo liên kết, dẫn đến khả năng thực thi mã từ xa và rò rỉ thông tin đăng nhập NTLM cục bộ.
Microsoft’s Patch Microsoft’s patch for CVE-2024-38021 follows a similar approach to the previous vulnerability, utilizing the BlockMkParseDisplayNameOnCurrentThread flag in the HrPmonFromUrl function. This prevents the invocation of the vulnerable MkParseDisplayName function for composite monikers in image tag URLs.
Tuy nhiên, các nhà nghiên cứu đã phát hiện rằng việc sử dụng một file moniker đơn giản vẫn có thể dẫn đến rò rỉ thông tin đăng nhập NTLM cục bộ, cho thấy bản vá chưa hoàn toàn khắc phục tất cả các rủi ro bảo mật tiềm ẩn.
Microsoft đã đánh giá lỗ hổng này với mức độ nghiêm trọng “Important”, phân biệt giữa người gửi đáng tin cậy và không đáng tin cậy. Đối với người gửi đáng tin cậy, lỗ hổng này là zero-click, nghĩa là không cần tương tác từ người dùng, trong khi đối với người gửi không đáng tin cậy, yêu cầu người dùng phải thực hiện một lần nhấp chuột.
–Khuyến cáo– Cập nhật kịp thời tất cả bản vá các ứng dụng Microsoft Outlook và Office mới nhất. Triển khai các biện pháp bảo mật email mạnh mẽ, bao gồm tắt tính năng xem trước email tự động.
Training người dùng về những rủi ro khi mở email từ các nguồn không xác định.
Ngày 07 tháng 05 năm 2024, Microsoft sẽ cung cấp bản cập nhật về lộ trình sản phẩm dành cho Microsoft Exchange Server và các cột mốc tiếp theo trong hành trình Exchange Server nhằm hỗ trợ các nhu cầu cụ thể của khách hàng tại chỗ, nhà cung cấp dịch vụ lưu trữ và các đối tác khác. Đây là những gì lộ trình như sau:
Microsoft sẽ phát hành một Bản cập nhật tích lũy (CU) cuối cùng cho Exchange Server 2019—H2 CU 2024 hay còn gọi là CU15—vào cuối năm nay.
Microsoft sẽ phát hành Phiên bản Exchange Server Subscription Edition (Exchange Server SE) vào đầu quý 3 năm dương lịch 2025.
Microsoft sẽ phát hành CU đầu tiên cho Exchange Server SE—CU1—vào cuối năm 2025.
Exchange Server 2019 CU15
CU15 sẽ giới thiệu các tính năng và thay đổi mới để hỗ trợ việc phát hành RTM của Exchange Server SE.
Tính năng mới trong Exchange Server 2019 CU15
Thêm hỗ trợ cho Bảo mật lớp vận chuyển (TLS) 1.3 . TLS 1.3 loại bỏ các thuật toán mã hóa lỗi thời, cải thiện tính bảo mật so với các phiên bản cũ hơn và nhằm mục đích mã hóa càng nhiều thao tác bắt tay càng tốt.
Giới thiệu lại quản lý chứng chỉ trong trung tâm quản trị Exchange (EAC) . Quản trị viên có thể tạo yêu cầu chứng chỉ mới, hoàn thành yêu cầu sau khi nhận được chứng chỉ từ nhà cung cấp của họ, xuất chứng chỉ dưới dạng tệp PFX và nhập chứng chỉ từ tệp PFX.
Những thay đổi để hỗ trợ Phiên bản Exchange Server Subscription Edition (SE) thuê bao
Loại bỏ hỗ trợ cùng tồn tại với Exchange 2013 . Do Exchange 2013 đã hết vòng đời vào năm ngoái và do Exchange Server SE không hỗ trợ cùng tồn tại với bất kỳ phiên bản không được hỗ trợ nào nên để chuẩn bị cho những gì tiếp theo, chúng tôi sẽ xóa hỗ trợ cho Exchange Server 2013. Khách hàng nên xóa máy chủ Exchange 2013 trước khi cài đặt Exchange 2019 CU15 hoặc Exchange Server SE RTM trở lên. Nếu phát hiện Exchange 2013 trong môi trường, Thiết lập trong CU15 và Exchange Server SE sẽ dừng và hiển thị thông báo lỗi về hiệu ứng này.
Hỗ trợ key sản phẩm mới . Cần phải lấy khóa sản phẩm mới cho các vai trò máy chủ khác, ngoại trừ các máy chủ Kết hợp sẽ tiếp tục nhận được giấy phép và khóa sản phẩm miễn phí thông qua Trình hướng dẫn Cấu hình Kết hợp. CU15 bổ sung hỗ trợ cho các khóa mới này, sẽ có sẵn khi Exchange Server SE có sẵn.
Hỗ trợ cho Windows Server 2025 . Hiện nay, Exchange 2019 có thể được cài đặt trên Windows Server 2019 và Windows Server 2022. CU15 sẽ giới thiệu hỗ trợ cho Windows Server 2025 (khi hệ điều hành đạt GA vào cuối năm nay).
Những thay đổi bổ sung dự kiến trong CU15 bao gồm:
Cập nhật Visual C++ có thể phân phối lại lên phiên bản đi kèm với Visual Studio 2022
Loại bỏ hỗ trợ cho UCMA 6.0 và tính năng nhắn tin tức thời trong Outlook trên web
Thành phần Windows MSMQ sẽ không còn được cài đặt bởi Setup
Exchange Server SE, bản phát hành tiếp theo của Microsoft Exchange Server, sẽ có sẵn để tải xuống từ trung tâm quản trị Microsoft 365 (trước đây là Trung tâm dịch vụ cấp phép số lượng lớn của Microsoft ) vào đầu quý 3 năm 2025. Mô hình cấp phép được Exchange Server SE sử dụng là giống như Phiên bản đăng ký SharePoint Server , yêu cầu giấy phép đăng ký hoặc giấy phép có Bảo hiểm phần mềm đang hoạt động cho giấy phép máy chủ và người dùng. Chúng tôi sẽ tiếp tục cung cấp khóa và giấy phép máy chủ Kết hợp miễn phí, sẽ tiếp tục được phân phối bằng Trình hướng dẫn Cấu hình Kết hợp .
Các yêu cầu về phần cứng và hệ điều hành cho Exchange Server SE giống như Exchange 2019 CU15, bổ sung hỗ trợ cho Windows Server 2025.
Bản phát hành RTM của Exchange Server SE sẽ không yêu cầu bất kỳ thay đổi nào đối với Active Directory khi nâng cấp từ Exchange Server 2019. Không có thay đổi nào về lược đồ Active Directory ngoài những thay đổi trong Exchange Server 2019 và chúng tôi sẽ tiếp tục hỗ trợ cấp độ chức năng nhóm của Windows Server 2012 R2 .
Để cho phép áp dụng và triển khai nhanh chóng, bản phát hành RTM của Exchange Server SE sẽ có mã tương đương với (ví dụ: mã chính xác giống như) Exchange Server 2019 CU15, ngoại trừ những thay đổi sau:
Thỏa thuận cấp phép, tệp RTF chỉ hiển thị trong phiên bản GUI của Cài đặt, sẽ được cập nhật.
Tên sẽ thay đổi từ Microsoft Exchange Server 2019 thành Microsoft Exchange Server Subscription Edition.
Số bản dựng và phiên bản sẽ được cập nhật.
Xin lưu ý rằng:
Nếu bất kỳ Bản cập nhật bảo mật (SU) nào được phát hành trước CU15 thì những bản cập nhật đó sẽ được tích hợp vào CU15.
Nếu bất kỳ SU nào được phát hành sau CU15 thì bản phát hành RTM của Exchange Server SE sẽ có mã tương đương với Exchange 2019 CU15 cộng với SU mới nhất. Nếu bạn đang sử dụng CU15, tức là nơi bạn nên đến, thì bạn cũng phải chạy SU mới nhất được phát hành sau CU15, nhờ đó duy trì mã tương đương với bản phát hành RTM.
Nâng cấp lên Exchange Server SE từ các phiên bản trước
To help further accelerate in-place upgrades, in addition to being code equivalent, Exchange Server SE will support two types of upgrades: in-place upgrade and legacy upgrade.
Để giúp đẩy nhanh hơn nữa việc nâng cấp tại chỗ (in-place upgrades), ngoài tính năng tương đương về mã, Exchange Server SE sẽ hỗ trợ hai loại nâng cấp: nâng cấp tại chỗ và nâng cấp kế thừa (legacy upgrade).
In-place upgrade
Cách nhanh nhất và dễ dàng nhất để chuyển từ Exchange Server 2019 sang Exchange Server SE là thực hiện nâng cấp tại chỗ. Trải nghiệm nâng cấp giống hệt như cài đặt CU. Sau khi máy chủ đang chạy Exchange Server SE, máy chủ sẽ được cập nhật với nhịp cập nhật của chúng tôi là hai CU mỗi năm (trong H1 và H2).
Legacy upgrade
Exchange Server SE cũng hỗ trợ các nâng cấp kế thừa , bao gồm việc xây dựng cơ sở hạ tầng mới cũng như di chuyển các không gian tên và hộp thư sang cơ sở hạ tầng mới đó. Một số quy trình này được sử dụng trong các trường hợp khác, chẳng hạn như khi thay thế phần cứng máy chủ hoặc khi bạn muốn sử dụng phiên bản Windows Server mới hơn và các quy trình đó tiếp tục được hỗ trợ trong Exchange Server SE.
Nếu tổ chức của bạn hiện đang chạy Exchange 2016 và bạn muốn tiếp tục chạy Exchange tại chỗ thì bạn phải thực hiện ít nhất một bản nâng cấp kế thừa nữa.
Để đảm bảo di chuyển kịp thời từ Exchange 2016 sang Exchange Server SE, chúng tôi khuyên bạn nên thực hiện nâng cấp cũ từ Exchange 2016 lên Exchange 2019 càng sớm càng tốt. Khi đang chạy Exchange 2019, bạn có thể thực hiện nâng cấp tại chỗ nhanh chóng và dễ dàng lên Exchange Server SE.
Update Paths for Exchange 2019 CU15 and Exchange Server SE
Giống như tất cả các phiên bản trước, Exchange Server SE có thể được sử dụng để tạo một tổ chức Exchange tại chỗ mới từ đầu và/hoặc có thể cùng tồn tại trong một tổ chức Exchange chỉ bao gồm các phiên bản được hỗ trợ (ví dụ: Exchange 2016 CU23 và/hoặc Exchange 2019 CU14 hoặc sau đó). Nó không thể được đưa vào tổ chức Exchange với các phiên bản không được hỗ trợ.
Dưới đây là bảng tóm tắt các đường dẫn có sẵn dựa trên (các) phiên bản bạn đang chạy:
Version
Exchange 2019 CU15
Exchange Server (SE)
Máy chủ trao đổi 2013
Không được hỗ trợ trong tổ chức. Nâng cấp lên Exchange 2019 CU14 ngay bây giờ, xóa Exchange 2013 và cập nhật lên Exchange 2019 CU15 khi khả dụng.
Không được hỗ trợ trong tổ chức. Nâng cấp lên Exchange 2019 CU14 ngay bây giờ hoặc CU15 khi khả dụng, xóa Exchange 2013 và nâng cấp tại chỗ lên Exchange Server SE khi khả dụng.
Máy chủ Exchange 2016 CU23
Nâng cấp lên Exchange 2019 CU14 ngay bây giờ và cập nhật lên CU15 khi có sẵn.
Nâng cấp lên Exchange 2019 CU14 ngay bây giờ hoặc CU15 khi khả dụng và nâng cấp tại chỗ lên Exchange Server SE khi khả dụng.
Exchange Server 2016 CU22 trở về trước
Không được hỗ trợ trong tổ chức. Nâng cấp lên Exchange 2019 CU14 ngay bây giờ và cập nhật lên CU15 khi có sẵn; hoặc cập nhật lên Exchange 2016 CU23 ngay bây giờ, sau đó nâng cấp lên Exchange 2019 CU15 khi có sẵn.
Không được hỗ trợ trong tổ chức. Cập nhật lên Exchange 2016 CU23 và/hoặc nâng cấp lên Exchange 2019 CU14/CU15, sau đó nâng cấp tại chỗ lên Exchange Server SE khi có sẵn.
Exchange Server 2019 CU14 trở lên
Cập nhật máy chủ CU14 lên Exchange 2019 CU15 khi khả dụng.
Nâng cấp tại chỗ lên Exchange Server SE.
Máy chủ Exchange 2019 CU13
Cập nhật lên Exchange 2019 CU14 ngay bây giờ và cập nhật lên CU15 khi có sẵn.
Không được hỗ trợ trong tổ chức. Cập nhật lên Exchange Server 2019 CU14/CU15, sau đó nâng cấp tại chỗ lên Exchange Server SE.
Exchange Server 2019 CU12 trở về trước
Không được hỗ trợ trong tổ chức. Cập nhật lên Exchange 2019 CU14 ngay bây giờ và cập nhật lên CU15 khi có sẵn.
Không được hỗ trợ trong tổ chức. Cập nhật lên Exchange Server 2019 CU14/CU15, sau đó nâng cấp tại chỗ lên Exchange Server SE.
Bảng 1 – Cập nhật đường dẫn tới Exchange Server 2019 CU15 và Exchange Server SE
Exchange Server SE CU1
Exchange Server SE sẽ được phục vụ với nhịp độ hiện tại là hai CU mỗi năm. Vào tháng 10 năm 2025, chúng tôi dự kiến sẽ phát hành Exchange Server SE CU1. Exchange Server SE CU1 dự kiến sẽ có những thay đổi sau:
Kerberos để liên lạc giữa máy chủ với máy chủ
Thêm hỗ trợ cho API quản trị và ngừng sử dụng RPS
Xóa Outlook mọi nơi
Loại bỏ hỗ trợ cùng tồn tại với các phiên bản trước đó
Kerberos for server-to-server communication
Giao thức xác thực mặc định được sử dụng để liên lạc giữa các máy chủ Exchange sẽ sử dụng Kerberos thay vì NTLMv2. Trong CU1, Thiết lập sẽ kích hoạt Kerberos (cụ thể là auth = Negotiate:Kerberos) trên tất cả các thư mục ảo của máy chủ Exchange trên máy chủ đang được cài đặt.
Admin API and RPS deprecation
API quản trị, một bộ API dựa trên REST để cho phép quản lý máy chủ Exchange từ xa sẽ được giới thiệu. PowerShell từ xa (RPS) sẽ được hỗ trợ trong CU1 nhưng không được dùng nữa trong các CU sau này.
Removing Outlook Anywhere
Exchange Online và Microsoft 365 đã loại bỏ hỗ trợ cho Outlook Anywhere (còn gọi là RPC qua HTTP) vài năm trước và bắt đầu từ CU1, Outlook Anywhere sẽ bị loại bỏ khỏi Exchange Server SE. Thay đổi này có thể ảnh hưởng đến mọi phần bổ trợ Outlook của bên thứ ba vẫn sử dụng giao thức này.
Loại bỏ hỗ trợ cùng tồn tại với tất cả các phiên bản trước
Vào thời điểm CU1 được phát hành, Exchange Server SE sẽ là phiên bản duy nhất được hỗ trợ. Vì tất cả các phiên bản trước đó sẽ không được hỗ trợ tại thời điểm đó, nên Thiết lập trong CU1 sẽ chặn sự tồn tại chung với bất kỳ phiên bản nào khác ngoài Exchange Server SE RTM trở lên.
Call to Action
Chuyển sang Exchange Server 2019 CU14 ngay hôm nay:
Nếu muốn chạy Exchange Server, hãy chuyển sang Exchange Server 2019 CU14 trên Windows Server 2022 ngay hôm nay.
Nếu bạn muốn đợi Windows Server 2025, hãy chuyển sang Exchange Server 2019 CU15 ngay khi có hệ điều hành mới.
Nếu bạn đang chạy Exchange Server 2019, hãy cập nhật máy chủ Exchange của bạn bằng cách luôn chạy CU được hỗ trợ và SU mới nhất cũng như các bản cập nhật mới nhất cho hệ điều hành Windows, đồng thời thường xuyên chạy Exchange Health Checker .
Vì Windows Server 2019 sắp hết vòng đời vào tháng 1 năm 2029 nên các triển khai mới của Exchange Server 2019 CU15 và Exchange Server SE RTM được khuyên nên cài đặt trên Windows Server 2022 hoặc Windows Server 2025 nếu có.
Câu hỏi thường gặp
Câu hỏi: Exchange Server SE sẽ được phát hành rất sớm trước khi phiên bản hiện tại của tôi (Exchange 2016 hoặc Exchange 2019) hết hạn sử dụng; làm thế nào tôi có thể nâng cấp kịp thời?
Trả lời: Cách tiếp cận của chúng tôi đối với bản phát hành RTM của Exchange Server SE cho phép bạn nâng cấp nhanh hơn các bản phát hành trước đó. Chúng tôi khuyên tất cả khách hàng nên thực hiện nâng cấp tại chỗ từ Exchange 2019. Đây là cách nhanh nhất và dễ dàng nhất để chuyển từ Exchange 2019 sang Exchange Server SE và trải nghiệm cũng giống như cài đặt CU.
—
Câu hỏi: Liệu Microsoft có gia hạn ngày hết hạn sử dụng, cung cấp hỗ trợ mở rộng hoặc cung cấp Bản cập nhật bảo mật mở rộng (ESU) cho Exchange 2016 hoặc Exchange 2019 không?
Trả lời: Không, chúng tôi sẽ không gia hạn ngày hết hạn sử dụng của Exchange 2016 hoặc Exchange 2019 và chúng tôi cũng không cung cấp hỗ trợ mở rộng hoặc ESU cho cả hai phiên bản. Những nỗ lực của chúng tôi tập trung vào việc đảm bảo rằng bản phát hành Exchange Server SE cũng như trải nghiệm nâng cấp tại chỗ được liền mạch cho khách hàng chạy Exchange 2019. Chúng tôi thực sự khuyên tất cả khách hàng Exchange 2016 muốn duy trì tại chỗ nên nâng cấp lên Exchange 2019 sớm nhất có thể.
—
Câu hỏi : Tôi đang chuyển từ Exchange 2016 sang Exchange 2019 theo khuyến nghị của Microsoft và tôi dự định thực hiện nâng cấp tại chỗ lên Exchange Server SE khi có sẵn. Tôi có nên triển khai CU14 trên Windows Server 2022 ngay bây giờ hay đợi đến cuối năm nay và triển khai CU15 trên Windows Server 2025 RTM?
Trả lời: Windows Server 2022 và Windows Server 2025 (khi được phát hành) là các hệ điều hành được hỗ trợ cho Exchange Server 2019 CU15 và Exchange Server SE và đối với Exchange, không có sự khác biệt nào về cách sử dụng thành phần hoặc tính năng của Windows Server. Sự khác biệt chính từ góc độ máy chủ Exchange là vòng đời, trong đó Windows Server 2025 hết vòng đời vài năm sau Windows Server 2022 .
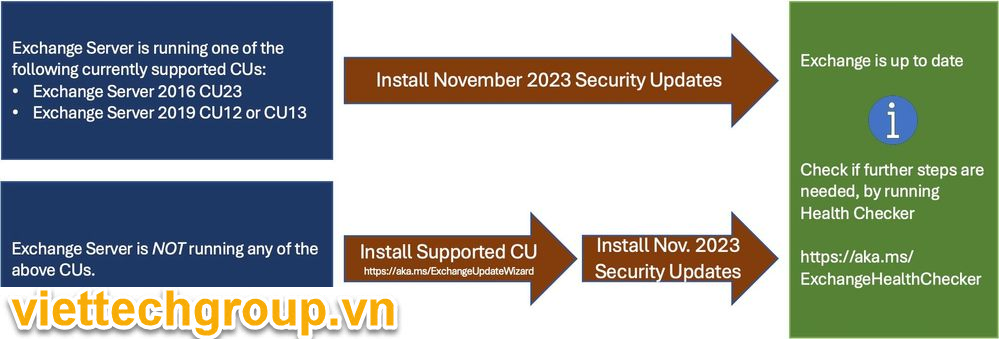
Microsoft đã phát hành Bản cập nhật Hotfix (HU) cho phép hỗ trợ các vấn đề về chức năng và địa chỉ mới trong Bản cập nhật bảo mật (SU) tháng 3 năm 2024
Áp dụng phiên bản:
Exchange Server 2019 CU13 and CU14 Exchange Server 2016 CU23
Điểm mới bản HU
HU tháng 4 năm 2024 giới thiệu hỗ trợ Chứng chỉ elliptic curve cryptography (ECC) và xác thực Hybrid modem cho Outlook trên web và ECP.
Published calendars might not work with a “This calendar isn’t available” error after installing March 2024 SU
Microsoft vẫn đang tìm cách khắc phục một sự cố khác khiến việc in lịch trong OWA có thể không hoạt động trừ khi sử dụng phím tắt CTRL+P. Một số tính năng bản HU Exchange lần này
Ngày 13/02/2024 MS đang công bố tính khả dụng của Bản cập nhật tích lũy H1 2024 (CU) cho Exchange Server 2019 (hay còn gọi là CU14). CU14 bao gồm các bản sửa lỗi cho các sự cố được khách hàng báo cáo, thay đổi bảo mật và tất cả các Bản cập nhật bảo mật (SU) đã phát hành trước đó.
Cài đặt Bản cập nhật tích lũy ngay lập tức để giải quyết các vấn đề được tìm thấy trong Exchange Server 2019 và bảo vệ môi trường của bạn.
1. Với Exchange 2019 CU14 khi cài mặt định enable Extended Protection hoặc chúng ta không muốn bật thêm tham số /DoNotEnableEP or /DoNotEnableEPFEEWS trong quá trình setup
2. Hỗ trợ .NET Framework 4.8.1 trên Windows Server 2022
3. TLS 1.3 dự kiến EX2019CU15
4. Lưu ý sau phiên bản sẽ không hỗ trợ bản vá bảo mật trong tương lai: EX2019CU12, EX2016CU22.
CVE dưới đây được giải quyết bằng Bản cập nhật tích lũy:
CVE-2024-21410 – Microsoft Exchange Server nâng cao lỗ hổng đặc quyền
Xin lưu ý rằng CVE-2024-21410 cũng áp dụng cho Exchange Server 2016. Đối với các máy chủ Exchange 2016, hãy làm theo Cấu hình Bảo vệ Mở rộng Windows trong Máy chủ Trao đổi nếu Bảo vệ Mở rộng chưa được bật trong tổ chức của bạn
Lưu ý rằng Exchange Server 2013 KHÔNG được hỗ trợ và bạn phải nâng cấp lên Exchange Server 2019 hoặc Exchange Online càng sớm càng tốt
Lưu ý rằng Exchange Server 2013 KHÔNG được hỗ trợ và bạn phải nâng cấp lên Exchange Server 2019 hoặc Exchange Online càng sớm càng tốt.
P/s: Khuyến cáo Quản trị viên cần triển khai cập nhật trong môi trường Lab trước khi thực hiện triển khai update trong môi trường Production
Theo như thông báo của Gmail thì bắt đầu tháng 02 năm 2024 có 1 số đổi mới bảo mật gửi vào gmail
Quan trọng: Kể từ tháng 2 năm 2024, Gmail sẽ yêu cầu những người gửi từ 5.000 thư trở lên mỗi ngày đến các tài khoản Gmail phải làm các việc sau: Xác thực email gửi đi, tránh gửi email không mong muốn, đồng thời giúp người nhận dễ dàng huỷ đăng ký.
Các nguyên tắc trong bài viết này có thể giúp bạn gửi và chuyển thành công email đến các tài khoản Gmail cá nhân. Tài khoản Gmail cá nhân là tài khoản có đuôi là @gmail.com hoặc @googlemail.com.
Người gửi trên Google Workspace: Nếu bạn sử dụng Google Workspace để gửi số lượng lớn email thì phải tuân thủ theo chính sách Gmail của Google Workspace.
Nội dung cập nhật về các yêu cầu đối với người gửi
Điểm mới trong tháng 12/2023 Gmail đã cập nhật đối với người gửi bắt buộc phải dùng kết nối TLS để truyền email.
Yêu cầu đối với tất cả người gửi vào gmail
Kể từ ngày 1 tháng 2 năm 2024, tất cả những người gửi email đến các tài khoản Gmail đều phải đáp ứng các yêu cầu trong mục này.
Quan trọng: Nếu bạn gửi hơn 5.000 thư mỗi ngày đến các tài khoản Gmail, hãy tuân theo Các yêu cầu đối với việc gửi từ 5.000 email trở lên mỗi ngày.
Thiết lập phương thức xác thực email DKIM hoặc SPF cho miền của bạn.
Đảm bảo rằng địa chỉ IP hoặc miền gửi thư có bản ghi DNS chuyển tiếp và bản ghi DNS ngược hợp lệ, còn được gọi là bản ghi PTR (PTR record hay dân gian gọi là IP Reverse). Tìm hiểu thêm hướng dẫn tại đây (https://support.google.com/mail/answer/81126)
IP Adress: Địa chỉ IP gửi của bạn phải có bản ghi PTR. Bản ghi PTR xác minh rằng tên máy chủ gửi được liên kết với địa chỉ IP gửi. Mỗi địa chỉ IP phải liên kết với một tên máy chủ trong bản ghi PTR. Tên máy chủ trong bản ghi PTR phải có DNS chuyển tiếp tham chiếu đến địa chỉ IP gửi.
IP Sharing (Dạng sài chung host): Địa chỉ IP dùng chung (IP dùng chung) là địa chỉ IP được nhiều người gửi email sử dụng. Hoạt động của bất kỳ người gửi nào sử dụng địa chỉ IP dùng chung cũng sẽ ảnh hưởng đến danh tiếng của tất cả người gửi sử dụng IP dùng chung đó.
Danh tiếng xấu có thể ảnh hưởng đến tần suất gửi thư của bạn.
Nếu bạn sử dụng một IP dùng chung để gửi email, bạn cần:
Đảm bảo địa chỉ IP dùng chung đó không thuộc bất kỳ danh sách chặn nào trên Internet. Thư được gửi từ địa chỉ IP trong danh sách chặn sẽ có nhiều khả năng bị đánh dấu là thư rác.
Nếu bạn sử dụng một nhà cung cấp dịch vụ email cho IP dùng chung của mình, hãy sử dụng Công cụ Postmaster để giám sát danh tiếng của địa chỉ IP dùng chung.
Sử dụng kết nối TLS để truyền email. Để biết các bước thiết lập TLS trong Google Workspace. Xem hướng dẫn tại đây (https://support.google.com/a/answer/2520500)
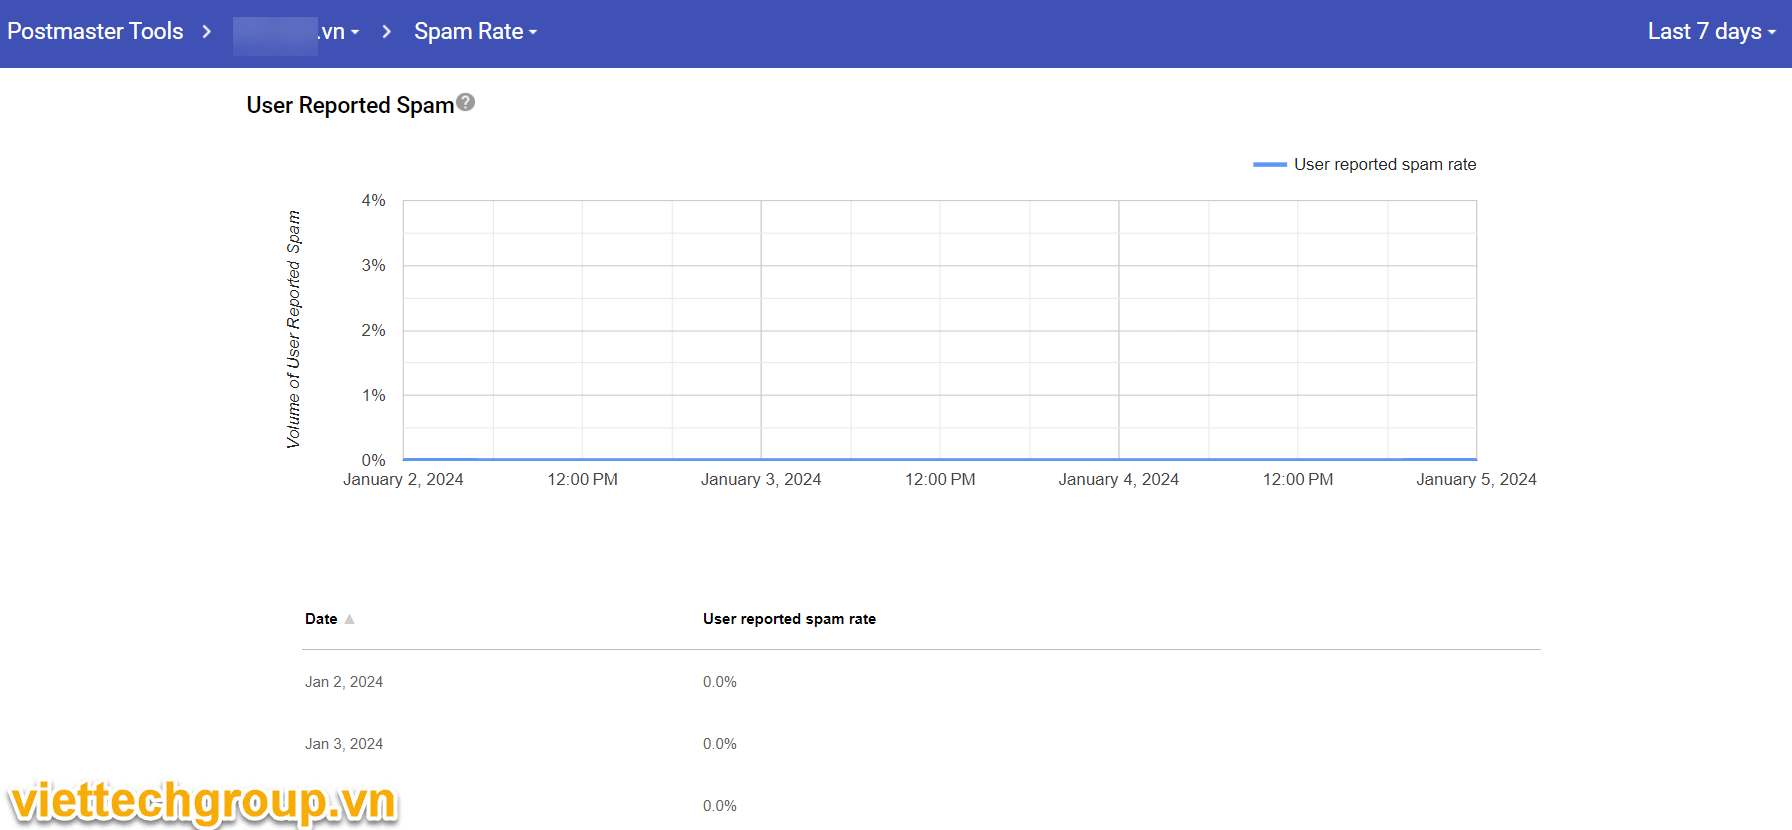
Giữ cho tỷ lệ thư rác được báo cáo trong Công cụ Postmaster dưới 0,1% và đừng để tỷ lệ thư rác bằng hoặc cao hơn 0,3%. Xem hướng dẫn tại (https://gmail.com/postmaster). Phần này nên đăng ký và add domain của các bạn vào để giám sát
Rate dưới 0.1%, và không cao hơn 0.3% sẽ bị khoá ngay lập tức này gặp rồi Gmail block luôn domain gửi vào.
5. Định dạng thư theo Tiêu chuẩn định dạng thư trên Internet (RFC 5322) (https://tools.ietf.org/html/rfc5322)
6 Không được mạo danh ở phần đầu thư Từ: của Gmail. Gmail sẽ bắt đầu sử dụng chính sách thực thi cách ly theo DMARC, và việc mạo danh trong phần đầu thư Từ: của Gmail có thể ảnh hưởng đến việc gửi email (https://support.google.com/a/answer/10032169#policy-options)
7. Nếu bạn thường xuyên chuyển tiếp email, kể cả việc sử dụng danh sách gửi thư hoặc cổng thư đến, hãy thêm phần đầu ARC vào email gửi đi. Phần đầu ARC cho biết thư đã được chuyển tiếp và xác định bạn là người chuyển tiếp. Người gửi danh sách gửi thư cũng phải thêm phần đầu List-id:. Phần đầu này chỉ định danh sách gửi thư cho các thư gửi đi. (https://support.google.com/mail/answer/81126?hl=vi&sjid=11774976608095956067-AP#arc)
Yêu cầu đối với việc gửi từ 5.000 email trở lên mỗi ngày gửi vào Gmail
Kể từ ngày 1 tháng 2 năm 2024, những người gửi hơn 5.000 thư mỗi ngày đến các tài khoản Gmail phải đáp ứng các yêu cầu trong mục này.
Thiết lập phương thức xác thực email DKIM hoặc SPF cho miền của bạn.
Đảm bảo rằng địa chỉ IP hoặc miền gửi thư có bản ghi DNS chuyển tiếp và bản ghi DNS ngược hợp lệ, còn được gọi là bản ghi PTR. Tìm hiểu thêm
Sử dụng một kết nối TLS để truyền email. Để biết các bước thiết lập TLS trong Google Workspace, hãy xem bài viết Cần có một kết nối bảo mật cho email.
Giữ cho tỷ lệ thư rác được báo cáo trong Công cụ Postmaster dưới 0,1% và đừng để tỷ lệ thư rác bằng hoặc cao hơn 0,3%. Tìm hiểu thêm về tỷ lệ thư rác.
Định dạng thư theo Tiêu chuẩn định dạng thư trên Internet (RFC 5322).
Không được mạo danh ở phần đầu thư Từ: của Gmail. Gmail sẽ bắt đầu sử dụng chính sách thực thi cách ly giao thức DMARC, và việc mạo danh phần đầu thư Từ: của Gmail có thể ảnh hưởng đến việc gửi email.
Nếu bạn thường xuyên chuyển tiếp email, kể cả việc sử dụng danh sách gửi thư hoặc cổng thư đến, hãy thêm phần đầu ARC vào email gửi đi. Phần đầu ARC cho biết thư đã được chuyển tiếp và xác định bạn là người chuyển tiếp. Người gửi danh sách gửi thư cũng phải thêm phần đầu List-id:. Phần đầu này chỉ định danh sách gửi thư cho các thư gửi đi.
Thiết lập phương thức xác thực email bằng DMARC cho miền gửi thư của bạn. Bạn có thể đặt Chính sách thực thi bằng DMARC thành none. Tìm hiểu thêm
Đối với thư trực tiếp, miền trong phần Từ: của người gửi phải khớp với miền SPF hoặc miền DKIM. Đây là điều kiện bắt buộc để vượt qua yêu cầu phù hợp với DMARC.
Thư tiếp thị và thư gửi cho những người đã đăng ký phải hỗ trợ tính năng nhấp một lần để huỷ đăng ký, đồng thời phải có một đường liên kết huỷ đăng ký rõ ràng trong nội dung thư. Tìm hiểu thêm
Nếu bạn gửi hơn 5.000 email mỗi ngày trước ngày 1 tháng 2 năm 2024, hãy làm theo các nguyên tắc trong bài viết này càng sớm càng tốt. Việc đáp ứng các yêu cầu dành cho người gửi trước thời hạn trên có thể giúp cải thiện khả năng gửi email. Nếu bạn không đáp ứng các yêu cầu được mô tả trong bài viết này, email của bạn có thể không được gửi như mong đợi hoặc có thể bị đánh dấu là thư rác.
Để tìm hiểu thêm về cách thiết lập SPF, DKIM và DMARC, hãy truy cập vào bài viết Ngăn chặn thư rác, hành vi giả mạo và lừa đảo bằng phương thức xác thực của Gmail (https://support.google.com/a/answer/10583557 )
Lời kết
Đối với Quản trị viên IT Admin đơn vị, công ty cơ quan mình đang quản lý nên xem lại cách gửi email hiện tại của để đảm bảo bảo mật Email đám ứng đủ các tiêu chí trên:
Authentication (SPF, DKIM và DMARC), PTR, mà Gmail hay Yahoo yêu cầu… Nếu cần, hãy cập nhật cấu hình SPF, DKIM và DMARC của bạn để tuân thủ các yêu cầu mới.
PTR Record
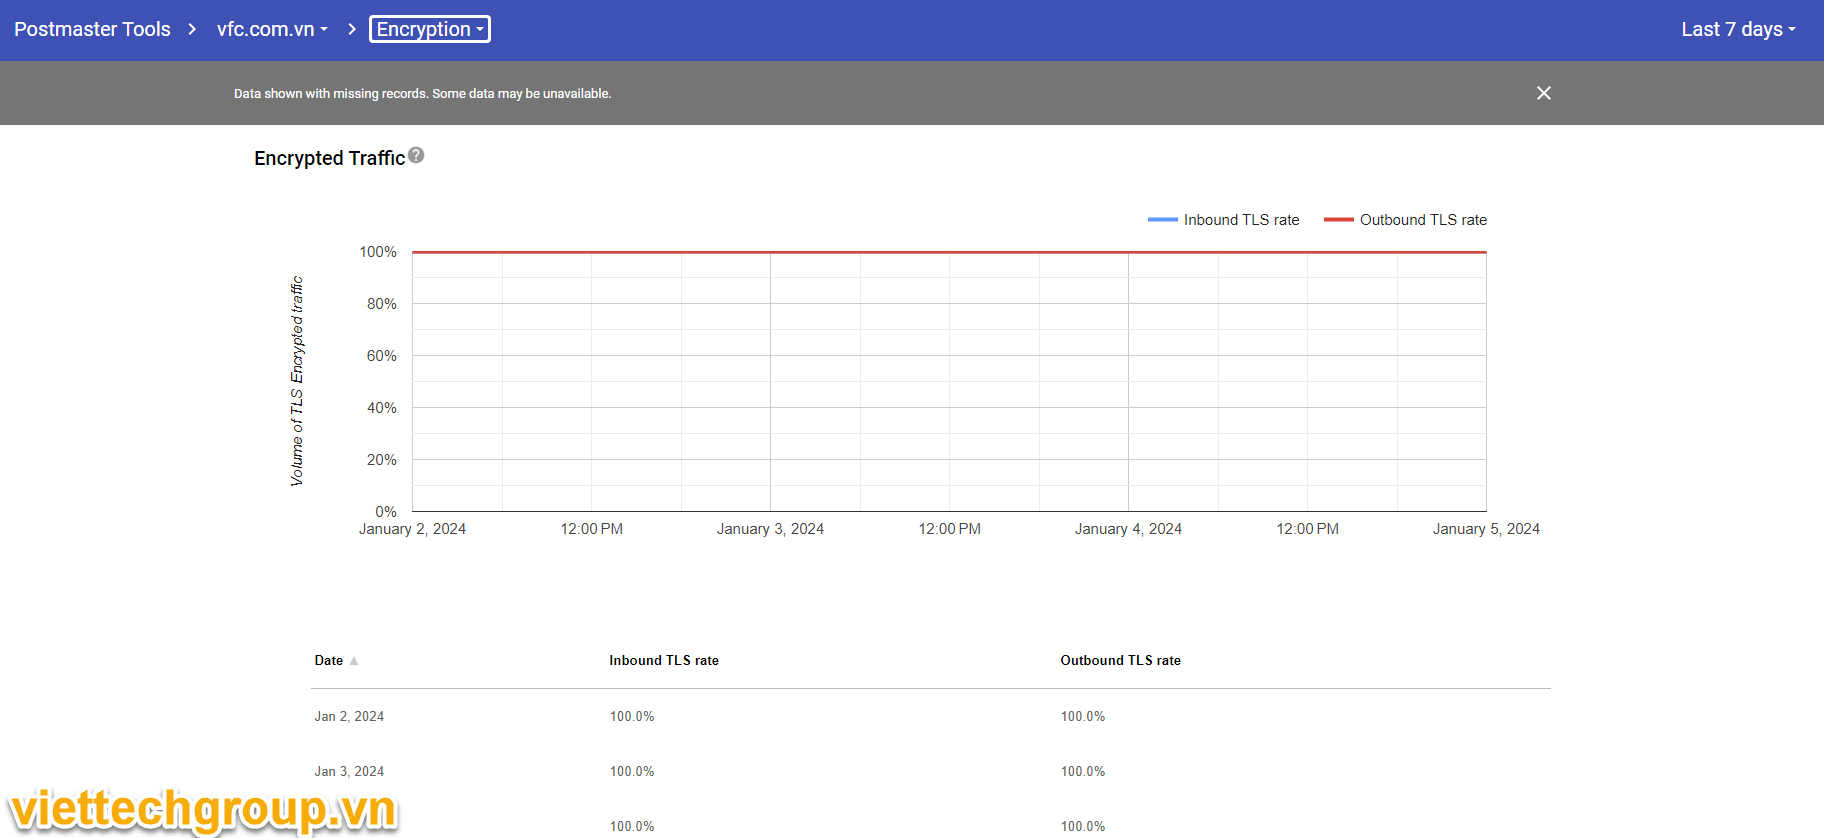
Kiểm tra Email System dùng giao thức TLS connection tranmission
Tận dụng tối đa công cụ Postmaster giám sát các chỉ số của Gmail đưa ra: Authenticated (SPF, DKIM, DMARC), Spam rate luôn dưới 0,1% và không vượt 0.3%, IP reputation, domain reputation (High), Encryption traffic(TLS incoming/ TLS Outgoing),…
Đối với hệ thống marketing thường dùng bulk email cần đáp ứng tiêu chí Gmail nếu không sẽ dính chưởng block domain trường hợp này Phương Nguyễn đã gặp rồi ít nhất hơn 3 khách hàng.
Hạn chế thấp nhất các email vào gmail quảng cáo mà bị report là spam thì sẽ dính spam. Trương hợp có dùng để gửi email dạng thông báo hoặc tiếp thị liên kết cho khách thì nên có phương thức dễ đăng ký (subscribe) và huỷ đăng (List-Unsubscribe=One-Click) một lần nếu có.
Thiết nghĩ đây là yêu cầu bắt buộc với 1 hệ thống email mà bạn đang quản trị hệ thống nhà làm (on-premise) hay thuê hosting hay đi thuê cloude GG, 365, Zoho,.. Cũng nên xem và kiểm tra chặt chẽ để tránh Spam không đáng có.
Bài viết có tham khảo gmail và hiệu chỉnh theo ý cá nhân.
Ngày 14/11/2023 Microsoft đã phát hành Bản cập nhật bảo mật(SU) cho các lỗ hổng được tìm thấy:
Exchange Server 2016 CU22, CU23 (KB5032147)
Exchange Server 2019 CU13 (KB5032146)
Giải Quyết
1/ Certificate signing of PowerShell serialization payload được bật mặt định. 2/ Fix Lỗi hổng Exchange Server 2016 & Exchange Server 2019 : CVE-2023-36439 – Microsoft Exchange Server Remote Code Execution Vulnerability CVE-2023-36050 – Microsoft Exchange Server Spoofing Vulnerability CVE-2023-36039 – Microsoft Exchange Server Spoofing Vulnerability CVE-2023-36035 – Microsoft Exchange Server Spoofing Vulnerability 3/ Fix lỗi Exchange Server 2019 Lỗi khi chạy lệnh RBAC trên CMD liên quan Serialization payload signing Unable to migrate mailbox as communication error parameter exception occurs 4/ Fix lỗi Exchange Server 2016 InvalidResponseException when you try to run Export-UMPrompt
Một số lỗi sau khi vá bản SU tháng 11 này:
Một số lệnh ghép sẽ bị lỗi trên máy remote có công cụ Management Tools nhưng không phải MBX như:
Chạy lệnh RedistributeActiveDatabases.ps1 or StartDagServerMaintenance.ps1 trong môi trường DAG sẽ bị lỗi, MS hứa chưa có bản vá 🙂 chờ bản sau. Có thể gây lỗi chạy lệnh EMS trong Exchange Powershell.
Khuyến Nghị
Nên Test kỹ lab trước khi chạy môi trường Production cân nhắc giữa bảo mật và an toàn. Hiện tại chưa khuyến cáo cập nhật với các lỗi trên. Vì theo ghi nhận nhiều ae bị lỗi :). Nếu bắt buộc cập nhật hãy đảm bảo rằng Exchange Auth Certificate hợp lệ trước khi cài đặt bản cập nhật bảo mật (SU). Bạn có thể sử dụng tập lệnh MonitorExchangeAuthCertificate.ps1 để thực hiện kiểm tra nhanh.
Cài đặt bản vá
Lưu ý rằng Exchange Server 2013 KHÔNG được hỗ trợ và bạn phải nâng cấp lên Exchange Server 2019 hoặc Exchange Online càng sớm càng tốt!
Tham khảo link comment https://techcommunity.microsoft.com/t5/exchange-team-blog/released-november-2023-exchange-server-security-updates/ba-p/3980209 https://aka.ms/MonitorExchangeAuthCertificate
MỘT SỐ BIỆN PHÁP NGĂN NGỪA HỆ THỐNG CHỐNG SPAM EMAIL SERVER EXCHANGE
Hệ thống Email Server Exchange Server Nhà làm (On-Premises) Để ngăn chặn spam trên máy chủ Exchange Server, bạn có thể thực hiện một số biện pháp phòng ngừa và bảo mật. Dưới đây là một số gợi ý mà Phương Nguyễn chia sẻ từ kinh nghiệm thực tế nhé:
Sử dụng các bộ lọc chống spam:
Kích hoạt và cấu hình các tính năng chống spam tích hợp của Exchange. Bật Antispam nội tại của Exchange sẵn có cũng quét khá ok.
Cấu hình thêm 1 số tính năng của Antispam protection: Content filter, Sender Filter, sender id, Recipient, attachment,…
Nếu có tiền thì nên xem xét việc triển khai các giải pháp bộ lọc chống spam bên ngoài phần cứng hay appliance phần mềm: SpamAssassin, Barracuda, hoặc Proofpoint, FortiMail,
Giải pháp mail gateway đối tác thứ 3:
Microsoft Exchange Server 2019.
Paubox.
Mimecast Email Security with Targeted Threat Protection.
Cisco Secure Email Threat Defense.
FortiMail.
Symantec Email Security.Cloud.
Cloudflare Area 1 Security.
Barracuda Email Security Gateway.
Cập nhật phần mềm và bảo mật:
Đảm bảo bạn đang sử dụng phiên bản Exchange Server mới nhất và đã áp dụng tất cả các bản vá bảo mật (CU, SU), bằng cách theo dõi thường xuyên trên trang Microsoft Exchange check bản vá.
Theo dõi và thường xuyên cập nhật phần mềm chống virus và bảo mật trên máy chủ chạy Exchange.
Cấu hình xác thực người gửi bằng cách cấu hình bảo mật DNS cho Email:
Kích hoạt các cơ chế xác thực như SPF (Sender Policy Framework), DKIM (DomainKeys Identified Mail), và DMARC (Domain-based Message Authentication, Reporting, and Conformance), IP resever (PTR)
Xác minh và thiết lập các quy tắc xác thực người gửi trong các bộ lọc spam.
Nếu tự làm email không có email gateway nên tìm IP sạch tí.
Quản lý danh sách đen (blacklist) và trắng (whitelist):
Thiết lập các quy tắc để tự động thêm địa chỉ email vào danh sách đen hoặc trắng dựa trên các tiêu chí cụ thể.
Kiểm tra định kỳ và cập nhật danh sách đen và trắng của bạn.
Ngoài ra 1 số hãng dbspam hoặc trang Spam phải mua thêm gở spam blocklist hoặc add ip mail server vào Whitelist (nhất là ông UCEPROTECT phải mua gở), nếu trang spam free thì email gở spam,
Thường xuyên dùng các công cụ kiểm tra xem IP có spam không nhé: Mxtoolbox, dnschecker, Testtls, spamhaus, Barracuda, Spamcop,..Dĩ nhiên phổ biến thôi còn nhiều các bạn có thể tìm thêm.
Quản lý và đào tạo người dùng cuối:
Các giải pháp công nghệ tốt đến đâu thì con người vận hành và sử dụng cũng là users nên yếu tố con người cũng quyết định thành công trong việc góp phần ngăn ngừa.
Cung cấp hướng dẫn và đào tạo người dùng về cách nhận biết và xử lý email spam, fishing email.
Khuyến khích họ không mở các đính kèm từ nguồn không rõ, click link nặc danh dẫn tới spam hoặc mã hoá dữ liệu.
Kiểm soát đồng bộ hóa (synchronization):
Hạn chế quá trình đồng bộ hóa với các danh bạ không tin cậy và ngăn chặn các kết nối không mong muốn từ các nguồn không rõ.
Giám sát log và thống kê:
Thường xuyên theo dõi các log và bản thống kê để phát hiện các hoạt động bất thường từ Log của Exchange transport, Ngoài các công cụ sẵn có của Exchange Server: Message tracking. Có thể dùng ManageEngine Exchange Reporter Plus khá ok dĩ nhiên phải tốn phí 😊
Thực hiện giám sát thời gian thực để nhanh chóng phát hiện và xử lý các vấn đề liên quan đến spam.
Sử dụng các giải pháp chống thấp hóa (greylisting):
Cài đặt các giải pháp chống thấp hóa để tạm thời chặn các email từ nguồn chưa được xác minh, và chỉ chấp nhận chúng khi được gửi lại từ cùng một nguồn. Này gần giống mục 3, dùng thêm các giải pháp tốn tiền
Rules Transport Exchange Server
Có thể tận dụng tạo các bộ lộc rules sẵn có của Exchange vẫn có khả năng ngănn chặn được nhiều đó, Mình nghỉ bộ công cụ này khá mạnh mọi người cần khai thác triệt để vì miễn phí mà có sẵn tận dụng có gì sài nấy trước khi đầu tư.
Lời Kết cho bài post
Bảo mật email là câu chuyện muôn thuở và nhiều tầng nhiều lớp, dĩ nhiên tuỳ thuộc vào nhu cầu và ngân sách doanh nghiệp nếu lên Cloud Email Online (Google Workspace, MS365-Microsoft Defender for Office 365 công nghệ mới XDR..) thì khá tốt rồi.
Bài post này chỉ đề cập đến giải pháp email Server Exchange nhà làm (On-Premise). Chúng ta đi từ trong ra ngoài theo các tầng thì có thể gôm lại các cách phòng chống spam cho Email như sau:
Tầng 1: Nội tại email Exchange Server có Antispam and antimalware sẵn có free, dĩ nhiên phải cấu hình và bật lên (Content filter, Sender, IP reputation,..).
Tầng 2: Rules transport Exchange có sẵn free chỉ tốn cơm suy nghĩ, spam đâu block đó
Tầng 3: tầng cài thêm phần mềm thứ ba nếu không nhiều tiền mua phần cứng: Antispam của ESET Mail Security, Symantec tích họp email security, McAFee,..
Tầng 4 tường lửa nếu có sẵn: Forgiate mua tính năng hoặc sài hẵn phần cứng mail gateway như của Baracuda, Sophos, Fortimail, hoặc đẩy thẳng mail relay Cloud Online: Microsoft, GG, Amazon SES, SendinBlue, DNSexit,..Nhiều lắm mà tốn tiền 😊
..
Lưu ý rằng không có biện pháp nào là hoàn toàn hiệu quả 100% trong việc ngăn chặn spam, vì vậy việc kết hợp nhiều biện pháp cùng một lúc là quan trọng.
Bài Post mang tính chất chủ quan tham khảo va chắc lọc từ kinh nghiệm cá nhân, anh em nào có khác hãy comment để thảo luận nhé.


 Sent to desktop cho dễ lần sau thao tác, chúng ta chạy file configuration.dkim.signer.exe